Step 4 - Pricing & Limits
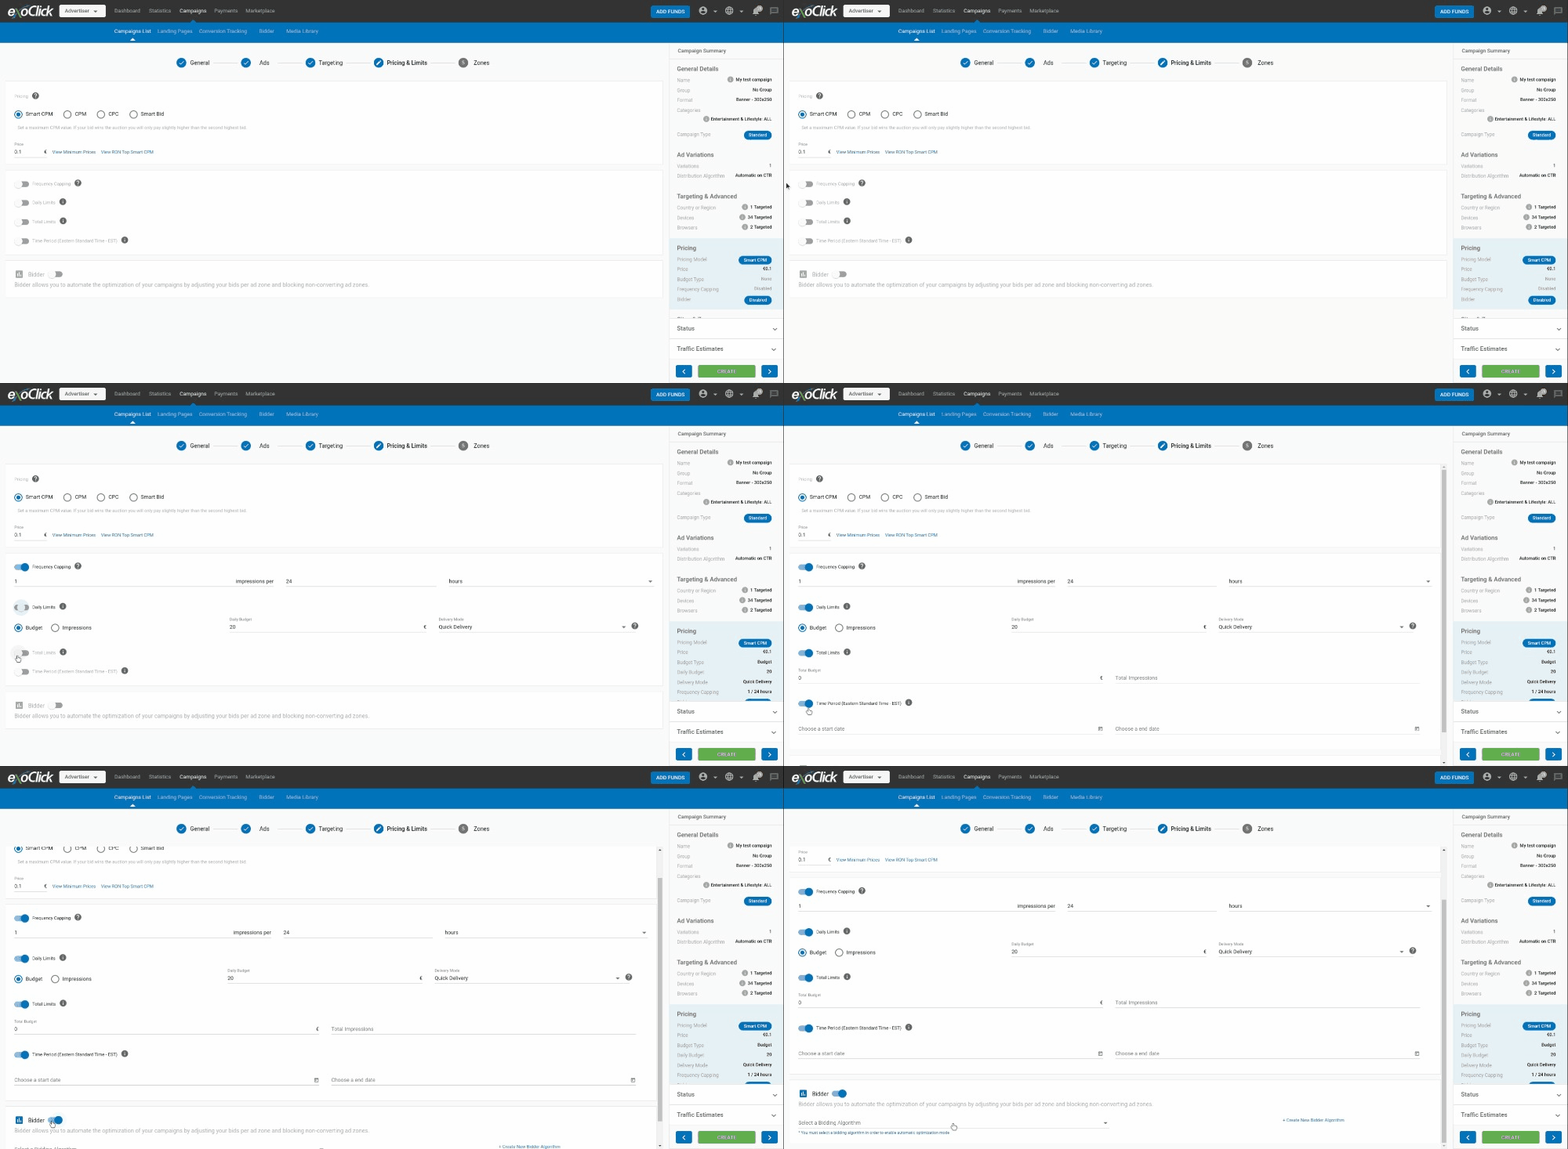
In the Pricing & Limits tab you set the Pricing Model and the Bid of the campaign. You can also set up Limits on spending or impressions to control the spending and traffic intake of the campaign.
Pricing models
Here is a table that shows what pricing models are available for each ad format:
| Ad Format | CPM | Smart CPM | CPC | Smart CPC | CPV | Smart Bid |
|---|---|---|---|---|---|---|
| Banner (all sizes) | X | X | X | X | ||
| Popunders (desktop & mobile) | X | X | X | |||
| Fullpage Interstitials (desktop & mobile) | X | X | X | X | ||
| Mobile Banner - 300x100 | X | X | X | X | ||
| Native Ad - 300x300 | X | X | X | X | ||
| Push Notifications (all sizes) | X | X | X | X | ||
| Email Clicks | X | X | X | |||
| Tab - Direct Link | X | X | X | |||
| Video | X | X | X | X | X |
Below you will find an explanation of every pricing model in ExoClick.
CPM (Cost Per Mille)
You set the price you will pay for 1,000 impressions of the ad.
Use: Suitable for campaigns focused on exposure and for easier traffic estimations.
CPC (Cost Per Click)
You set the price you will pay for each click on the ad.
Use: This model is suitable to assess the responsiveness of your variations. It works especially well with segments that generate lots of impressions but have a low CTR.
Smart CPM
Smart CPM is our custom pricing model which allows you to bid for impressions at the best price possible.
When using Smart CPM, you set up the maximum CPM you are willing to pay. The system will determine the actual bid to be used based on the minimum price for that segment (GEO, device, category, etc.) and the top CPM that is running in that segment at the moment.
The system determines the lowest price you must pay to get the best position in the rotation of the campaigns up until your maximum CPM price.
Use: Smart CPM is suitable for exposure, like regular CPM. However, unlike regular CPM, Smart CPM helps you to be competitive by getting the best CPM. Used wisely, Smart CPM can save you time and guarantee the best visibility at the most affordable price.
Example of Smart CPM in action:
The top bid in the targeted segment is 0.4. You set up a Smart CPM campaign of 0.7 and become the top bidder. However, you won't be paying 0.7 right away.
You will only pay what is needed to keep you in the top position, rather than the price you have set in the campaign. You will start paying 0.7 when another advertiser matches or outbids you.
Smart CPC
This pricing model is available only for Email Clicks and Direct Links campaigns.
Smart CPC works just like Smart CPM, but you are bidding for clicks rather than impressions. In Smart CPC, you set up the maximum you would pay per click and the system will determine what you pay depending on the minimum price and the top CPC.
CPV (Cost Per View)
This pricing model is available only for Video campaigns.
In CPV, you set the price you will pay for each view on the ad. A view happens when ten seconds of the video ad are displayed to the site visitor at normal speed.
Use: This model is suitable to assess the engagement of the traffic you are targeting as well as the responsiveness of the materials you are using. You can run a CPV campaign for prospecting and then another campaign in CPM, Smart CPM or Smart Bid to focus on your profitable zones.
We also strongly recommend setting up separate campaigns for desktop and mobile traffic. There is a big difference in video ads implementation between Desktop and Mobile, which affects the View and Click Rate of the campaigns. Hence, we encourage you to set up different campaigns for each device.
Smart Bid
Note: Smart Bid won't work unless you are tracking conversions. Make sure you are registering conversions of the goal you want to use in your campaign.
Smart Bid is a pricing model that allows Advertisers to automatically determine an optimal bid for their campaigns based on the likelihood of a user to convert. It does this by using historical information about the campaign and evaluating the contextual signals that are present at the time. The algorithm is able to predict what traffic is most likely to drive quality conversions and reach the campaign objectives.
When setting up a Smart Bid campaign, there are several settings you need to select and/or input:

- Bid Strategy: The value you want as reference to determine the bid. There are two options: Target CPA and Target ROAS (i.e: Return On Ad Spend). A CPA strategy will be based on the cost you are willing to pay per conversion, whereas a ROAS strategy will be based on the percentage of profit you are aiming for. You will have to input the desired target for the corresponding strategy you choose.
Notes:
- There is a minimum value validation of 0.001 on Target CPA value.
- When Target ROAS is selected, you will also see a ROI value below the ROAS reflecting the expected Return on Investment you will get from this campaign.
- Initial CPM/CPC: Smart Bid won’t set up an optimized bid right away. When you enable Smart Bid, the campaign will work as a Smart CPM or Smart CPC campaign, using the bid you specify here. The system will use this bid until a specific segment of traffic in your campaign has reached "data significance", i.e: when the segment has generated enough conversions to estimate its profitability. When that happens, Smart Bid will begin optimizing the bid. Note that this will all happen while Smart Bid pricing model is enabled in the campaign.
- Conversion Goal: The conversion goal you will be using to determine profitability. In order to set up Smart Bid, you need to have at least one Conversion goal created in your account. Note that, if you selected Target ROAS as your Bid Strategy, you can only choose goals with Fixed value or Dynamic value, since conversion goal value is needed to determine the ad spend.
- Bid Optimization: This determines what type of sources are able to send traffic to your campaign. A Maximize Volume optimization (which is the default and recommended option) will allow the campaign to receive traffic from segments that haven't generated any conversions yet, whereas a Maximize CPA/ROAS optimization will only receive traffic from segments that have generated conversions. Since this type of optimization is more restrictive and can prevent your campaign from receiving traffic, Maximize CPA/ROAS will only work when you have generated at least 30 conversions in the campaign.
You will know when Maximize CPA/ROAS Bid Optimization option is available when you see the message "This campaign has enough conversions to apply the Maximize Target CPA/ROAS Bid" under the Bid Optimization section.

Note: When the pricing model is changed to Smart Bid, any Custom Bids you had in Step 5 - Zone targeting will be lost.
Bear in mind:
Smart Bid requires some time in order to perform the appropriate optimizations. Therefore, please make sure that you have a decent budget when running Smart Bid campaigns. We do not recommend using Smart Bid if you are running campaigns on a tight budget or if you expect to see immediate results. View Smart Bid as an investment in a campaign.
More detailed info and tips can be found in the Smart Bid FAQs as well as our Smart Bid blog post. For a more specific use case, please read our Case Study of a Smart Bid advertiser.
Lastly, you can find a summarised version of this explanation as a Video Tutorial.
Switching Pricing Models
You can change the pricing model of a campaign after you have created it in the majority of cases. However, there are some situations were switching price models is limited:
- In all ad formats except Direct Link and Email Clicks, you cannot change from CPC to CPM or Smart Bid. Likewise, you cannot change from Smart Bid or CPM to CPC. However, you can change from Smart Bid to CPM and vice versa.
- In video campaigns, you cannot change from or to CPV after creating the campaign.
Minimum Prices and View RON Top bid
Next to the Price section, where you state your bid, you will find the View Minimum Prices and the View RON Top CPM/CPC/CPV links:
As its name says, the View Minimum Prices link will tell you the minimum CPC, CPM or CPV bid you need to use for the Ad Format, Country, Category, Device and Network Type you selected.
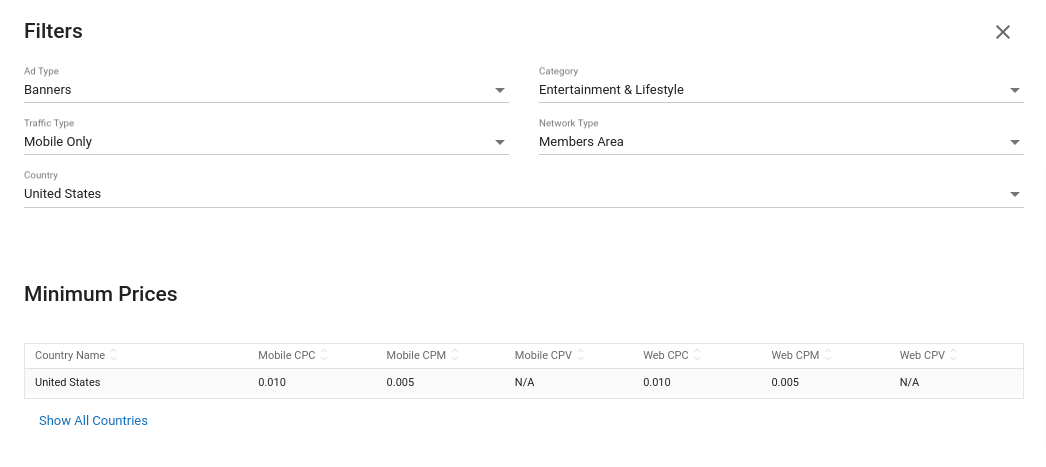
The View RON Top CPM/CPC/CPV link will tell you which is the current top bid in the chosen pricing model for your desired segment. After clicking on the link, select the Category, Country, Device, Operating System, Mobile Carrier and Browser.
The pop-up window will tell you what's the current top bid and compare it with the bid of your campaign. If your bid is lower, you can either click on the Match it button to match the top bid or click on the Beat it button to let the system set up a higher bid.

Notes:
- The View RON Top CPM/CPC/CPV tool is useful when you do not have a whitelist/blacklist of zones yet. If you are targeting or blocking specific sites, then it is better to use the Top/Min column from Step 5 - Zones page.
- Neither of the links explained here are available when using the Smart Bid pricing model.
Frequency Capping
Turn on the Frequency Capping switch to determine how many impressions are shown per unique user per minute/hour. The frequency capping settings specify how many impressions each variation in the campaign can receive in a time period, not the number of impressions per unique user the whole campaign can receive.
When using a format that doesn't generate impressions (Direct Link and Email Clicks), frequency capping is based on click. A best practice when prospecting or testing new sources is to set a frequency capping of 1 impression/click per 24 hours.
Daily limits

Turn on the Daily Limits switch to set daily limits for the Budget or Impressions for the campaign. Note that Impressions are not available for formats that don't generate impressions: Direct Link, Email Clicks and Video.
After choosing the Daily Limit, you also have to choose the Delivery Mode. There are two options:
- Quick Delivery: The system will try to reach the Daily Limit as quickly as possible.
- Distribute throughout the day: The system will regulate the campaign displays to ensure that the Daily Budget is reached over the course of the whole day.
Daily limits are re-set at the end of the day based on our server time zone, which is NY time zone.
Note: Be realistic with your limits. Setting up a small budget or a small impression limit while targeting a large segment or using a high bid price can cause an overspending. We will explain these cases in detail in the "learning how to bid" section.
How budget and impressions are distributed
When the Daily Limits feature is set to Distribute throughout the day, an algorithm controls how the campaign displays to ensure the budget/impressions limit is reached over the course of the whole day.
When the user sets a Daily Limit for the campaign, this functions like a 'balance' of budget or impressions that the campaign has available to spend during the day, starting at 00:00 New York time zone. Budget and impressions are subtracted from this initial balance over the course of the day.
Our system takes snapshots of this balance every 15 minutes and uses them to calculate two things:
- Spending velocity: How fast the balance is being spent, based on the balance in each snapshot compared to the previous one.
- Acceleration: Whether spending velocity is speeding up or slowing down, based on comparing velocities between the current snapshot and the last.
We then use these spending velocity and acceleration values to tell us how much time the campaign will take to spend all of its balance if we do nothing. We use the ratio between this time and the actual time until the end of the day to calculate how much we need to slow things down, to ensure the campaign runs for the whole day.
For best practices, we recommend using Distribute throughout the day when you are concerned that you will overspend. If you are not concerned about this, then we suggest you to use Quick Delivery instead.
If you want to keep Distribute throughout the day but you are receiving little traffic, then we recommend you to increase the daily limits. This will ramp up the spending velocity of the campaign. Note that Distribute throughout the day doesn't work very well with Push Notification campaigns because of the delayed nature of balances subtraction for them.
Lastly, please note that Daily Limits and associated algorithms are set for one 24-hour period and do not take into account Daily Limits for other days or carry over budget/impressions from previous days. Likewise, Distribute throughout the day will take into consideration the full 24-hour period, meaning that Ad Schedule is not taken into consideration.
Total Limits

In this section you can set a limit to the total Budget this campaign can spend and/or the total Impressions the campaign can receive. As opposed to Daily Limits, Total Limits will completely pause the campaign once the specified Budget or Impressions have been reached. The campaign won't run again until you remove these limits.
Note: The Total Limits you set on budget/impressions start counting from the moment you turn them on, but do not include budget/impressions from before then. So, if you set a limit of 10,000 impressions on a campaign that already has 20,000, it will not suddenly stop. It will run until it has reached 10,000 more.
Time Period

Here you can set a time period for the campaign to run in. Click on the calendar icon to choose start and end dates for the campaign.
Bidder

The Bidder switch allows you enable a Bidder algorithm in your campaign. You can either select an algorithm you had already created or set up a new one from scratch. You can also edit from here the settings of the algorithm.
For a detailed explanation of what Bidder does, please go to the specific section of Bidder in this documentation.
Note: Bidder cannot be enabled in Smart Bid campaigns.
Learning How to Bid
Your campaigns are in constant competition through our real time bidding system, which is based on the calculation of the eCPM. Generally speaking, the higher your bid is, the more traffic you will receive. While the eCPM of a campaign is calculated differently based on the Pricing Model you use, in most cases the best way to get a big volume of traffic is to become the top bidder.
In this section we will explain how to set up the right bid to reach your campaign goals and how to estimate the costs of your campaign.
How your campaign eCPM is calculated
In CPM/Smart CPM campaigns, the eCPM basically corresponds to the CPM bid price. With this pricing model, the more you bid and the lower the frequency capping, the more traffic you will receive.
In CPC, the eCPM will be determined by the bid price and the CTR. As a result, advertisers should have BOTH a competitive bid and variations with a good CTR to receive more traffic.
In CPV, the eCPM is calculated like in CPC, but using the View Through ratio instead of the CTR.
In Smart Bid, the eCPM also corresponds to the bid price. However, bear in mind that this bid price will be changing constantly based on the likelihood of conversion from the targeted segment as well as the bid strategy and optimization you selected.
Traffic estimates
To measure how much traffic you might receive, check the Traffic Estimates panel in the bottom right of the screen. When you click on the Refresh button, you will get an estimation of the available Impressions, Clicks or Video Impressions for the targeting settings you selected.
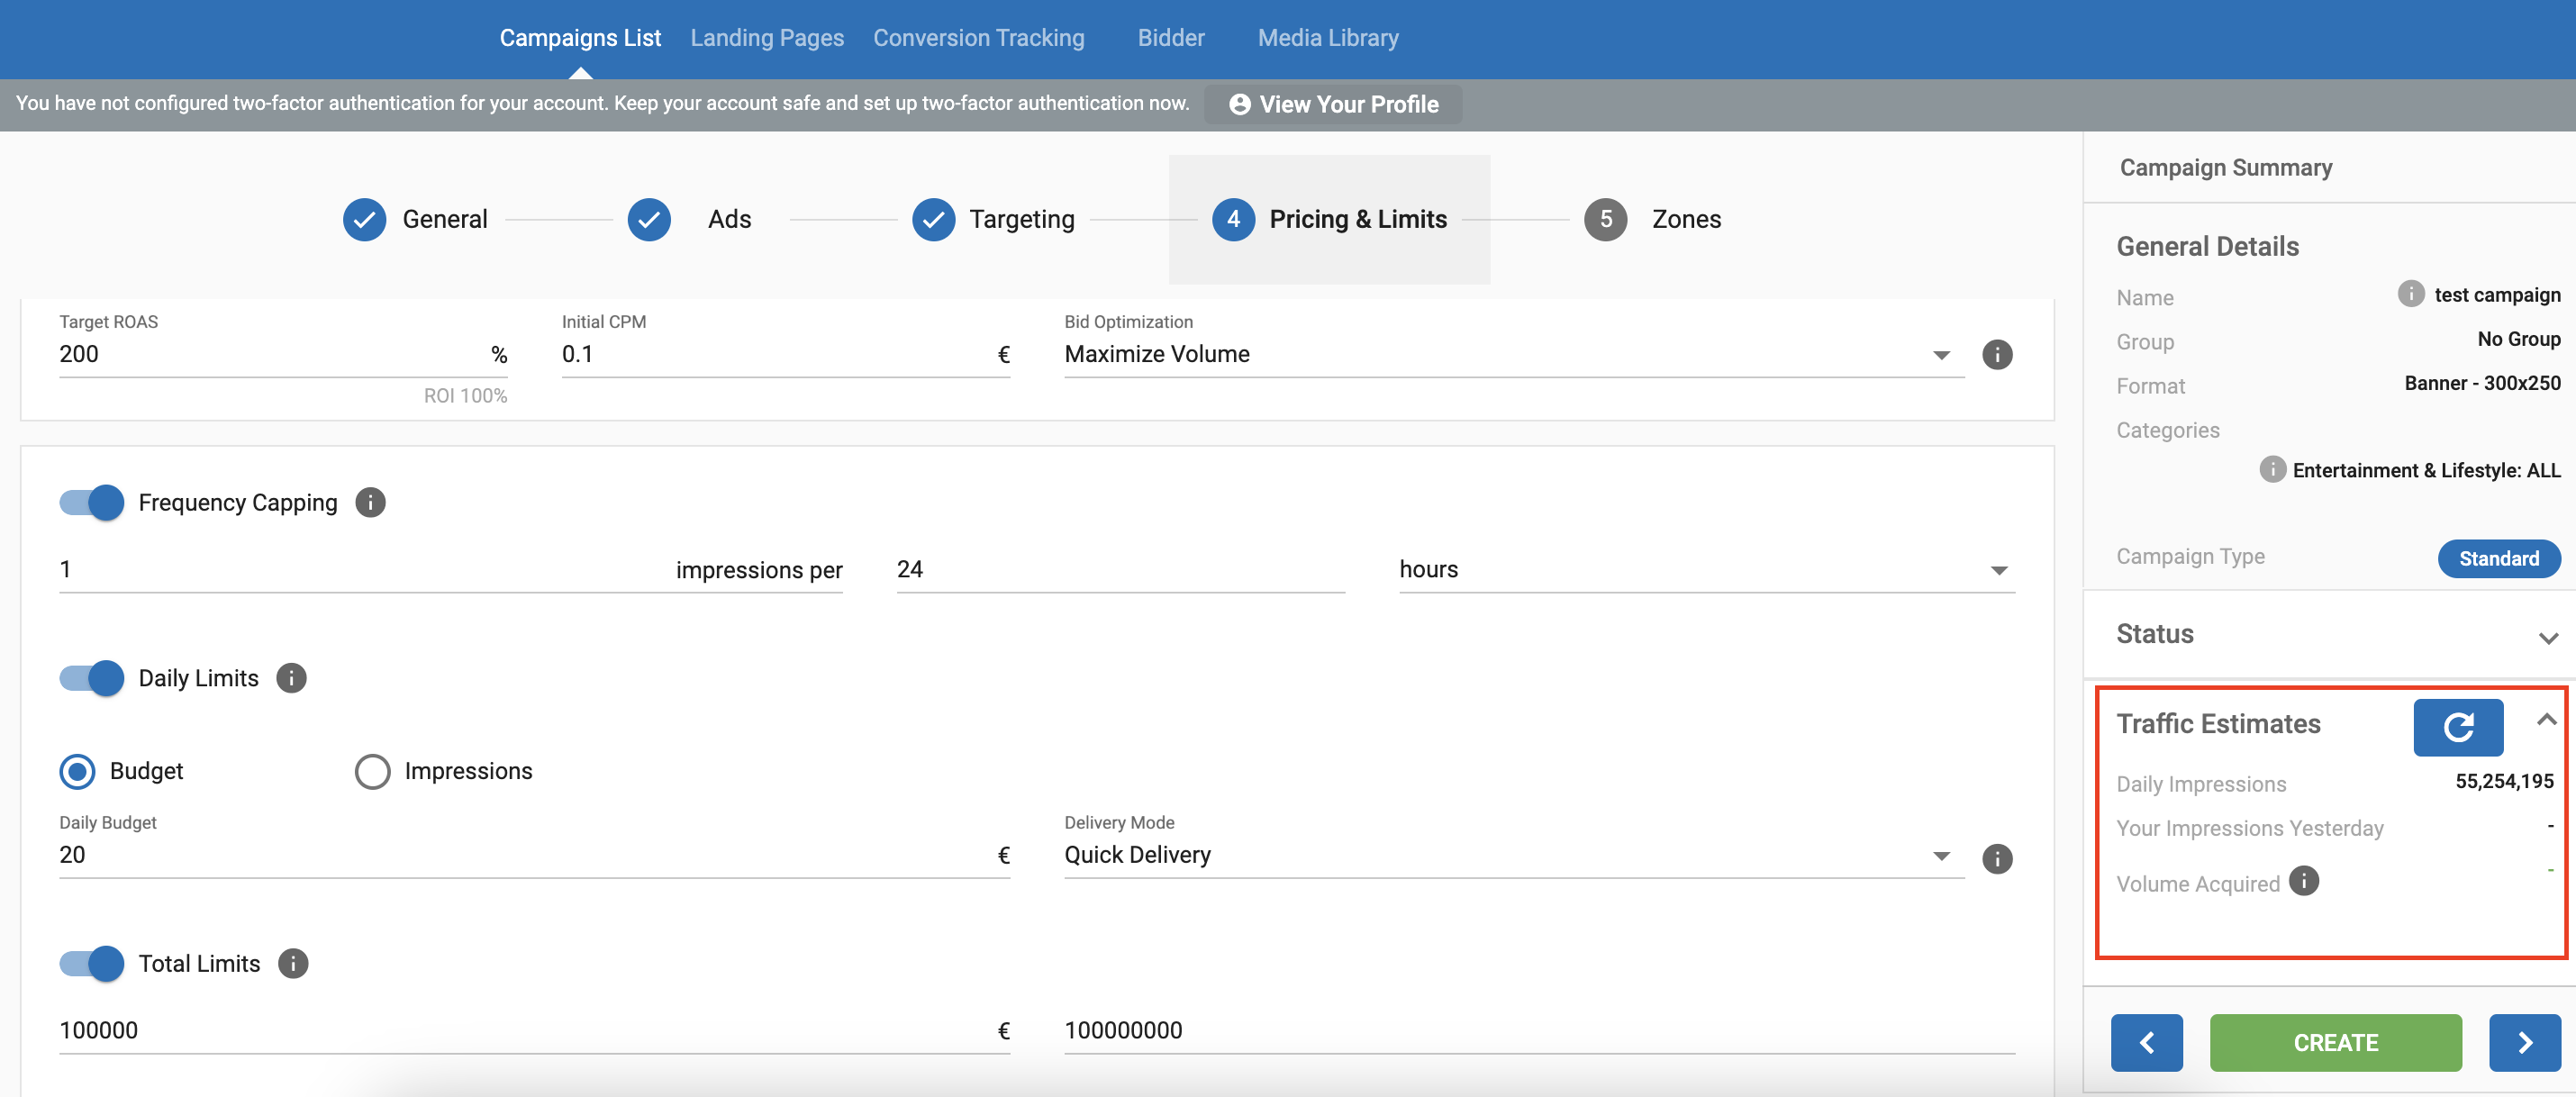
Normally, the traffic you can get is about 2-5% of the total indicated in this tab, unless you use very specific targets and you are 100% sure that your campaign has the top eCPM on all the zones you are targeting.
Note there are several factors that can have an impact on your traffic intake and which are not reflected in the Traffic Estimates. Here is a few of them:
- Another advertiser agrees to a Traffic Share deal, which allows him to buy a fixed share of the traffic, thus reducing the available traffic for you.
- Your variations have labels which are blocked by the majority of publishers in the targeted segment, preventing your campaign from reaching the full inventory.
- IP targeting, domains targeting, keyword targeting, retargeting and ad schedule settings are not reflected in the traffic estimates.
- A new source of traffic becomes available and starts sending traffic, suddenly increasing your campaign volumes (traffic estimates take 24 hours in order to be updated with the real volumes).
- Another advertiser stops competing for the traffic, thus passing its share of traffic to you.
Lastly, remember to click on the Refresh button of the Traffic Estimates panel whenever you change some targeting settings in order to make sure you the estimated amount is updated.
Negative and positive examples of price settings
Having explained how your bid works and how to estimate the traffic you will receive, here are some example cases of unrealistic and realistic Pricing and Limit settings:
- Unrealistic settings
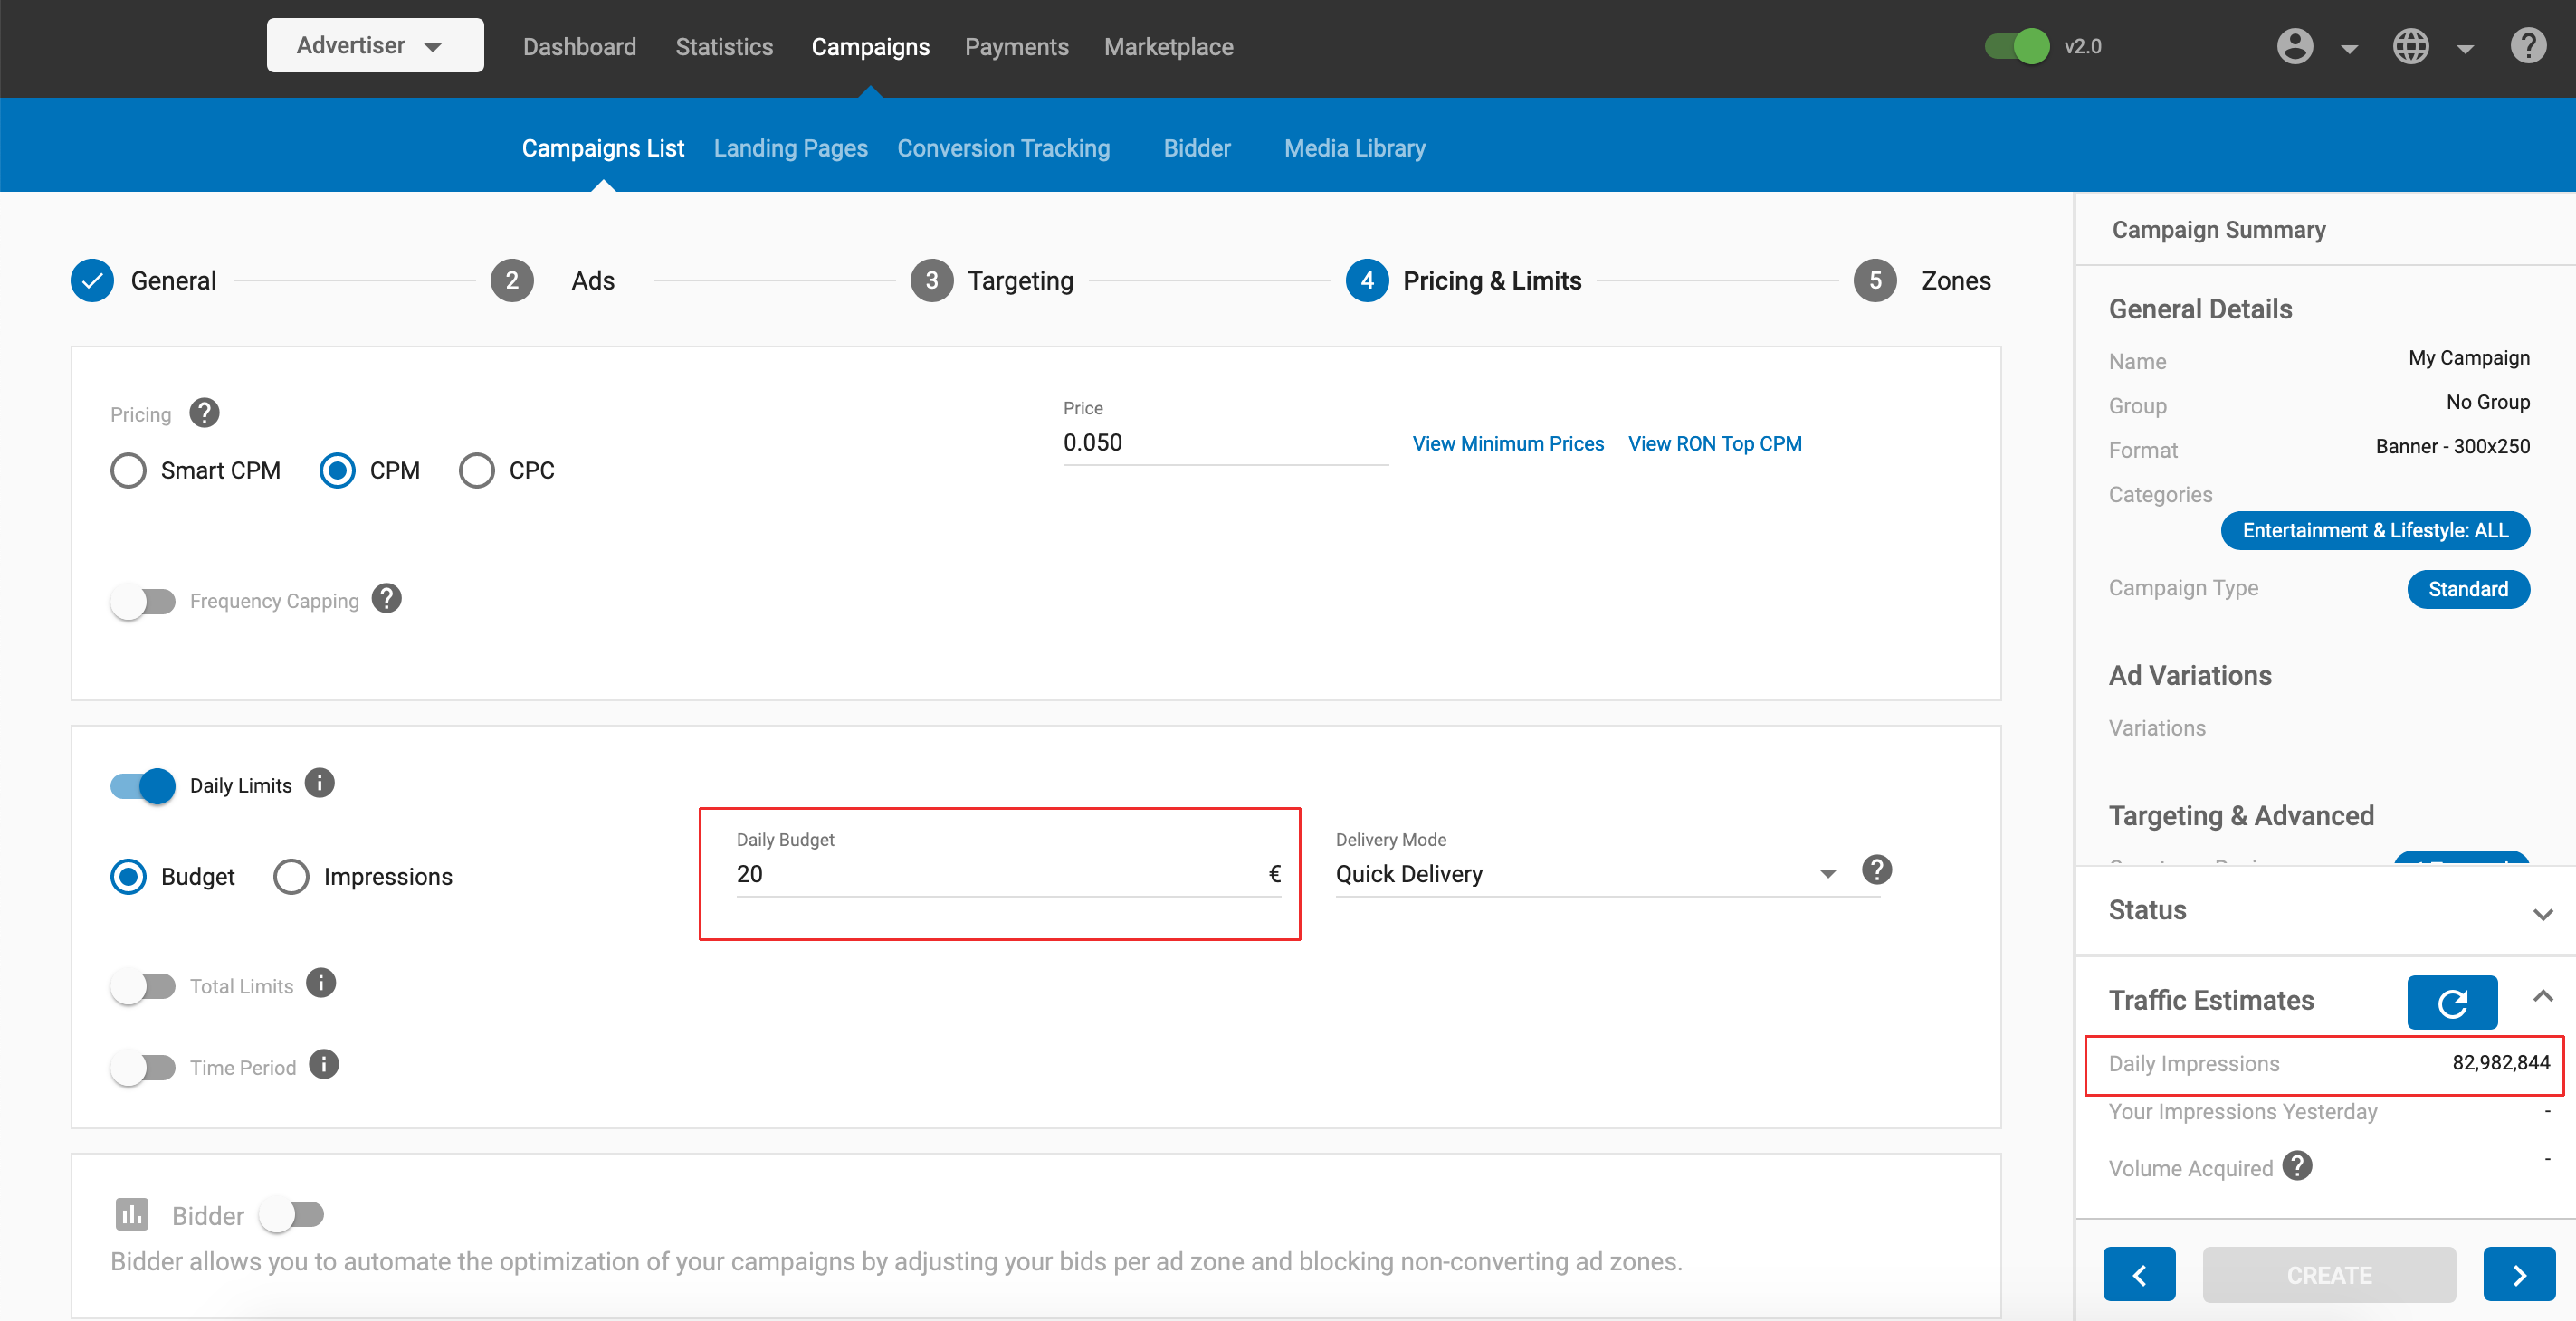
In this example, the campaign has a 0.05$ CPM bid, a $20 Daily Budget Limit and is targeting more than 80M impressions. Even if it gets only 1% of the available traffic, the campaign costs would already double what was estimated, meaning that the budget will not be respected:
((80,000,000 x 0.01) / 1000) x 0.05 = $40
- Realistic settings
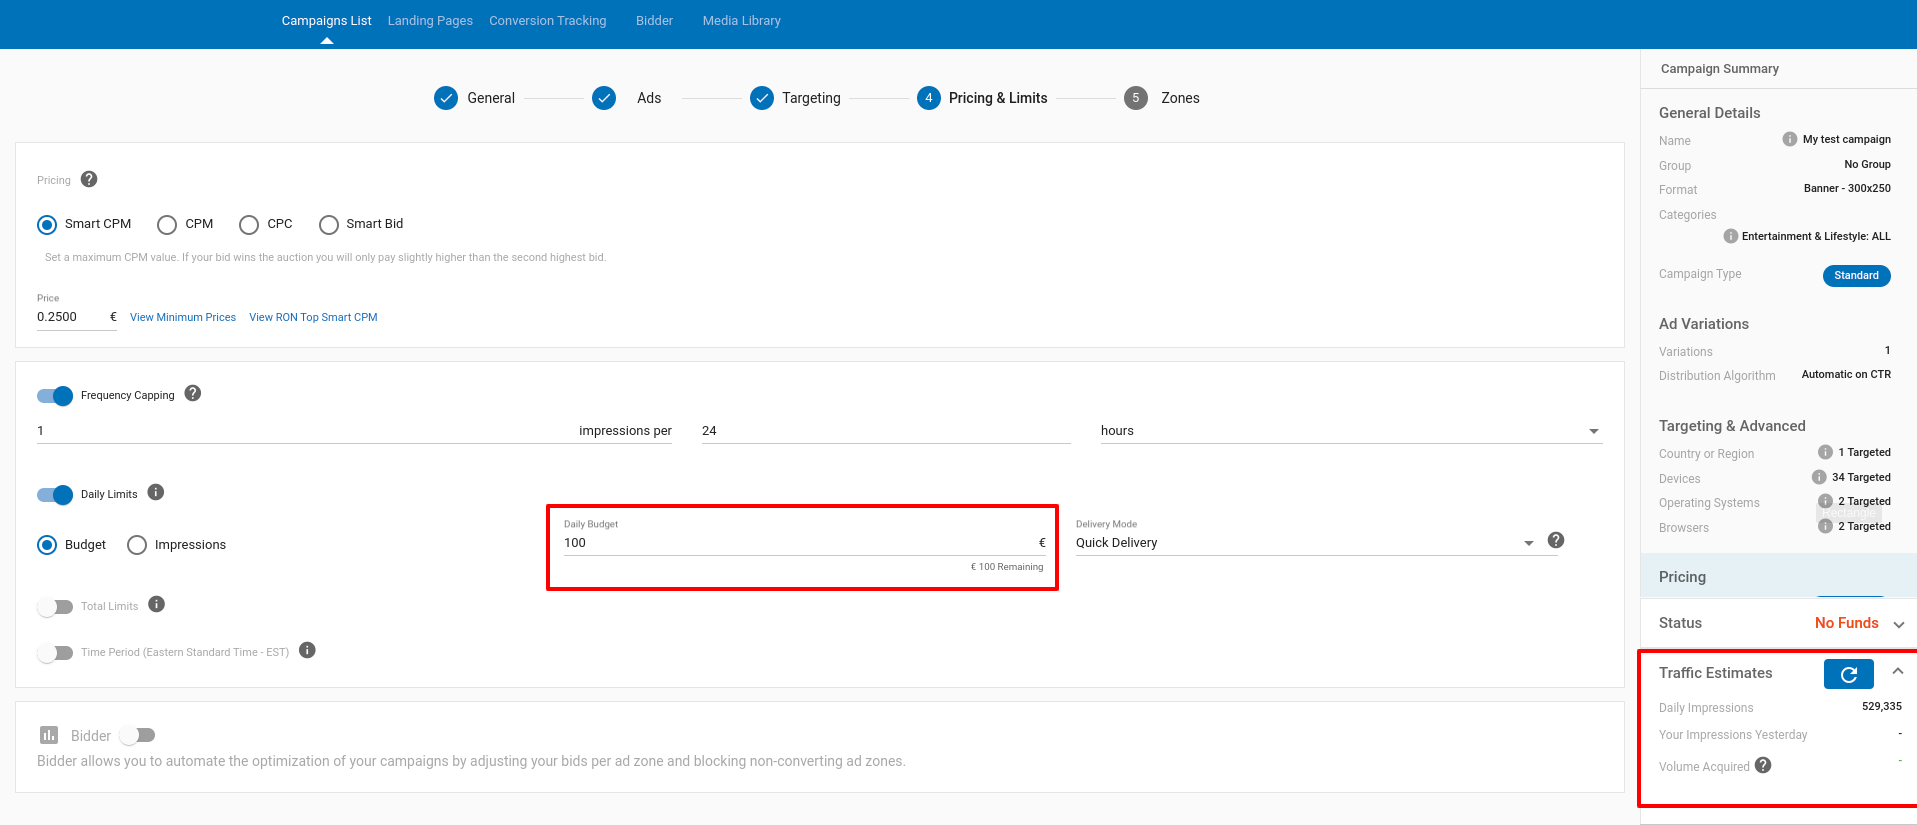
In this example, the targeted traffic is smaller and the campaign Daily Budget is bigger, but the campaign bid is also higher. Despite this, the campaign will not overspend, even if the high bid allows the campaign to get a generous share of the traffic, such as a 50%:
((530,000 x 0.5) / 1000) x 0.25 = $66.25
Common bidding strategies
Below you will find some common bidding strategies based on the end-goal of your campaigns:
Focus on top impressions: Set a small frequency capping (one to three) and a high CPM/SmartCPM bid to get on top of the rotation of campaigns.
- Advantages: Traffic performances are higher and traffic is very targeted.
- Disadvantages: The lower volume and tough competition drives prices up.
Reach middle or remnant inventory: Set a bigger frequency capping (four to unlimited) and an average or minimum CPM bid.
- Advantages: Less competition, affordable prices. The campaign will get conversions on quantity over quality.
- Disadvantages: Traffic performance is lower. High traffic volume means you need to work more on optimization.
The effectiveness of an advertising message is based on repetition. By testing different types of campaigns and playing with the Frequency Capping, you can fine-tune the campaign to get the right exposure and higher profits.