How to track conversions with TUNE/HasOffers
This guide is for TUNE (formerly HasOffers) only. If you want to know the generic steps for S2S tracking, please check the Advertisers section.
ExoClick gives you access to global traffic sources, targeting features, big data and statistical analytical tools to filter results and optimise your campaigns. This manual explains how to track conversions on the ExoClick network when you are using tracking software TUNE (formerly known as HasOffers). In order to track your offer, you need Tune and ExoClick to speak to each other through their servers.
If you want to receive additional information, please check Tune's integration guide.
Step 1: Create the Goal ID for the Postback URL
Log into your ExoClick Admin Panel and go to Campaigns > Conversions tracking. This allows you to create the conversions tracking code to be used in your postback URL:

Click "New Conversion Goal". There are three fields you must complete: Name, Conversion Value and Order. In Name, simply add a name for the goal, for example: "Postback".
The available Conversion Values are:
- No Value: value is 0
- Fixed: you determine the payout of the conversion manually when setting up the Goal.
- Dynamic: the value of the payout will be passed through the Postback URL. Dynamic value passing will be explained in detail later during the guide.
Order is used to organize the different goals you have created in your account. If you have created multiple Conversion Goals, the Order will help you organize how these goals are displayed in your Statistics and in the Campaigns List.
Once you have added all these fields, click on the "Create" button. The Admin Panel will display the structure of the Postback URL as well as the Goal ID corresponding to the Goal you just created. It should look something similar to this:
http://s.magsrv.com/tag.php?goal=66a8605e6cce49fbb8056f273f8e1a2e&tag=
You can also check our Conversions Tracking page to find out more details about our Goal creation process.
Step 2: Add the postback URL to your TUNE dashboard
A Postback URL is a URL that notifies our server when a conversion has been made in your campaigns. You must store this URL in TUNE and get it to notify ExoClick’s server each time a user generates a conversion.
There are two ways to add a Postback URL in TUNE: through the Offer settings or as a Global Postback in your account.
A Postback URL in the offer settings will be applied exclusively to that offer, whereas a Global Postback will be applied to all your offers.
Specific Offer Postback URL
In order to add ExoClick's Postback URL in a specific offer, follow these steps:
- Login to your TUNE dashboard
- Click on "My Live Offers", then select the Offer where you want to add the Postback.
- Scroll down to "Your Pixels/Postbacks", then click on "Add New Pixel/Postback":
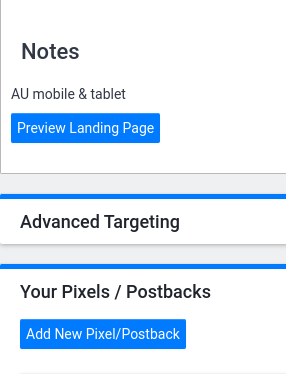
- Select "Postback URL" under "Code Type", then add the Postback URL you generated in the previous section from this guide.
- Add {aff_click_id} at the end of the Postback. Your URL should look like this:
http://s.magsrv.com/tag.php?goal=66a8605e6cce49fbb8056f273f8e1a2e&tag={aff_click_id}
Note: If the goal you created has Dynamic Value, then you must also add &value={payout} at the end of the Postback:
http://s.magsrv.com/tag.php?goal=66a8605e6cce49fbb8056f273f8e1a2e&tag={aff_click_id}&value={payout}
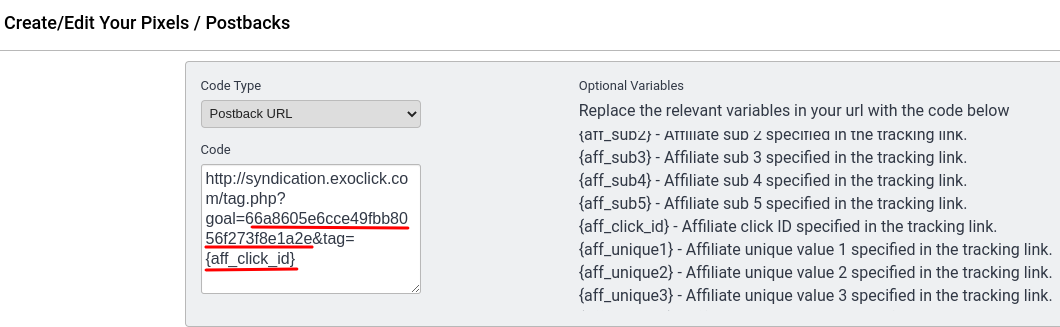
- Click Create.
Global Postback URL
In order to add ExoClick's Postback URL as a Global Postback, follow these steps:
- Click on "Tools" > "Pixels/Postbacks"
- Click on "Add new Postback" (if this option is not available for you, please contact your Account Manager from TUNE)
- Under "Code/URL", add the Postback URL:
http://s.magsrv.com/tag.php?goal=66a8605e6cce49fbb8056f273f8e1a2e&tag={aff_click_id}
Note: If the goal you created has Dynamic Value, then you must also add value={payout} at the end of the Postback:
http://s.magsrv.com/tag.php?goal=66a8605e6cce49fbb8056f273f8e1a2e&tag={aff_click_id}&value={payout}

- The Postback URL should be saved automatically.
Step 3: Add conversion tracking macro to your Tracking Link
Go to "My Live Offers", click on the Offer ID you want to promote, then copy the Tracking Link from the Offer.
E.g:
http://mypage.com/?a=14030&c=64375&aff_id=2422
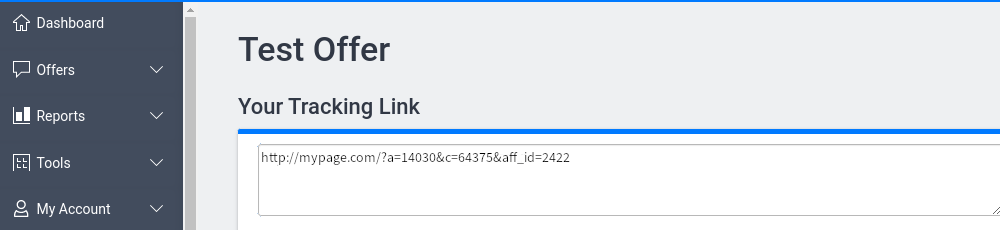
In order to track conversions, you will have to add &aff_click_id={conversions_tracking} to the Tracking Link. It will look like this:
http://mypage.com/?a=14030&c=64375&aff_id=2422&aff_click_id={conversions_tracking}
You will use this URL as your variation in ExoClick. You can also add additional macros from ExoClick by preceeding them with the appropriate "aff_sub" parameter from TUNE.
For instance, if you also want to track the Zone ID and the Campaign ID from ExoClick, then the Tracking Link will look like this:
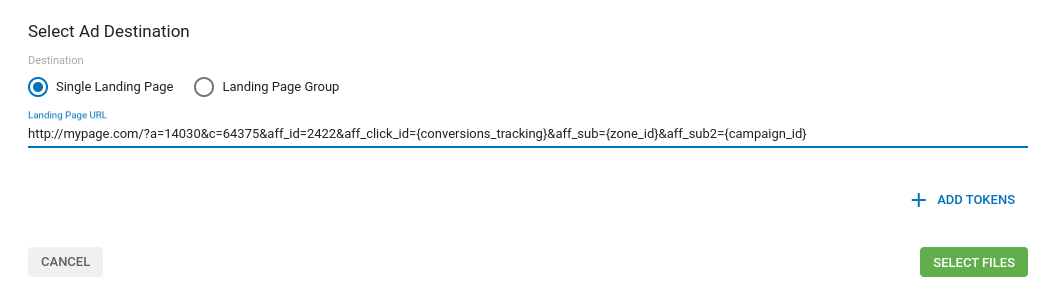
http://mypage.com/?a=14030&c=64375&aff_id=2422&aff_click_id={conversions_tracking}&aff_sub={zone_id}&aff_sub2={campaign_id}
You will be able to see all these details in your Performance Reports from TUNE:
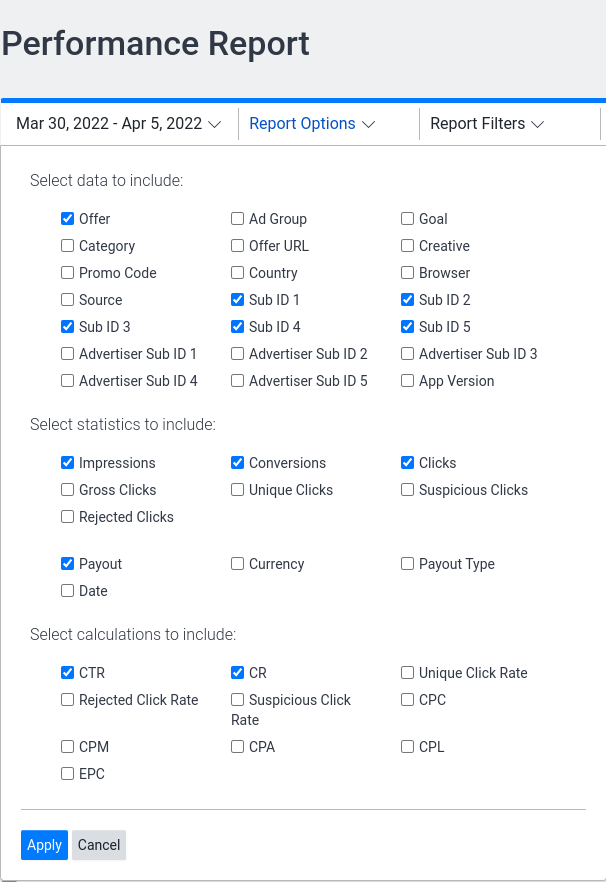
Note that only {conversions_tracking} is required to track conversions.
Step 4: Set up your Campaign in ExoClick
Paste the Tracking Link created in the previous step as your "Variation" for your ExoClick campaign:
Finish the campaign set up. You can find a detailed guide on how to create a campaign in Exoclick here.
If the set up has been done correctly, you will start seeing conversions both in TUNE and Exoclick. Do not forget to enable the corresponding Goal column in your Campaigns List and your Statistics
If you need further guidance on how to set up Conversion tracking in TUNE, don't hesitate to contact TUNE support at support@tune.com. You can also contact Exoclick's Customer Success to review these steps.