Creating a Zone
To create an ad zone, click on the Sites & Zones tab, and then the New Zone button.

When you click the New Zone button, you need to select the website(s) where the ad zone will be added. If there are multiple sites available, they will appear in a drop-down.
On the left side, you will see all the ad zone formats available. Select the one you wish to use and click Next at the bottom of the page.
Note: There is a limit to how many active zones an account can have. There is no limit to the number of archived zones.
Available settings per ad format
Once you click Next, you will need to fill in the details for the new ad zone. The options available will depend on which format you select.
Banner
| Option | Explanation |
|---|---|
| Name | Enter a name for the ad zone. |
| Site | Enter a name for the site the ad zone is on. |
| Category | Choose a category for the ad zone. |
| Subcategory | Choose a subcategory for the ad zone. |
| Format | Choose which format of banner you wish to use. |
| Border | Choose a width for a border for the banner ad, from No Border to 5 pixels. |
| Ad Refresh | Allows you to refresh the ad up to 10 times per unique user. Available only for Asynchronous script. Ad refresh can be configured at intervals of 30, 60, 90 and 120 seconds. |
| Fallback HTML | Switching on this option opens a few more options for your zone. Floor CPM: Here you can set a minimum price (floor) that the ad zone will accept for traffic. Type: A Soft Floor means that we will also run CPC campaigns that could have an average eCPM higher than your floor CPM, meaning that the floor is not 100% guaranteed. A Hard Floor means we will only run CPM and Smart CPM campaigns on this zone, meaning that the floor is 100% guaranteed. You can also click +Add Tokens to add dynamic tokens to the HTML, for items such as {country}, {sub} or {keyword}. A full list of tokens and how they work are listed in the table at the bottom of this page. Note that the impressions/clicks from the Fallback code will not be registered in your Statistics. |
| Alternative HTML tag | Paste the alternative HTML tag to show if the floor is not met. |
| Responsive Display Ads | Switching on this option opens up banner zones to demand from Native Ad campaigns. These campaigns are then added to the bidding auction for these zones. The content from winning Native campaigns is then served to responsively display within the allocated banner zone. |
| Enable Ad Transparency Dialog | Keep this option enabled to remain compliant with EU regulation. More information here |
| Filter Ads | In the Block Ad Types section you can block certain types of ads, or specific target audiences by simply clicking the types of ad or target audiences that you wish to block. |
| In the Block Specific Products section, you can block certain adverts from your website(s). Note: When adding blocks you are also restricting revenue potential, so you are strongly advised only to block when necessary. |
When you create your Banner Zone HTML tag, you can choose from two options:
- Asynchronous Script (recommended)
- iFrame
Popunder
| Option | Explanation |
|---|---|
| Name | Enter a name for the ad zone. |
| Site | Enter a name for the site the ad zone is on. |
| Category | Choose a category for the ad zone. |
| Subcategory | Choose a subcategory for the ad zone. |
| Capping | Choose this option to enable capping (display frequency) for popunder. |
| Return URL | This is a secondary URL that the popunder can direct to, if it does not generate enough revenue. |
| Frequency & Every | Set how many popunders will be triggered within the specified time period. |
| Delay Between Executions | Set a delay in the Popunders execution to prevent them from executing on the consecutive clicks in case there are multiple actions in the period. This can only be used when Frequency is more than 1. |
| Force Pop-Up | Choose this option to always show a popup instead of a popunder. |
| Fallback to Popup | If there are any difficulties showing a popunder (due to browser for example), choose this option to fallback to a popup. |
| New Tab | This option will make popunders appear in a tab instead of a window. This will not have any effect on browsers which already open popunders in a tab by default, such as Chrome. |
| Trigger Method | Set what action should cause the ad to occur: Clicking anywhere on the page, on links with a specific class (Google Compliant), only when clicking on a valid link, anywhere on the page, excluding specific classes, or clicking on Links, excluding specific classes. |
| Chrome Enabled | Enabled: Popunders will be shown on all browsers. Disabled: popunders will not be shown on Chrome. |
| Fallback URL | Switching on this option opens a few more options for your zone. Floor CPM: Here you can set a minimum price (floor) that the ad zone will accept for traffic. Type: A Soft Floor means that we will also run CPC campaigns that could have an average eCPM higher than your floor CPM, meaning that the floor is not 100% guaranteed. A Hard Floor means we will only run CPM and Smart CPM campaigns on this zone, meaning that the floor is 100% guaranteed. You can also click +Add Tokens to add dynamic tokens to the URL, for items such as {country}, {sub} or {keyword}. A full list of tokens and how they work are listed in the table at the bottom of this page. A full list of tokens and how they work are listed in the table at the bottom of this page. Note that the impressions from the Fallback URL will not be registered in your Statistics. |
| Alternative URL | Paste the alternative URL tag to show if the floor is not met. |
| Filter Ads | In the Block Ad Types section you can block certain types of ads, or specific target audiences by simply clicking the types of ad or target audiences that you wish to block. |
| In the Block Specific Products section, you can block certain adverts from your website(s). Note: When adding blocks you are also restricting revenue potential, so you are strongly advised only to block when necessary. |
When you create your Popunder Zone HTML tag, you can choose from two options:
- Inline + Remote Script (Recommended): The default options. It is a heavier code, but allows Adblock traffic monetization
- Remote Script only: If the remote script doesn't load (possibly due to an ad blocker) we will fall back to using the Inline + Remote Script.
Instant Message
| Option | Explanation |
|---|---|
| Name | Enter a name for the ad zone. |
| Site | Enter a name for the site the ad zone is on. |
| Category | Choose a category for the ad zone. |
| Subcategory | Choose a subcategory for the ad zone. |
| Once closed, hide for | Set the length of time that the ad is hidden for once it is closed. Note that this setting applies on page sessions, meaning that if the user refreshes the page or moves to a different one, the ad will be shown again. |
| Ad Refresh | Allows you to refresh the ad up to 10 times per unique user. Available only for Asynchronous script. Ad refresh can be configured at intervals of 30, 60, 90 and 120 seconds. |
| Fallback HTML | Switching on this option opens a few more options for your zone. Floor CPM: Here you can set a minimum price (floor) that the ad zone will accept for traffic. Type: A Soft Floor means that we will also run CPC campaigns that could have an average eCPM higher than your floor CPM, meaning that the floor is not 100% guaranteed. A Hard Floor means we will only run CPM and Smart CPM campaigns on this zone, meaning that the floor is 100% guaranteed. You can also click +Add Tokens to add dynamic tokens to the HTML, for items such as {country}, {sub} or {keyword}. A full list of tokens and how they work are listed in the table at the bottom of this page. Note that the impressions/clicks from the Fallback code will not be registered in your Statistics. |
| Responsive Display Ads | Switching on this option opens up instant message zones to demand from Native Ad campaigns. These campaigns are then added to the bidding auction for these zones. The content from winning Native campaigns is then served to responsively display within the allocated instant message zone. |
| Enable Ad Transparency Dialog | Keep this option enabled to remain compliant with EU regulation. More information here |
| Alternative HTML tag | Paste the alternative HTML tag to show if the floor is not met. |
| Filter Ads | In the Block Ad Types section you can block certain types of ads, or specific target audiences by simply clicking the types of ad or target audiences that you wish to block. |
| In the Block Specific Products section, you can block certain adverts from your website(s). Note: When adding blocks you are also restricting revenue potential, so you are strongly advised only to block when necessary. |
Sticky Banner
| Option | Explanation |
|---|---|
| Name | Enter a name for the ad zone. |
| Site | Enter a name for the site the ad zone is on. |
| Category | Choose a category for the ad zone. |
| Subcategory | Choose a subcategory for the ad zone. |
| Format | Choose a format for the sticky banner. |
| Border | Choose a width for a border for the banner ad, from No Border to 5 pixels. |
| Once closed, hide for | The length of time that the ad is hidden for once it is closed. Note that this setting applies on page sessions, meaning that if the user refreshes the page or moves to a different one, the ad will be shown again. |
| Sticky Vertical Position | The vertical position for the sticky banner. |
| Sticky Horizontal Position | The horizontal position for the sticky banner. |
| Ad Refresh | Allows you to refresh the ad up to 10 times per unique user. Available only for Asynchronous script. Ad refresh can be configured at intervals of 30, 60, 90 and 120 seconds. |
| Fallback HTML | Switching on this option opens a few more options for your zone. Floor CPM: Here you can set a minimum price (floor) that the ad zone will accept for traffic. Type: A Soft Floor means that we will also run CPC campaigns that could have an average eCPM higher than your floor CPM, meaning that the floor is not 100% guaranteed. A Hard Floor means we will only run CPM and Smart CPM campaigns on this zone, meaning that the floor is 100% guaranteed. You can also click +Add Tokens to add dynamic tokens to the HTML, for items such as {country}, {sub} or {keyword}. A full list of tokens and how they work are listed in the table at the bottom of this page. Note that the impressions/clicks from the Fallback code will not be registered in your Statistics. |
| Alternative HTML tag | Paste the alternative HTML tag to show if the floor is not met. |
| Responsive Display Ads | Switching on this option opens up instant message zones to demand from Native Ad campaigns. These campaigns are then added to the bidding auction for these zones. The content from winning Native campaigns is then served to responsively display within the allocated instant message zone. |
| Enable Ad Transparency Dialog | Keep this option enabled to remain compliant with EU regulation. More information here |
| Filter Ads | In the Block Ad Types section you can block certain types of ads, or specific target audiences by simply clicking the types of ad or target audiences that you wish to block. |
| In the Block Specific Products section, you can block certain adverts from your website(s). Note: When adding blocks you are also restricting revenue potential, so you are strongly advised only to block when necessary. |
Desktop Fullpage Interstitial
| Option | Explanation |
|---|---|
| Name | Enter a name for the ad zone. |
| Site | Enter a name for the site the ad zone is on. |
| Category | Choose a category for the ad zone. |
| Subcategory | Choose a subcategory for the ad zone. |
| Capping | Choose this option to enable capping (display frequency) for Desktop Fullpage Interstitial. |
| Frequency | In this section you set how often you wish the ad to appear. You can choose whether to do this based on Clicks or Time using the radio button. |
| Time | If you choose Time, you can set how often the ad appears when a user is browing the site. Simply set the number of times it shows per minute or hour, by entering two numbers and choosing Hours or Minutes from the drop-down. |
| Clicks | If you choose Clicks, you can set how many clicks it takes to show the ad for the first time, and how many clicks will make it appear every time after that. Type a number into the field following 1st time after to set how many clicks cause the ad to appear. Then enter a number into the field following then after every, to set how many clicks cause the ad to repeat from then onwards. |
| Trigger Method | Set what action should cause the ad to occur: Clicking anywhere on the page, on links with a specific class (Google Compliant), only when clicking on a valid link, anywhere on the page, excluding specific classes, or clicking on Links, excluding specific classes. |
| Trigger Classes | Here you indicate the class name that HTML elements need to have to trigger an ad. |
| Browser Settings | Choose whether to show this format on All browsers, Chrome only, or Non-Chrome Only. |
| Fallback HTML | Switching on this option opens a few more options for your zone. Floor CPM: Here you can set a minimum price (floor) that the ad zone will accept for traffic. Type: A Soft Floor means that we will also run CPC campaigns that could have an average eCPM higher than your floor CPM, meaning that the floor is not 100% guaranteed. A Hard Floor means we will only run CPM and Smart CPM campaigns on this zone, meaning that the floor is 100% guaranteed. You can also click +Add Tokens to add dynamic tokens to the HTML, for items such as {country}, {sub} or {keyword}. A full list of tokens and how they work are listed in the table at the bottom of this page. Note that the impressions/clicks from the Fallback code will not be registered in your Statistics. |
| Alternative HTML tag | Paste the alternative HTML tag to show if the floor is not met. |
| Responsive Display Ads | Switching on this option opens up instant message zones to demand from Native Ad campaigns. These campaigns are then added to the bidding auction for these zones. The content from winning Native campaigns is then served to responsively display within the allocated instant message zone. |
| Enable Ad Transparency Dialog | Keep this option enabled to remain compliant with EU regulation. More information here |
| Filter Ads | In the Block Ad Types section you can block certain types of ads, or specific target audiences by simply clicking the types of ad or target audiences that you wish to block. |
| In the Block Specific Products section, you can block certain adverts from your website(s). Note: When adding blocks you are also restricting revenue potential, so you are strongly advised only to block when necessary. |
In-Stream Video (VAST)
| Option | Explanation |
|---|---|
| Name | Enter a name for the ad zone. |
| Site | Enter a name for the site the ad zone is on. |
| Category | Choose a category for the ad zone. |
| Subcategory | Choose a subcategory for the ad zone. |
| Frequency | Set how often you wish the ad to appear. |
| Skip Button | Here you can set the number of seconds that elapse before the Skip button becomes active. The default is Disabled, but you can set with No Delay or Custom Delay in seconds. |
| VAST Version | Select the VAST Version. The default is 3.0, but you can choose 4.3 if needed. |
| VAST Wrapper Support | You can disable VAST Wrapper Support if your video player does not support third-party VAST tags (VAST Wrappers). |
| Fallback ads | Determines how many ads can a VAST tag put in queue. This ensures that an ad will be shown in case that the first campaign requested cannot be served for any reason. The default is No fallback and you can choose up to 4 ads in Fallback. Note that your player must be compatible with Fallback ads in order to be able to use this feature. |
| Fallback URL | Switching on this option opens a few more options for your zone. Floor CPM: Here you can set a minimum price (floor) that the ad zone will accept for traffic. Type: A Soft Floor means that we will also run CPC campaigns that could have an average eCPM higher than your floor CPM, meaning that the floor is not 100% guaranteed. A Hard Floor means we will only run CPM and Smart CPM campaigns on this zone, meaning that the floor is 100% guaranteed. You can also click +Add Tokens to add dynamic tokens to the URL, for items such as {country}, {sub} or {keyword}. A full list of tokens and how they work are listed in the table at the bottom of this page. Note that the video impressions/clicks from the Fallback URL will not be registered in your Statistics. |
| Alternative URL | Paste the alternative URL tag to show if the floor is not met. |
| Filter Ads | In the Block Ad Types section you can block certain types of ads, or specific target audiences by simply clicking the types of ad or target audiences that you wish to block. |
| In the Block Specific Products section, you can block certain adverts from your website(s). Note: When adding blocks you are also restricting revenue potential, so you are strongly advised only to block when necessary. |
Note: See VAST Tag related documentation.
In-Video Banner (VAST)
| Option | Explanation |
|---|---|
| Name | Enter a name for the ad zone. |
| Site | Enter a name for the site the ad zone is on. |
| Category | Choose a category for the ad zone. |
| Subcategory | Choose a subcategory for the ad zone. |
| Format | Choose a format for the In-Video Banner. |
| Vertical Alignment | Choose whether to put the banner at the top, middle or bottom. |
| Trigger Type | Select between Pre-Roll (at the start of the video), Pause (when the video is paused), Post roll (at the end of the video), or custom. If you select "Custom" as your trigger, you can decide precisely when in the video stream to show the advert. Choose between setting seconds or a percentage of the video before the ad appears. |
| VAST Version | Select the VAST Version. The default is 3.0, but you can choose 4.3 if needed. |
| Show Ad | Choose whether to show ad until the video ends (unless closed by visitor) or hide it after a defined number of seconds. |
| Fallback URL | Switching on this option opens a few more options for your zone. Floor CPM: Here you can set a minimum price (floor) that the ad zone will accept for traffic. Type: A Soft Floor means that we will also run CPC campaigns that could have an average eCPM higher than your floor CPM, meaning that the floor is not 100% guaranteed. A Hard Floor means we will only run CPM and Smart CPM campaigns on this zone, meaning that the floor is 100% guaranteed. You can also click +Add Tokens to add dynamic tokens to the URL, for items such as {country}, {sub} or {keyword}. A full list of tokens and how they work are listed in the table at the bottom of this page. Note that the impressions/clicks from the Fallback URL will not be registered in your Statistics. |
| Alternative URL | Paste the alternative URL tag to show if the floor is not met. |
| Filter Ads | In the Block Ad Types section you can block certain types of ads, or specific target audiences by simply clicking the types of ad or target audiences that you wish to block. |
| In the Block Specific Products section, you can block certain adverts from your website(s). Note: When adding blocks you are also restricting revenue potential, so you are strongly advised only to block when necessary. |
Note: See VAST Tag related documentation.
Outstream Video
| Option | Explanation |
|---|---|
| Name | Enter a name for the ad zone. |
| Site | Enter a name for the site the ad zone is on. |
| Category | Choose a category for the ad zone. |
| Subcategory | Choose a subcategory for the ad zone. |
| Maximum Width | Select Responsive to allow the ad to respond to the container size, or choose Custom Width and enter a custom width from 200 - 1080 pixels in the field that appears. |
| Once closed, hide for | Select how long ads will be hidden for once the user closes the ad. Show on every page (default) means that the ad will always show. |
| Branding | Use this switch to turn on/off the branding that appears on the ad. |
| CTA Overlay | Use this switch to turn on/off the call-to-action text that appears on the ad. |
| Fallback URL | Switching on this option opens a few more options for your zone. Floor CPM: Here you can set a minimum price (floor) that the ad zone will accept for traffic. Type: A Soft Floor means that we will also run CPC campaigns that could have an average eCPM higher than your floor CPM, meaning that the floor is not 100% guaranteed. A Hard Floor means we will only run CPM and Smart CPM campaigns on this zone, meaning that the floor is 100% guaranteed. You can also click +Add Tokens to add dynamic tokens to the HTML, for items such as {country}, {sub} or {keyword}. A full list of tokens and how they work are listed in the table at the bottom of this page. Note that the video impressions/clicks from the Fallback URL will not be registered in your Statistics. |
| Alternative URL | Paste the alternative URL tag to show if the floor is not met. |
| Enable Ad Transparency Dialog | Keep this option enabled to remain compliant with EU regulation. More information here |
Important - Container Height: When implementing Outstream Video zones, select an automatic responsive width that fits 100% of the container on your site. If you choose a Custom Width size, do not apply any restriction to the container's height. The video ad height must be adjusted automatically based on the width to maintain the correct aspect ratio. Restricting the height will negatively impact viewability and user experience.
For additional best practices and optimization tips, see our Outstream Video Publisher Do's and Don'ts guide.
Video Slider
| Option | Explanation |
|---|---|
| Name | Enter a name for the ad zone. |
| Site | Enter a name for the site the ad zone is on. |
| Category | Choose a category for the ad zone. |
| Subcategory | Choose a subcategory for the ad zone. |
| Once closed, hide for | Select how long ads will be hidden for once the user closes the ad. |
| Close Button Delay | There you can set the number of seconds that elapse before the Skip button becomes active. The default is No Delay, or you can set a Custom Delay in seconds. |
| Maximum Density | This drop-down sets the maximum percentage of the screen that can be taken up by the ad zone. Choose a percentage between 20 and 30. This option ensures that the ad zone will display well on all screen sizes. |
| Branding | Turning this on will show our networks branding on your ad. |
| CTA Overlay | Use this switch to turn on/off the call-to-action text that appears on the ad.* |
| Hide on Complete | If enabled, the video slider will close when it is finished. If disabled it will stay visible with a repeat button. |
| Fallback URL | Switching on this option opens a few more options for your zone. Floor CPM: Here you can set a minimum price (floor) that the ad zone will accept for traffic. Type: A Soft Floor means that we will also run CPC campaigns that could have an average eCPM higher than your floor CPM, meaning that the floor is not 100% guaranteed. A Hard Floor means we will only run CPM and Smart CPM campaigns on this zone, meaning that the floor is 100% guaranteed. You can also click +Add Tokens to add dynamic tokens to the HTML, for items such as {country}, {sub} or {keyword}. A full list of tokens and how they work are listed in the table at the bottom of this page. Note that the video impressions/clicks from the Fallback URL will not be registered in your Statistics. |
| Alternative URL | Paste the alternative URL tag to show if the floor is not met. |
| Filter Ads | In the Block Ad Types section you can block certain types of ads, or specific target audiences by simply clicking the types of ad or target audiences that you wish to block. |
| In the Block Specific Products section, you can block certain adverts from your website(s). Note: When adding blocks you are also restricting revenue potential, so you are strongly advised only to block when necessary. |
Note: If you want to disable CTA, make sure to update your code on the site in order to apply the corresponding ad zone setting.
Mobile Banner
| Option | Explanation |
|---|---|
| Name | Enter a name for the ad zone. |
| Site | Enter a name for the site the ad zone is on. |
| Category | Choose a category for the ad zone. |
| Subcategory | Choose a subcategory for the ad zone. |
| Format | Choose a format for the Mobile Banner. |
| Ad Refresh | Allows you to refresh the ad up to 10 times per unique user. Available only for Asynchronous script. Ad refresh can be configured at intervals of 30, 60, 90 and 120 seconds. |
| Fallback HTML | Switching on this option opens a few more options for your zone. Floor CPM: Here you can set a minimum price (floor) that the ad zone will accept for traffic. Type: A Soft Floor means that we will also run CPC campaigns that could have an average eCPM higher than your floor CPM, meaning that the floor is not 100% guaranteed. A Hard Floor means we will only run CPM and Smart CPM campaigns on this zone, meaning that the floor is 100% guaranteed. You can also click +Add Tokens to add dynamic tokens to the HTML, for items such as {country}, {sub} or {keyword}. A full list of tokens and how they work are listed in the table at the bottom of this page. Note that the impressions/clicks from the Fallback code will not be registered in your Statistics. |
| Alternative HTML tag | Paste the alternative HTML tag to show if the floor is not met. |
| Responsive Display Ads | This option is available only for banner zones and Ad Servers where Responsive Display Ads are enabled. When activated, it allows banner zones to receive demand from Native Ad campaigns, which are then included in the bidding auction for those zones. The content from the winning Native campaign is served responsively within the allocated banner zone. |
| Enable Ad Transparency Dialog | Keep this option enabled to remain compliant with EU regulation. More information here |
| Filter Ads | In the Block Ad Types section you can block certain types of ads, or specific target audiences by simply clicking the types of ad or target audiences that you wish to block. |
| In the Block Specific Products section, you can block certain adverts from your website(s). Note: When adding blocks you are also restricting revenue potential, so you are strongly advised only to block when necessary. |
On the Your Zone HTML Tag screen you can then choose the tag type which you wish to use:
- Asynchronous Script (recommended)
- iFrame
Mobile Popunder
| Option | Explanation |
|---|---|
| Name | Enter a name for the ad zone. |
| Site | Enter a name for the site the ad zone is on. |
| Category | Choose a category for the ad zone. |
| Subcategory | Choose a subcategory for the ad zone. |
| Capping | Choose this option to enable capping (display frequency) for popunder. |
| Return URL | This is a secondary URL that the popunder can direct to, if it does not generate enough revenue. |
| Frequency & Every | Set how many popunders will be triggered within the specified time period. |
| Delay Between Executions | Set a delay in the Popunders execution to prevent them from executing on the consecutive clicks in case there are multiple actions in the period. This can only be used when Frequency is more than 1. |
| Force Pop-Up | Choose this option to always show a popup instead of a popunder. |
| Fallback to Popup | If there are any difficulties showing a popunder (due to browser for example), choose this option to fallback to a popup. |
| New Tab | This option will force the popunder to show in a new tab. |
| Trigger Method | Set what action should cause the ad to occur: Clicking anywhere on the page, on links with a specific class (Google Compliant), only when clicking on a valid link, anywhere on the page, excluding specific classes, or clicking on Links, excluding specific classes. |
| Fallback URL | Switching on this option opens a few more options for your zone. Floor CPM: Here you can set a minimum price (floor) that the ad zone will accept for traffic. Type: A Soft Floor means that we will also run CPC campaigns that could have an average eCPM higher than your floor CPM, meaning that the floor is not 100% guaranteed. A Hard Floor means we will only run CPM and Smart CPM campaigns on this zone, meaning that the floor is 100% guaranteed. You can also click +Add Tokens to add dynamic tokens to the URL, for items such as {country}, {sub} or {keyword}. A full list of tokens and how they work are listed in the table at the bottom of this page. Note that the impressions/clicks from the Fallback code will not be registered in your Statistics. |
| Alternative URL | Paste the alternative URL tag to show if the floor is not met. |
| Filter Ads | In the Block Ad Types section you can block certain types of ads, or specific target audiences by simply clicking the types of ad or target audiences that you wish to block. |
| In the Block Specific Products section, you can block certain adverts from your website(s). Note: When adding blocks you are also restricting revenue potential, so you are strongly advised only to block when necessary. |
When you create your Popunder Zone HTML tag, you can choose from two options:
- Inline + Remote Script (Recommended): This is the recommended format, as it enables popunders to continue working when ad blockers are installed.
- Remote Script only: If the remote script doesn't load (possibly due to an ad blocker) we will fall back to using the Inline + Remote Script.
Mobile Instant Message
| Option | Explanation |
|---|---|
| Name | Enter a name for the ad zone. |
| Site | Enter a name for the site the ad zone is on. |
| Category | Choose a category for the ad zone. |
| Subcategory | Choose a subcategory for the ad zone. |
| Once closed, hide for | Set the amount of time that the ad is hidden for once the user closes it. Note that this setting applies on page sessions, meaning that if the user refreshes the page or moves to a different one, the ad will be shown again. |
| User Capping | Here you can set a limit to how many times a single user will see this zone, to avoid annoying them. |
| Ad Refresh | Allows you to refresh the ad up to 10 times per unique user. Available only for Asynchronous script. Ad refresh can be configured at intervals of 30, 60, 90 and 120 seconds. |
| Fallback HTML | Switching on this option opens a few more options for your zone. Floor CPM: Here you can set a minimum price (floor) that the ad zone will accept for traffic. Type: A Soft Floor means that we will also run CPC campaigns that could have an average eCPM higher than your floor CPM, meaning that the floor is not 100% guaranteed. A Hard Floor means we will only run CPM and Smart CPM campaigns on this zone, meaning that the floor is 100% guaranteed. You can also click +Add Tokens to add dynamic tokens to the HTML, for items such as {country}, {sub} or {keyword}. A full list of tokens and how they work are listed in the table at the bottom of this page. Note that the impressions/clicks from the Fallback code will not be registered in your Statistics. |
| Alternative HTML tag | Paste the alternative HTML tag to show if the floor is not met. |
| Responsive Display Ads | Switching on this option opens up banner zones to demand from Native Ad campaigns. These campaigns are then added to the bidding auction for these zones. The content from winning Native campaigns is then served to responsively display within the allocated banner zone. |
| Enable Ad Transparency Dialog | Keep this option enabled to remain compliant with EU regulation. More information here |
| Filter Ads | In the Block Ad Types section you can block certain types of ads, or specific target audiences by simply clicking the types of ad or target audiences that you wish to block. |
| In the Block Specific Products section, you can block certain adverts from your website(s). Note: When adding blocks you are also restricting revenue potential, so you are strongly advised only to block when necessary. |
Mobile Fullpage Interstitial
| Option | Explanation |
|---|---|
| Name | Enter a name for the ad zone. |
| Site | Enter a name for the site the ad zone is on. |
| Category | Choose a category for the ad zone. |
| Subcategory | Choose a subcategory for the ad zone. |
| Capping | Choose this option to enable capping (display frequency) for Mobile Fullpage Interstitial. |
| Frequency | In this section you set how often you wish the ad to appear. You can choose whether to do this based on Clicks or Time using the radio button. |
| Time | If you choose Time, you can set how often the ad appears when a user is browing the site. Simply set the number of times it shows per minute or hour, by entering two numbers and choosing Hours or Minutes from the drop-down. |
| Clicks | If you choose Clicks, you can set how many clicks it takes to show the ad for the first time, and how many clicks will make it appear every time after that. Type a number into the field following 1st time after to set how many clicks cause the ad to appear. Then enter a number into the field following then after every, to set how many clicks cause the ad to repeat from then onwards. |
| Trigger Method | Set what action should cause the ad to occur: Clicking anywhere on the page, on links with a specific class (Google Compliant), only when clicking on a valid link, anywhere on the page, excluding specific classes, or clicking on Links, excluding specific classes. |
| Trigger Classes | Here you indicate the class name that HTML elements need to have to trigger an ad. |
| Browser Settings | Choose whether to show this format on All browsers, Chrome only, or Non-Chrome Only. |
| Fallback HTML | Switching on this option opens a few more options for your zone. Floor CPM: Here you can set a minimum price (floor) that the ad zone will accept for traffic. Type: A Soft Floor means that we will also run CPC campaigns that could have an average eCPM higher than your floor CPM, meaning that the floor is not 100% guaranteed. A Hard Floor means we will only run CPM and Smart CPM campaigns on this zone, meaning that the floor is 100% guaranteed. You can also click +Add Tokens to add dynamic tokens to the HTML, for items such as {country}, {sub} or {keyword}. A full list of tokens and how they work are listed in the table at the bottom of this page. Note that the impressions/clicks from the Fallback code will not be registered in your Statistics. |
| Alternative HTML tag | Paste the alternative HTML tag to show if the floor is not met. |
| Responsive Display Ads | Switching on this option opens up banner zones to demand from Native Ad campaigns. These campaigns are then added to the bidding auction for these zones. The content from winning Native campaigns is then served to responsively display within the allocated banner zone. |
| Enable Ad Transparency Dialog | Keep this option enabled to remain compliant with EU regulation. More information here |
| Filter Ads | In the Block Ad Types section you can block certain types of ads, or specific target audiences by simply clicking the types of ad or target audiences that you wish to block. |
| In the Block Specific Products section, you can block certain adverts from your website(s). Note: When adding blocks you are also restricting revenue potential, so you are strongly advised only to block when necessary. |
Recommendation Widget
| Option | Explanation |
|---|---|
| Name | Enter a name for the ad zone. |
| Site | Enter a name for the site the ad zone is on. |
| Category | Choose a category for the ad zone. |
| Subcategory | Choose a subcategory for the ad zone. |
| Video Thumb | Enabling this option will show a video preview on touch/hover of the ad when available. |
| Fallback HTML | Switching on this option opens a few more options for your zone. Floor CPM: Here you can set a minimum price (floor) that the ad zone will accept for traffic. Type: A Soft Floor means that we will also run CPC campaigns that could have an average eCPM higher than your floor CPM, meaning that the floor is not 100% guaranteed. A Hard Floor means we will only run CPM and Smart CPM campaigns on this zone, meaning that the floor is 100% guaranteed. You can also click +Add Tokens to add dynamic tokens to the HTML, for items such as {country}, {sub} or {keyword}. A full list of tokens and how they work are listed in the table at the bottom of this page. Note that the impressions/clicks from the Fallback code will not be registered in your Statistics. |
| Alternative HTML tag | Paste the alternative HTML tag to show if the floor is not met. |
| Enable Ad Transparency Dialog | Keep this option enabled to remain compliant with EU regulation. More information here |
| Filter Ads | In the Block Ad Types section you can block certain types of ads, or specific target audiences by simply clicking the types of ad or target audiences that you wish to block. |
| In the Block Specific Products section, you can block certain adverts from your website(s). Note: When adding blocks you are also restricting revenue potential, so you are strongly advised only to block when necessary. |
Push Notifications
| Option | Explanation |
|---|---|
| Name | Enter a name for the ad zone. |
| Site | Enter a name for the site the ad zone is on. |
| Category | Choose a category for the ad zone. |
| Subcategory | Choose a subcategory for the ad zone. |
| Push Notification Integration Method | Choose from Direct or Hosted. Direct Push Notifications will be sent from YOUR domain. Hosted Push Notifications will be sent from OUR domain. |
| Soft-Ask Prompt | Enable the Soft-Ask Prompt switch to show soft prompts. If you choose to Use Default, the prompt will use the default one from the browser. If you choose Enable Call to Action you can then define the soft-ask prompt yourself. |
| Filter Ads | In the Block Ad Types section you can block certain types of ads, or specific target audiences by simply clicking the types of ad or target audiences that you wish to block. |
| In the Block Specific Products section, you can block certain adverts from your website(s). Note: When adding blocks you are also restricting revenue potential, so you are strongly advised only to block when necessary. |
In-Page Push Notifications
| Option | Explanation |
|---|---|
| Name | Enter a name for the ad zone. |
| Site | Enter a name for the site the ad zone is on. |
| Category | Choose a category for the ad zone. |
| Subcategory | Choose a subcategory for the ad zone. |
| Vertical Position | Choose whether to display the Push Notifications at the top, middle or bottom of the page. |
| Horizontal Position | Choose whether to display the Push Notifications at the right, center or left of the page. |
| Delay for 1st Notification | Set the time delay in seconds for the 1st Push Notification to appear. |
| Max Number of Notifications on Page | Set the maximum number of Push Notifications to display on the page. |
| Delay between 1st and 2nd notification | Set the time delay in seconds between the 1st and 2nd Push Notifications displaying on the page. |
| Once closed, hide for | Set the amount of time that the Push Notification is hidden for once the user closes it. Note that this setting applies on page sessions, meaning that if the user refreshes the page or moves to a different one, the ad will be shown again. |
| User Session Capping | Set a limit on how many times a single user will see Push Notifications display in a single session. |
| Enable Ad Transparency Dialog | Keep this option enabled to remain compliant with EU regulation. More information here |
| Filter Ads | In the Block Ad Types section you can block certain types of ads, or specific target audiences by simply clicking the types of ad or target audiences that you wish to block. |
| In the Block Specific Products section, you can block certain adverts from your website(s). Note: When adding blocks you are also restricting revenue potential, so you are strongly advised only to block when necessary. |
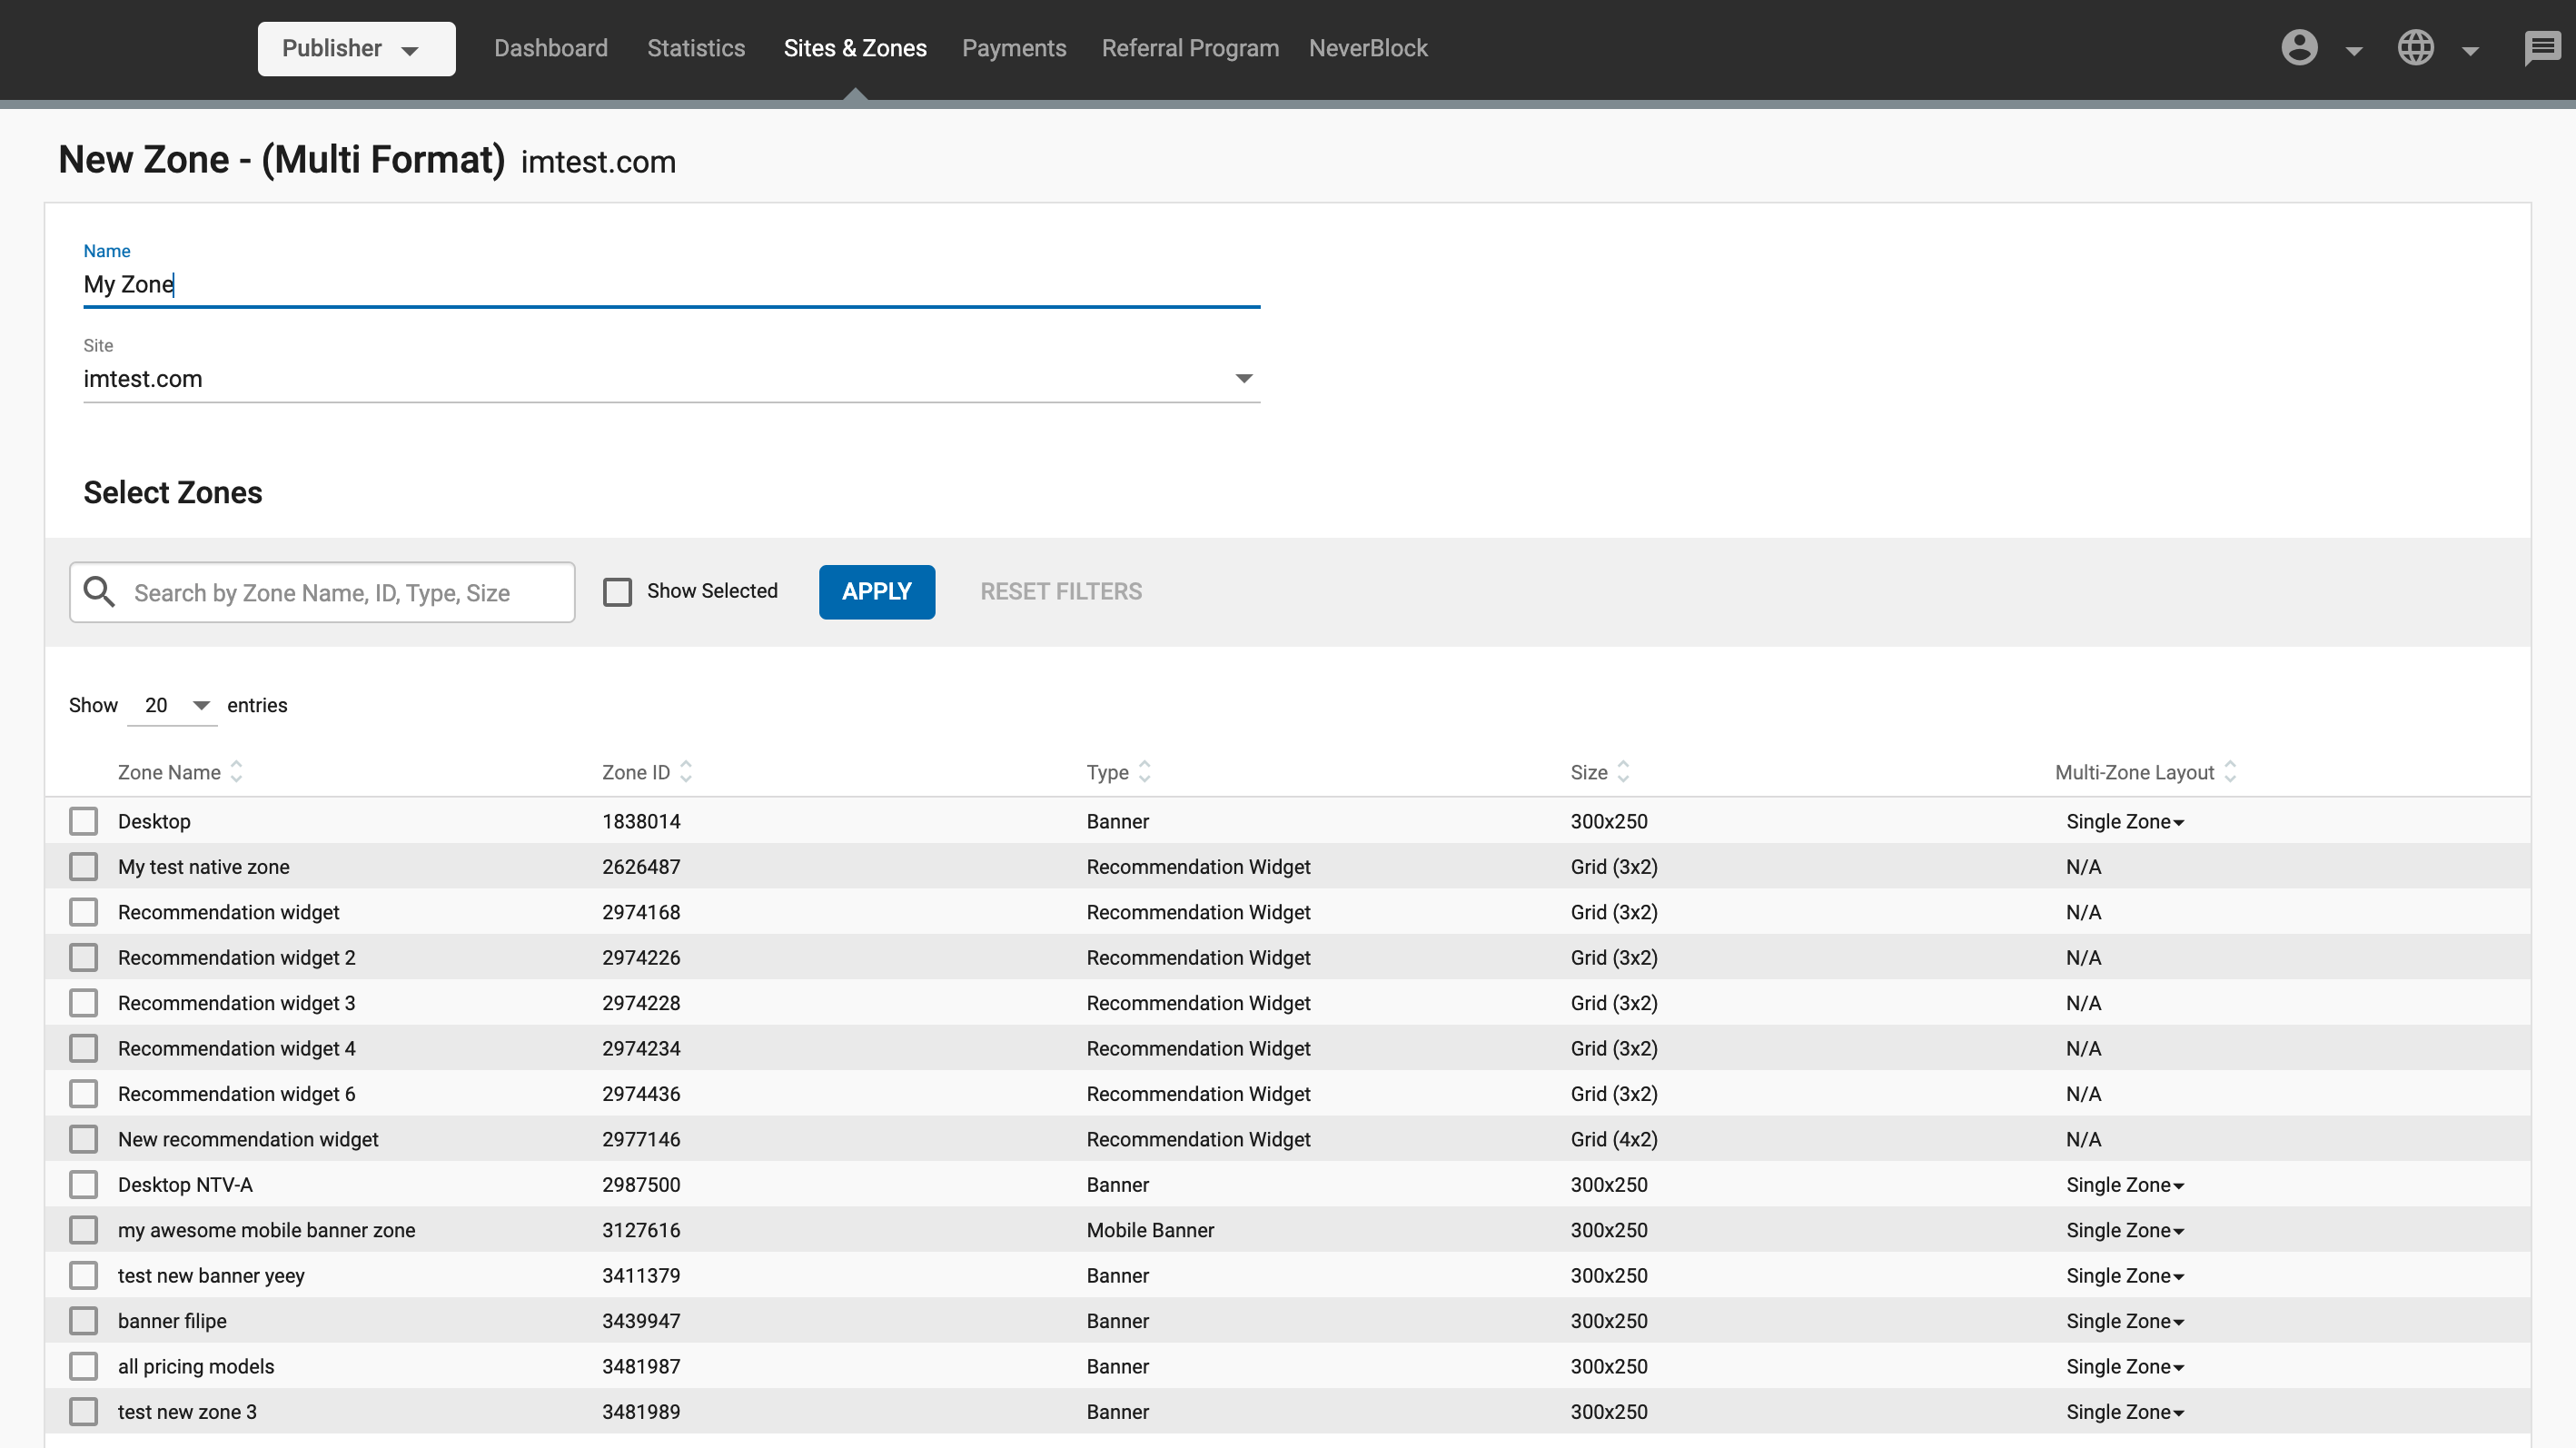
Multi-Format
| Option | Explanation |
|---|---|
| Name | Enter a name for the Multi-Format ad zone. |
| Site | Choose the site to create the ad zone on. |
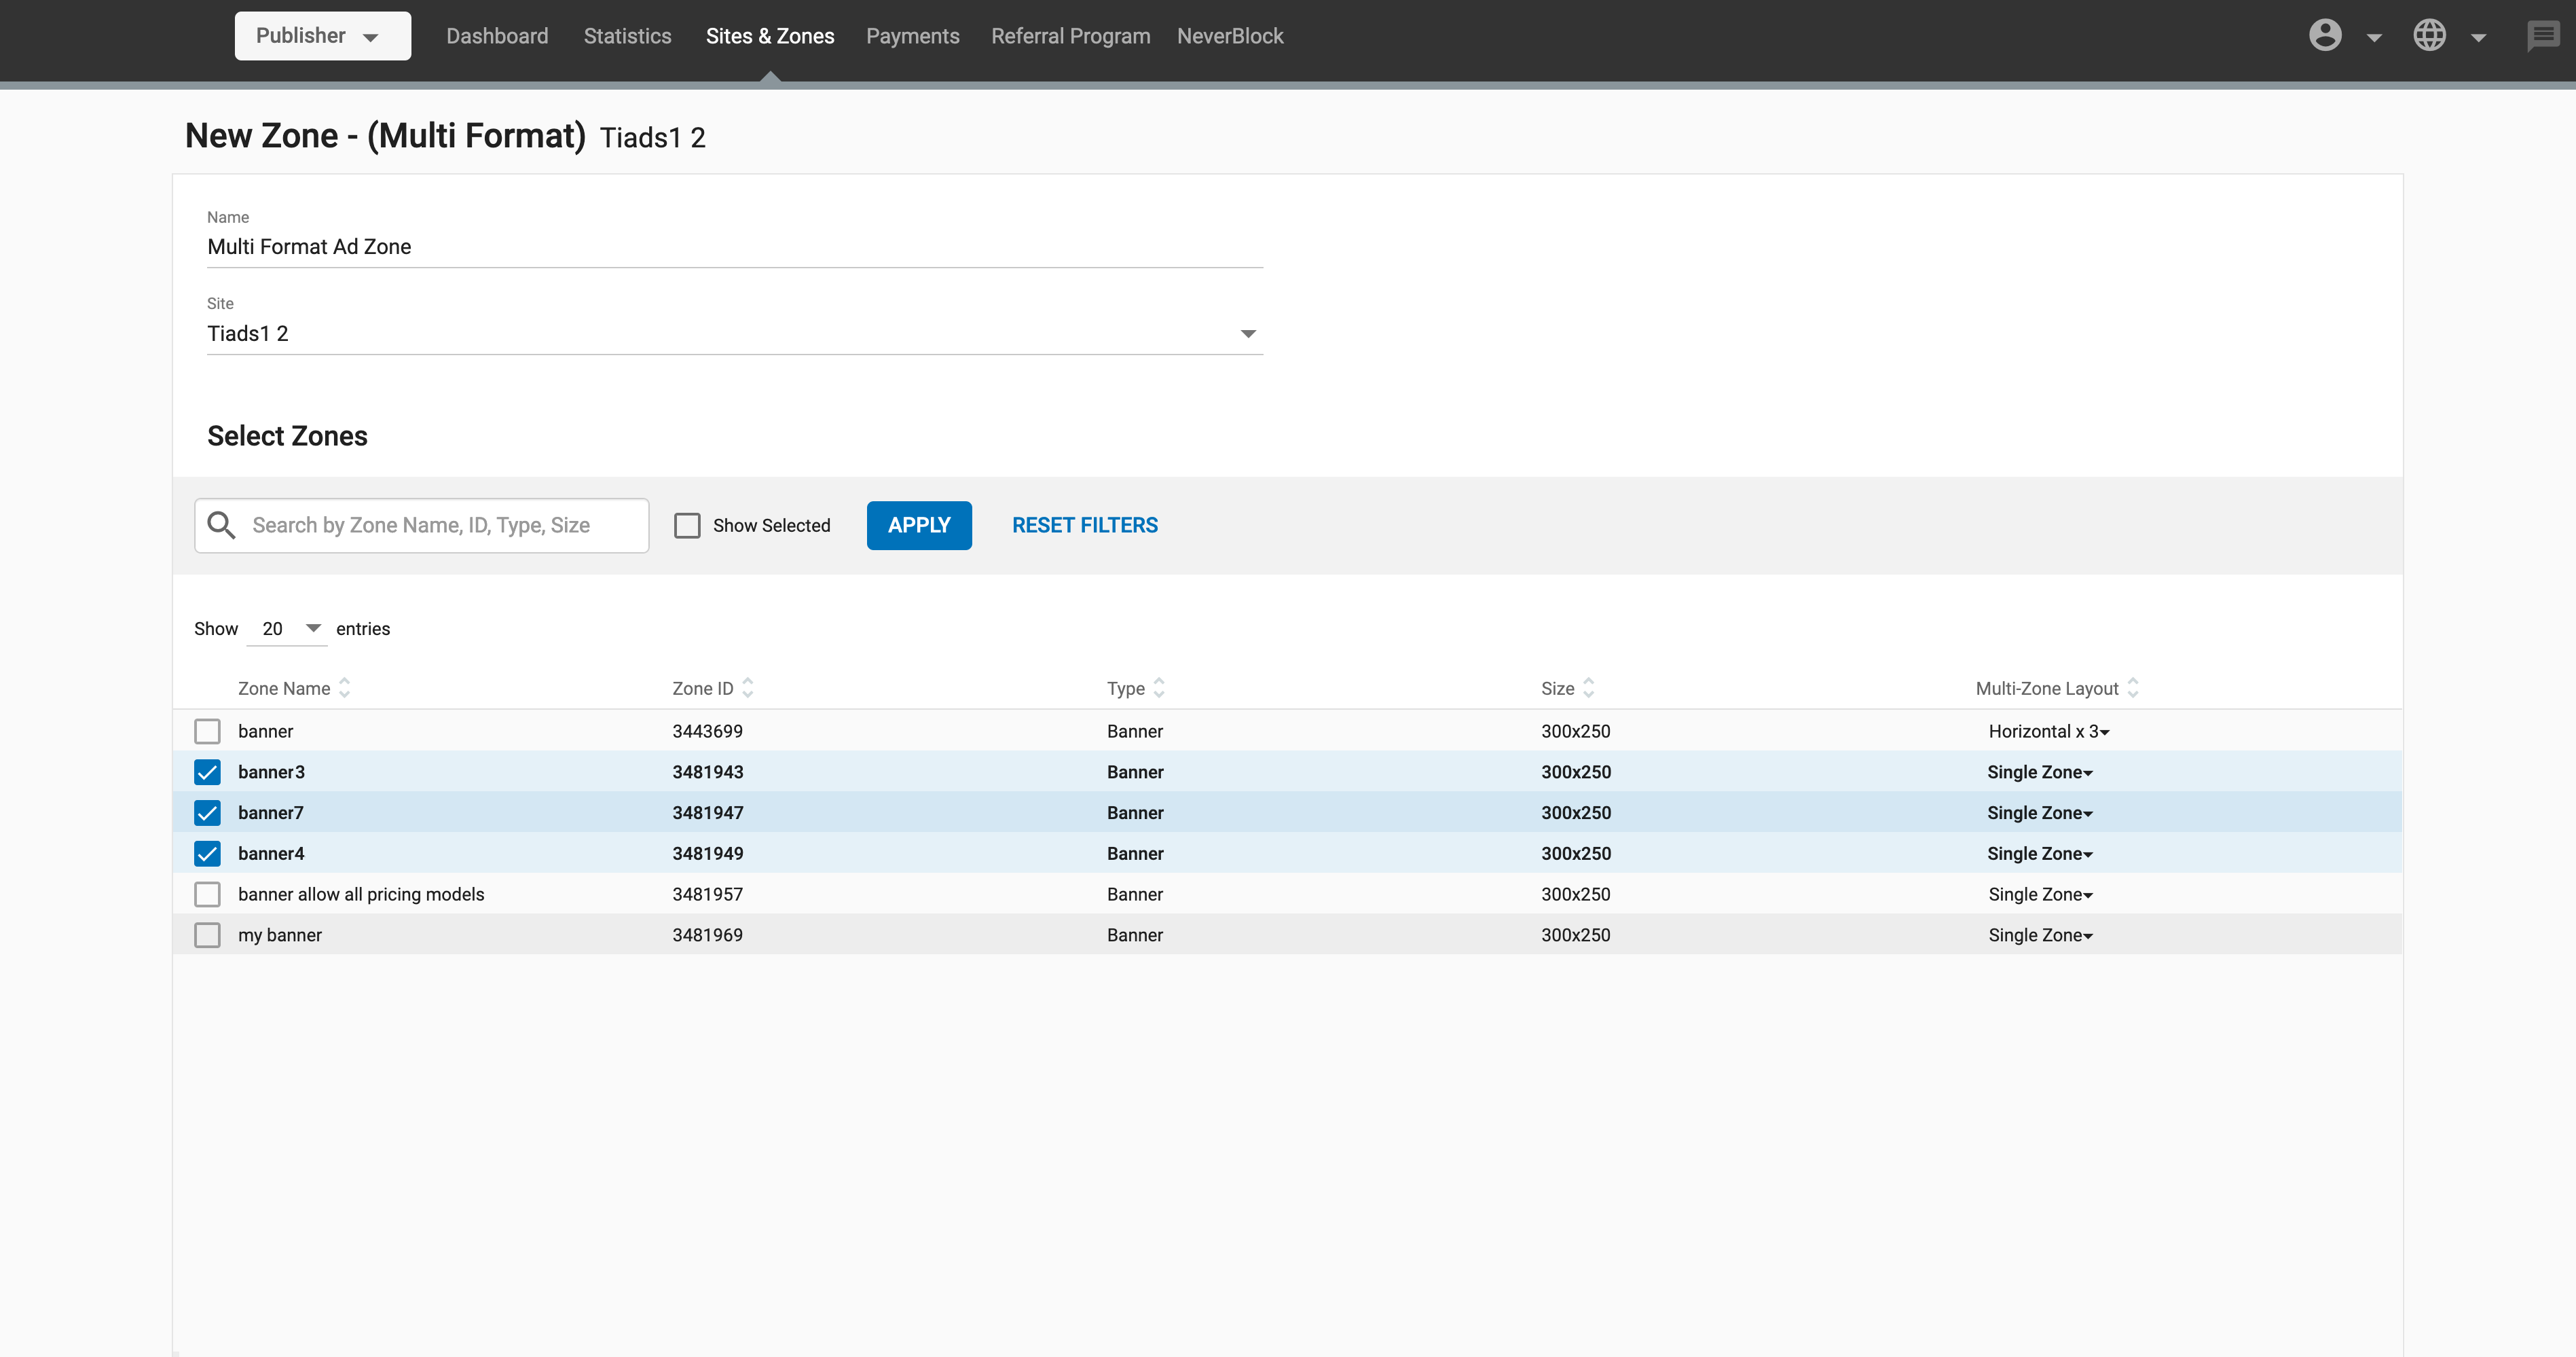
Regardless of the site you choose, you will see a list of Banner and Recommendation Widget ad zones that you've already created below. This list shows only the individual zones that are eligible to be used in your Multi-Format zone, meaning that you won't see all the zones from the site.
Adding zones to your Multi-Format zone
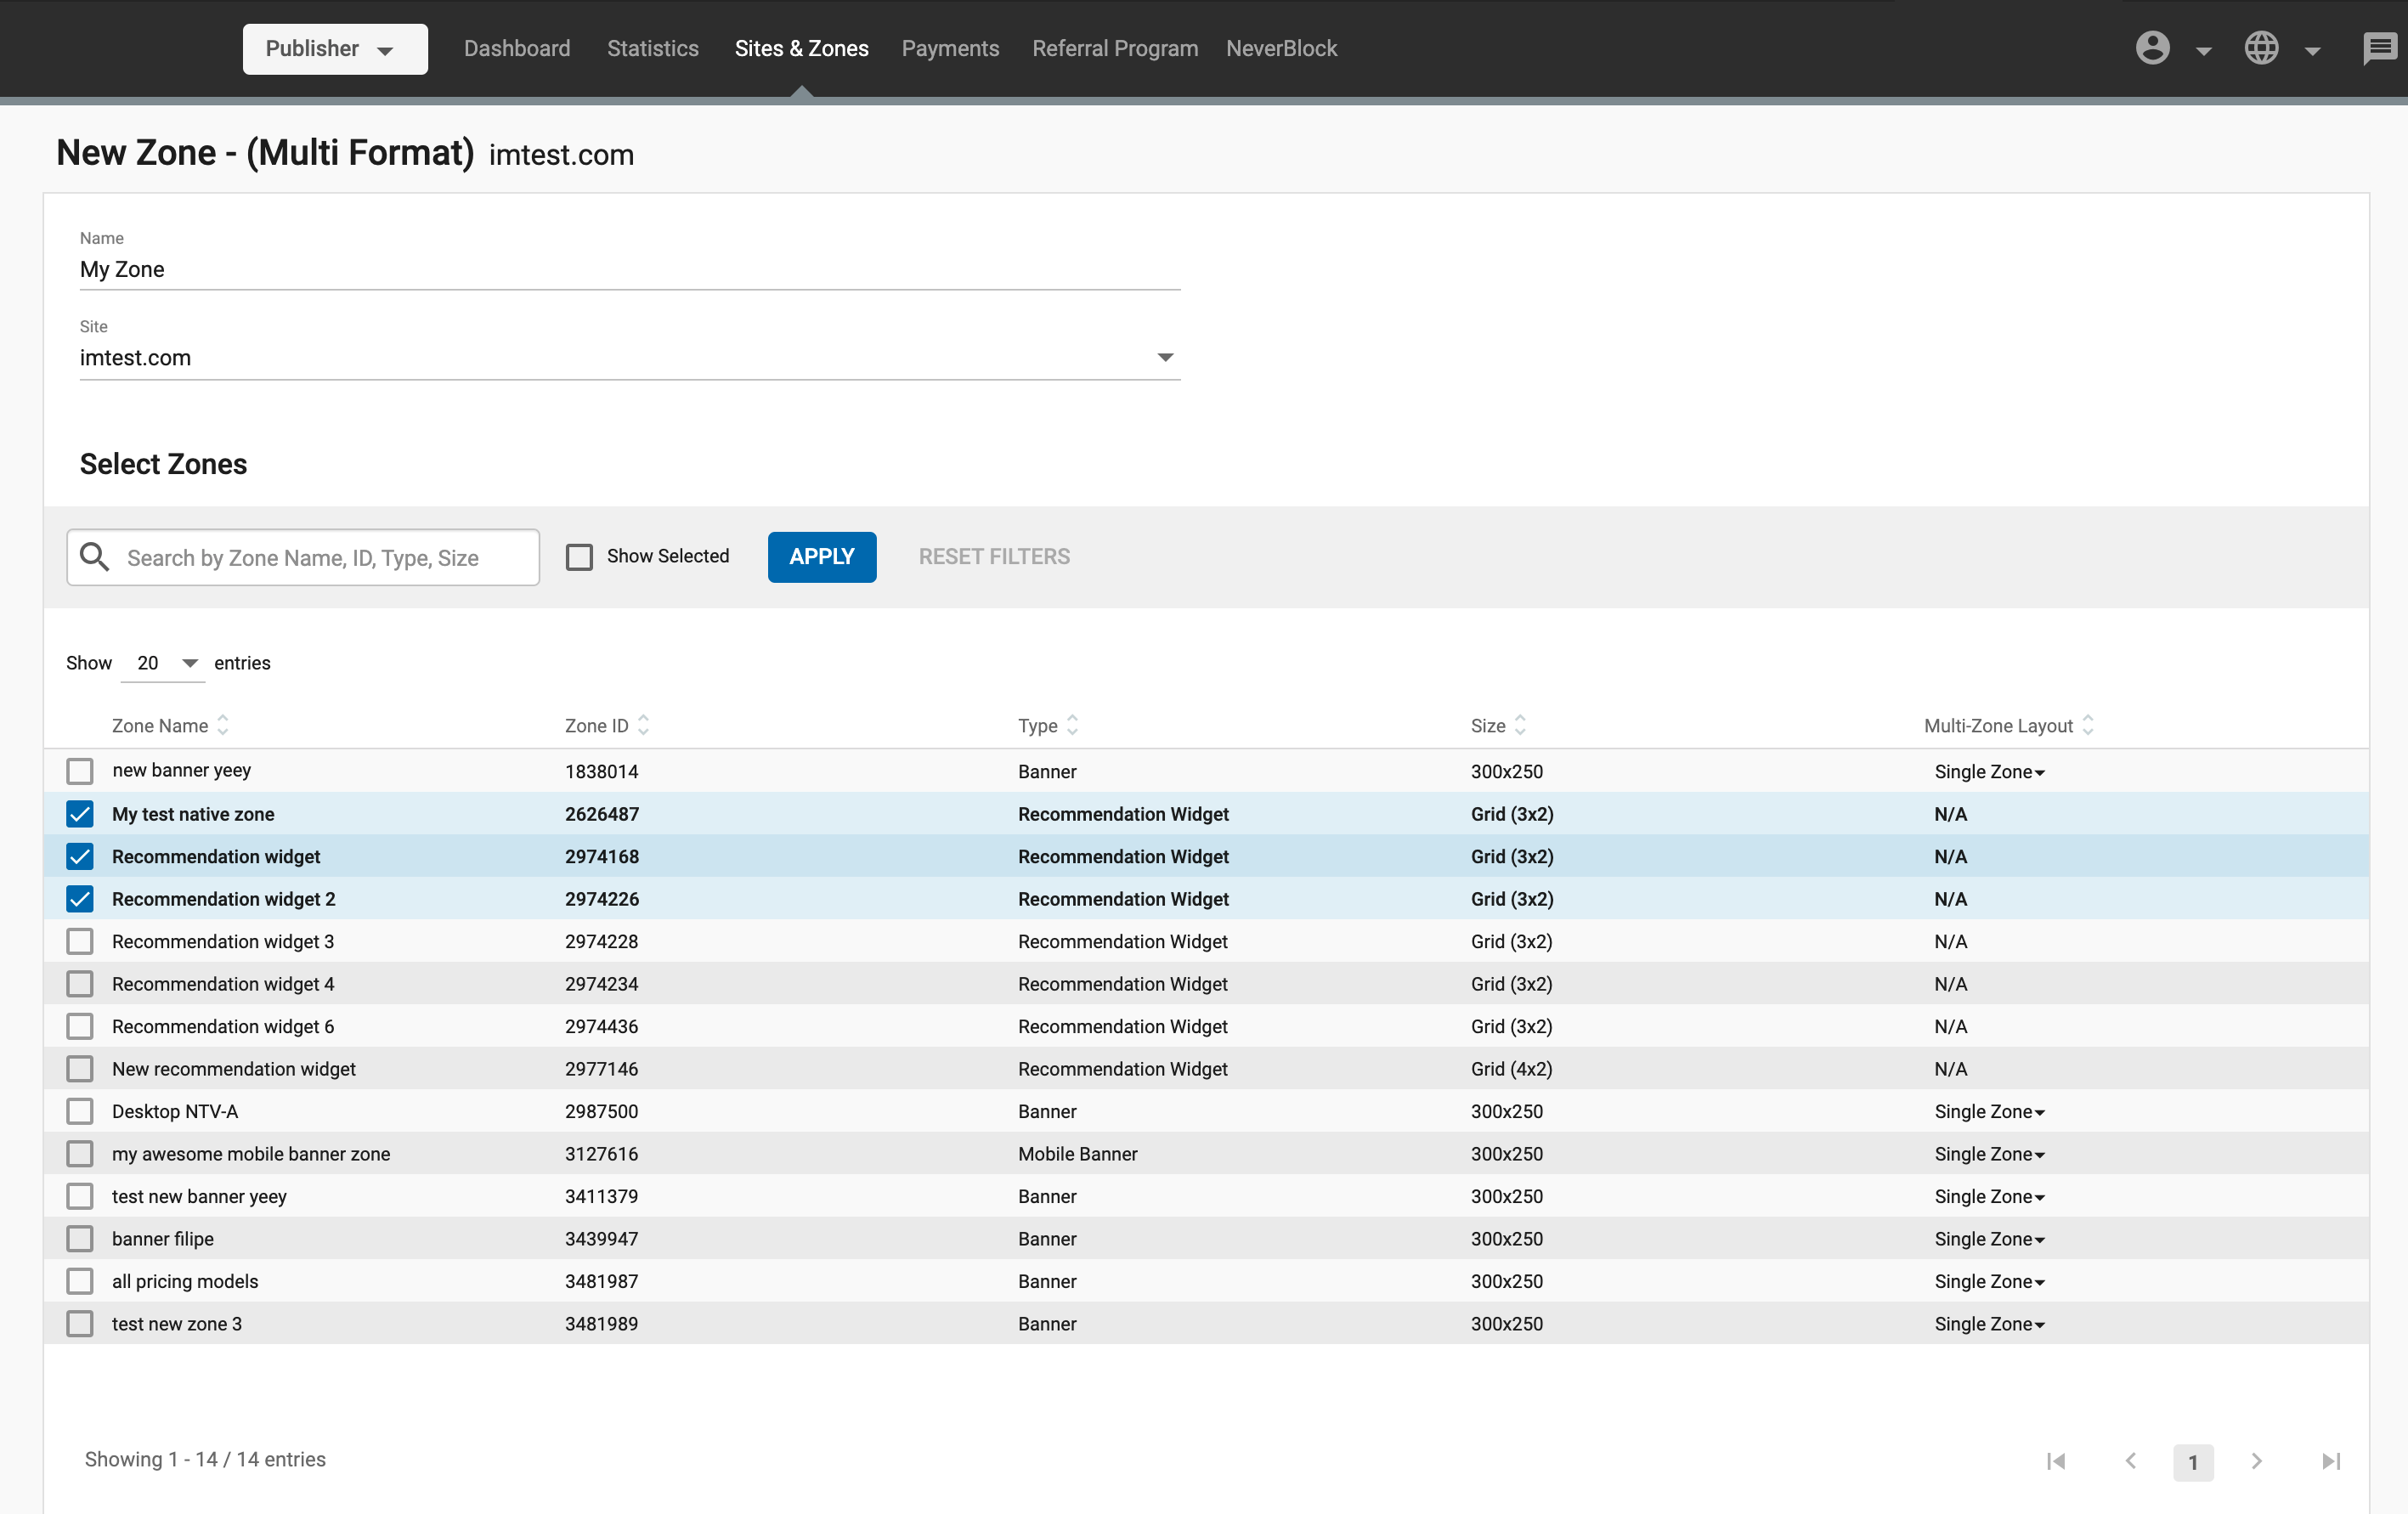
To add zones to your Multi-Format ad zone, tick the box on the left side of them.
Once you’ve selected multiple zones, you are essentially setting these zones to compete against each other to show in the Multi-Format ad zone. The zone that gets the highest eCPM is the one that will display.
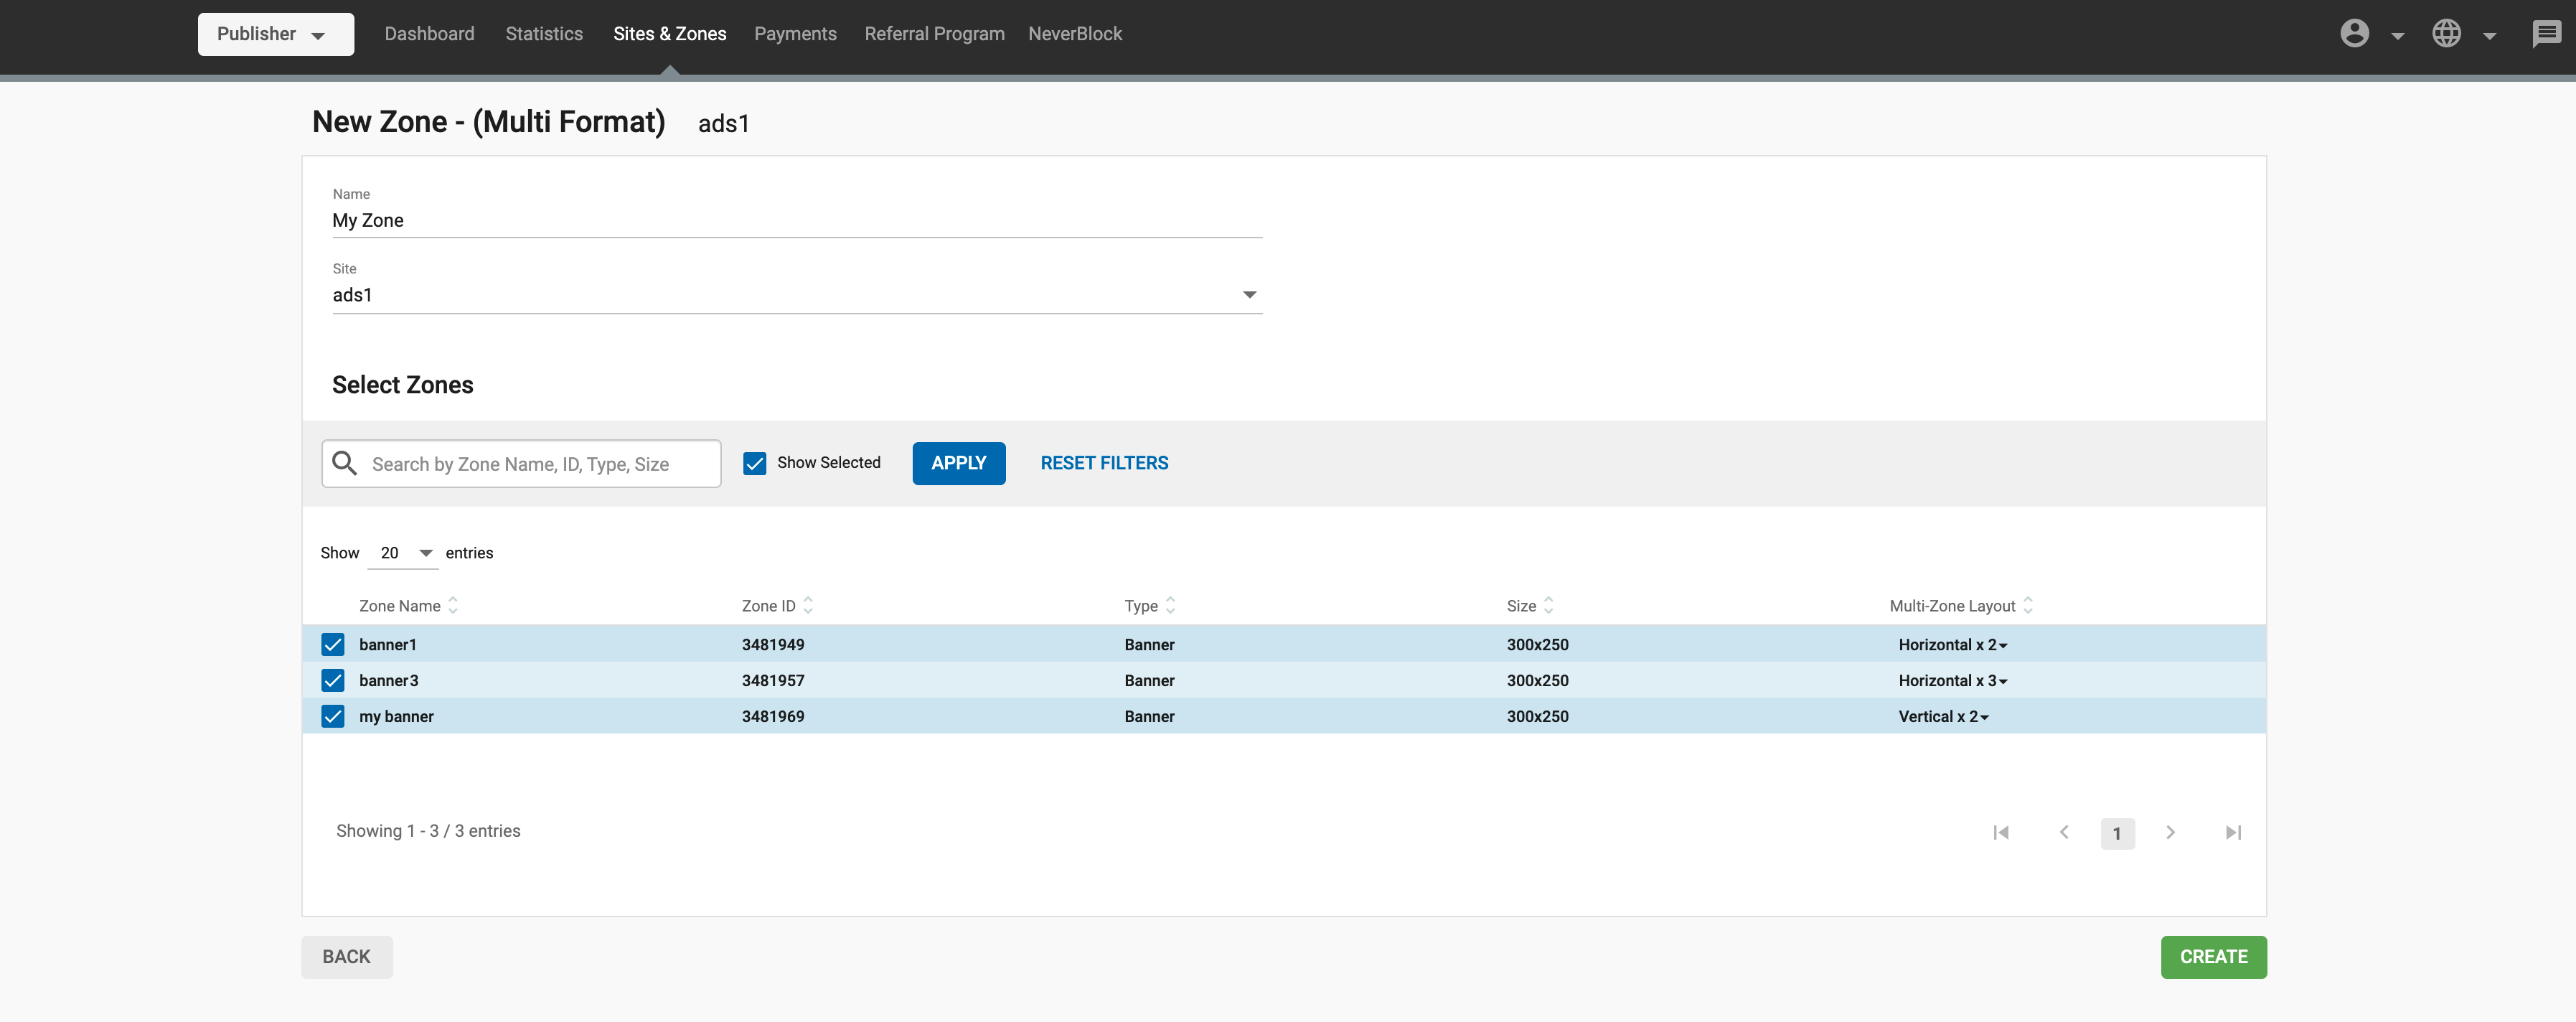
Selecting the layout for your Multi-Format Zone
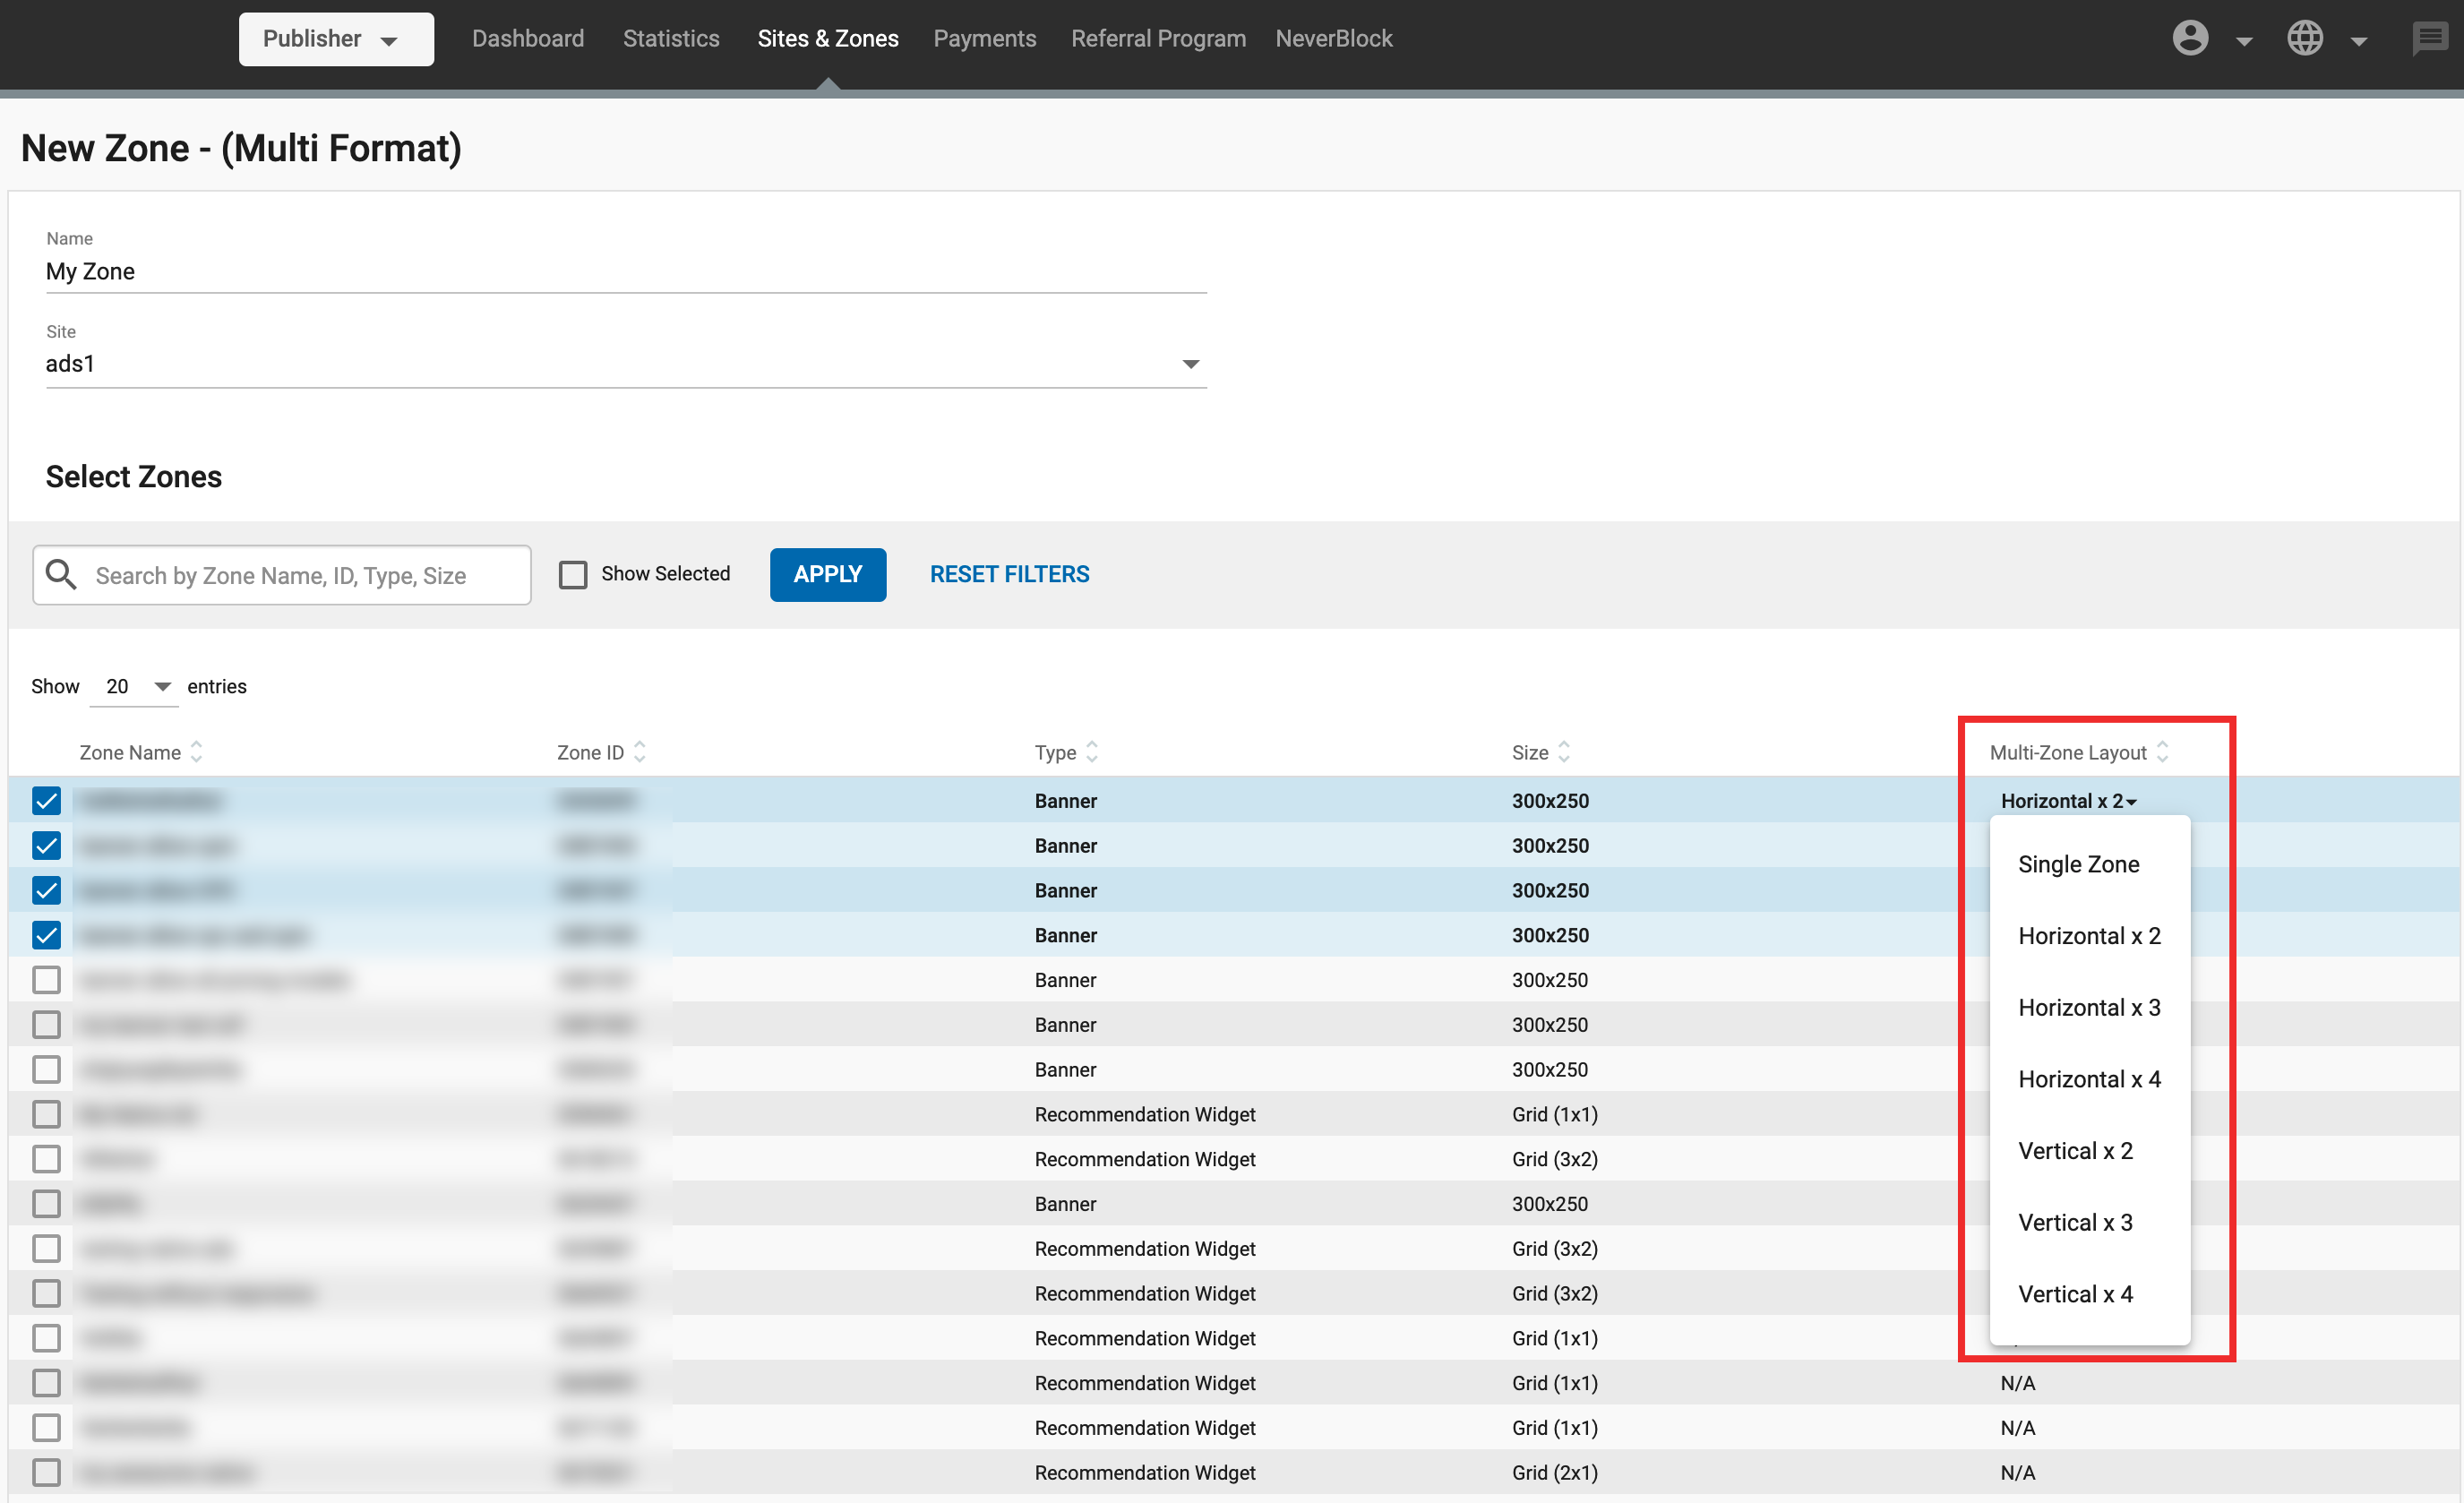
Under the Multi-Zone Layout column, you can choose the layout of the Banner zones that will display in this Multi-Format:
- Single Zone will show the winning banner zone only once in the Multi-Format ad zone.
- Horizontal X will show the winning banner zone X times horizontally (side-to-side).
- Vertical X will show the winning banner zone X times vertically (on top of each other).
Recommendation Widget zones will always have the layout from its corresponding settings, which is why they show N/A in the Multi-Zone Layout column.
Below you will see some Multi-format setup examples
- Example 1:
Three Banner zones competing against each other. The winning one will be displayed only once (Single Zone) and the one that displays will display only once as a Single Zone.
- Example 2:
Same zones as before, but with different layouts. If ‘banner1’ wins, it will be displayed twice horizontally, whereas if ‘banner3’ wins, it will be displayed three times horizontally.
- Example 3:
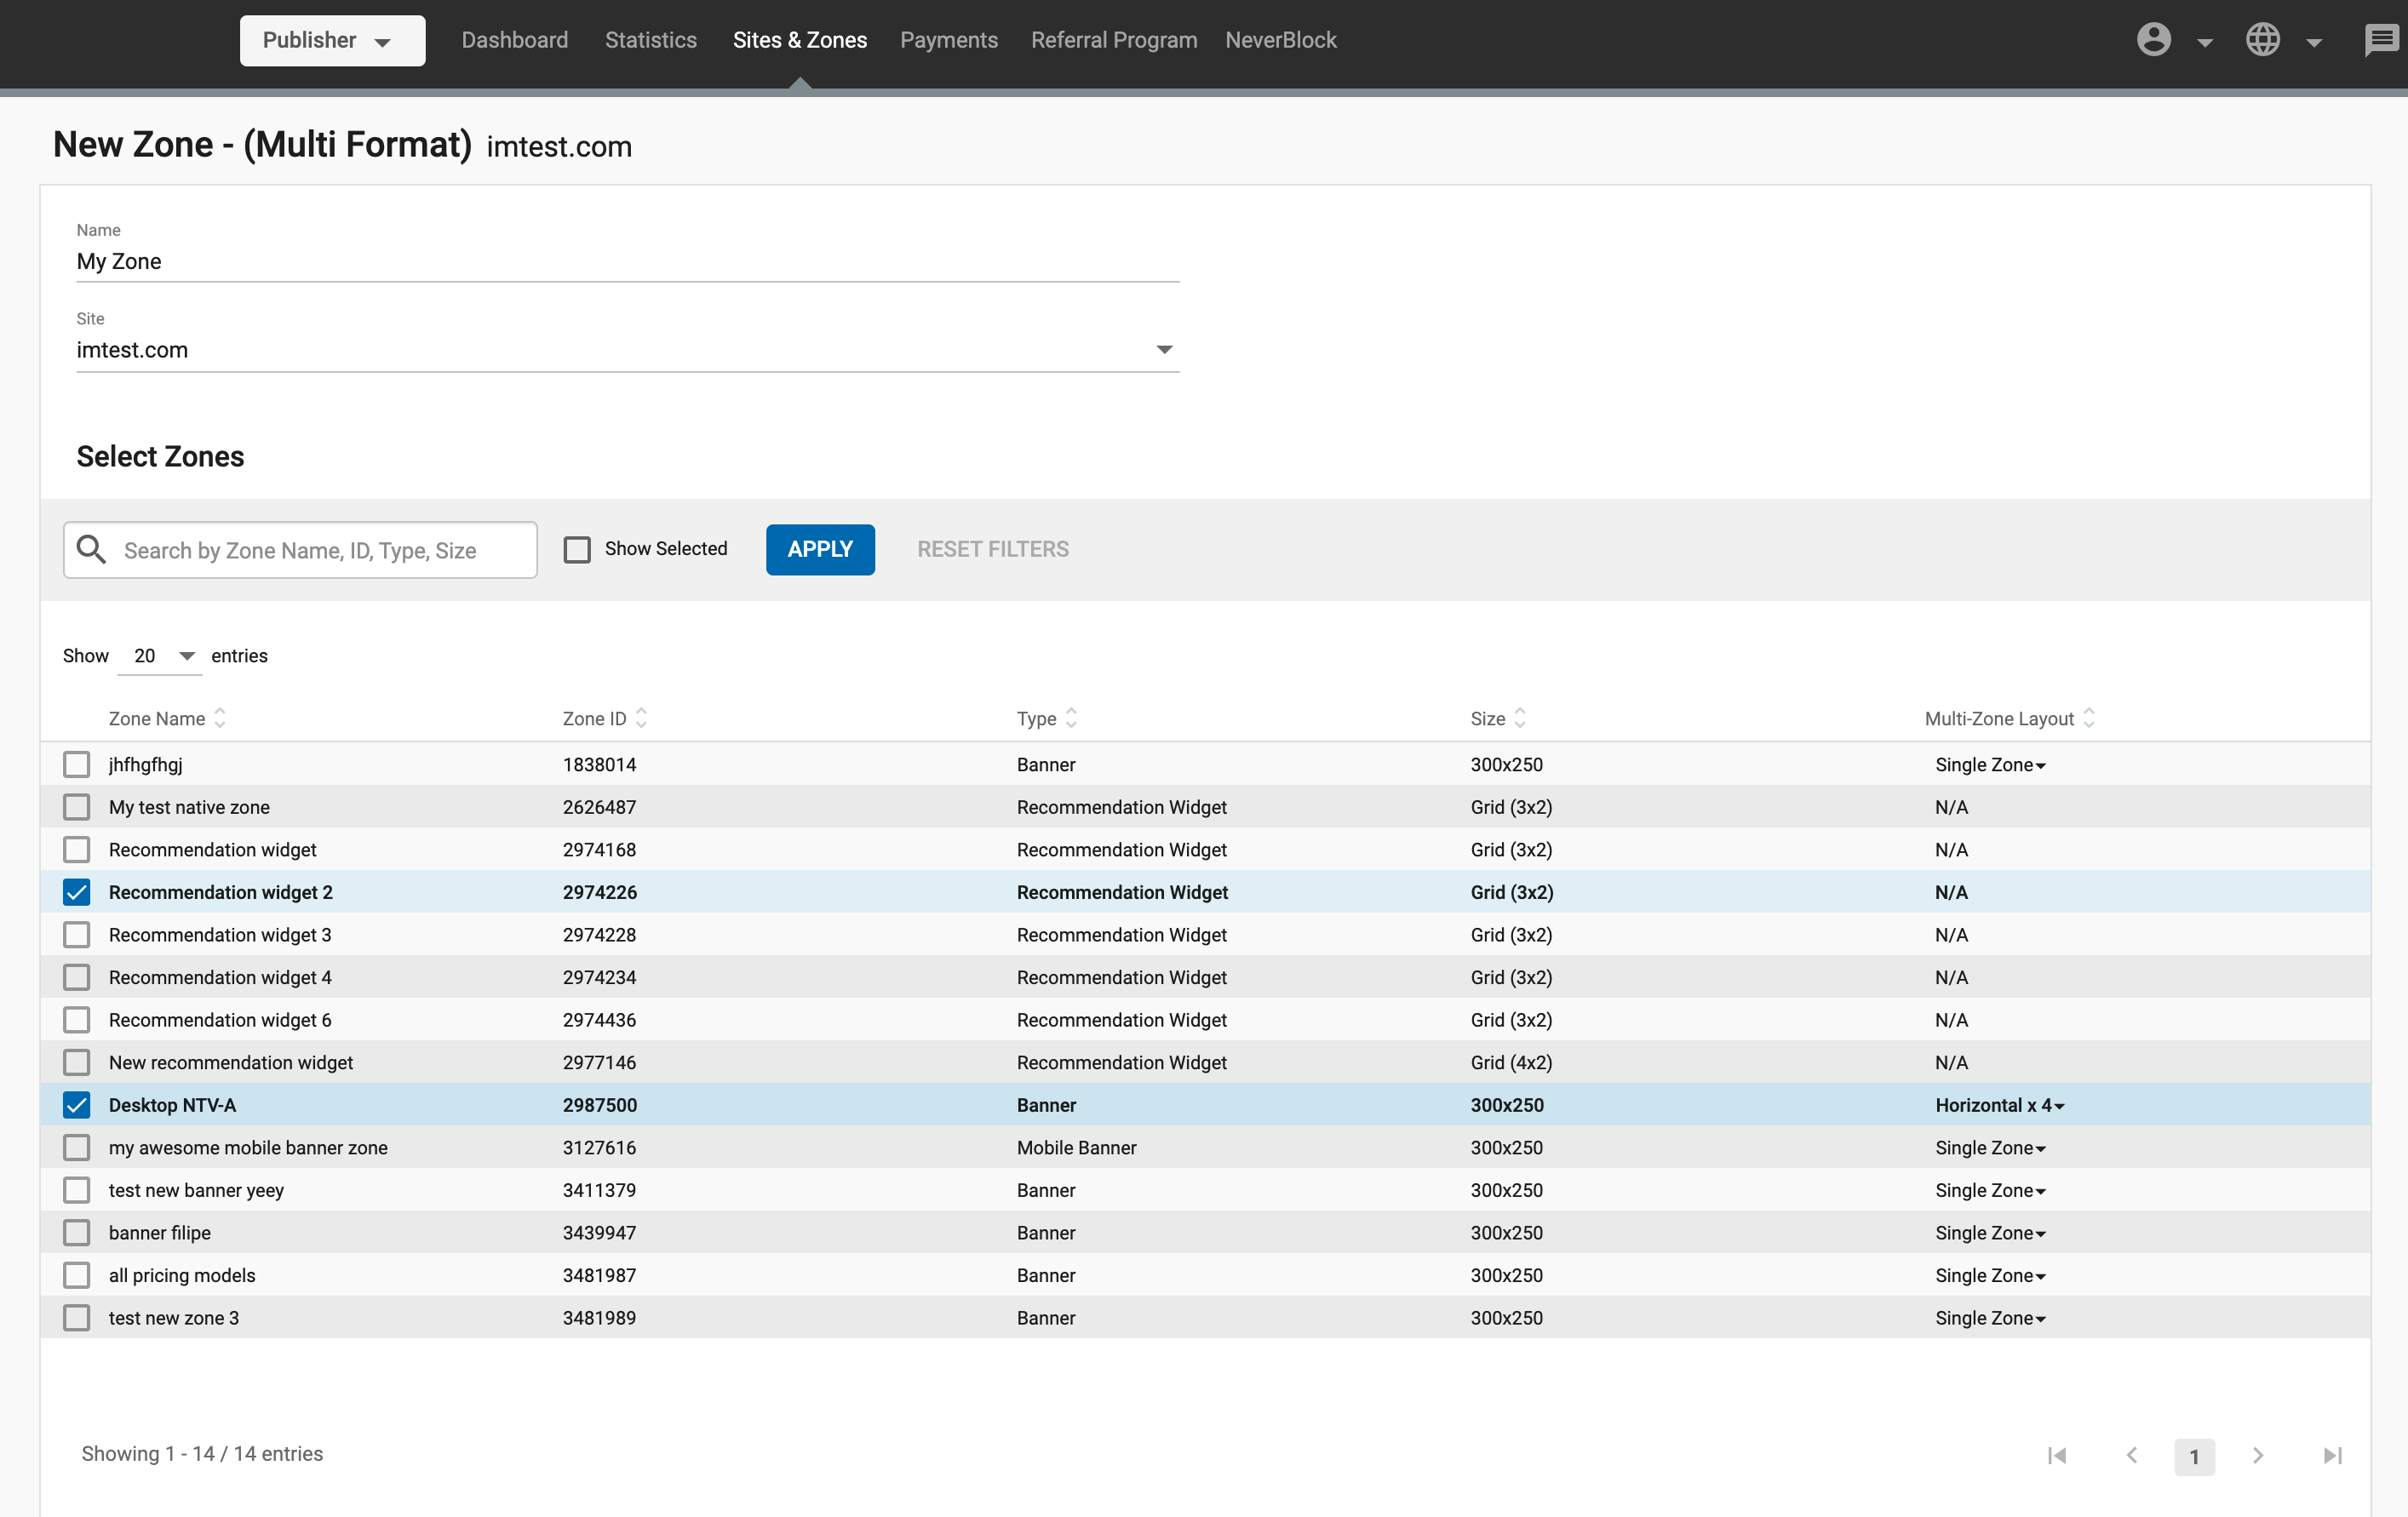
In this case, a Recommendation Widget is competing against a Banner. If the Banner wins, it will be display the amount of times chosen under the Multi-Zone Layout drop-down. If the Recommendation Widget wins, it will just display once, based on the layout of the Widget settings.
How Multi-Format ad zone bidding works
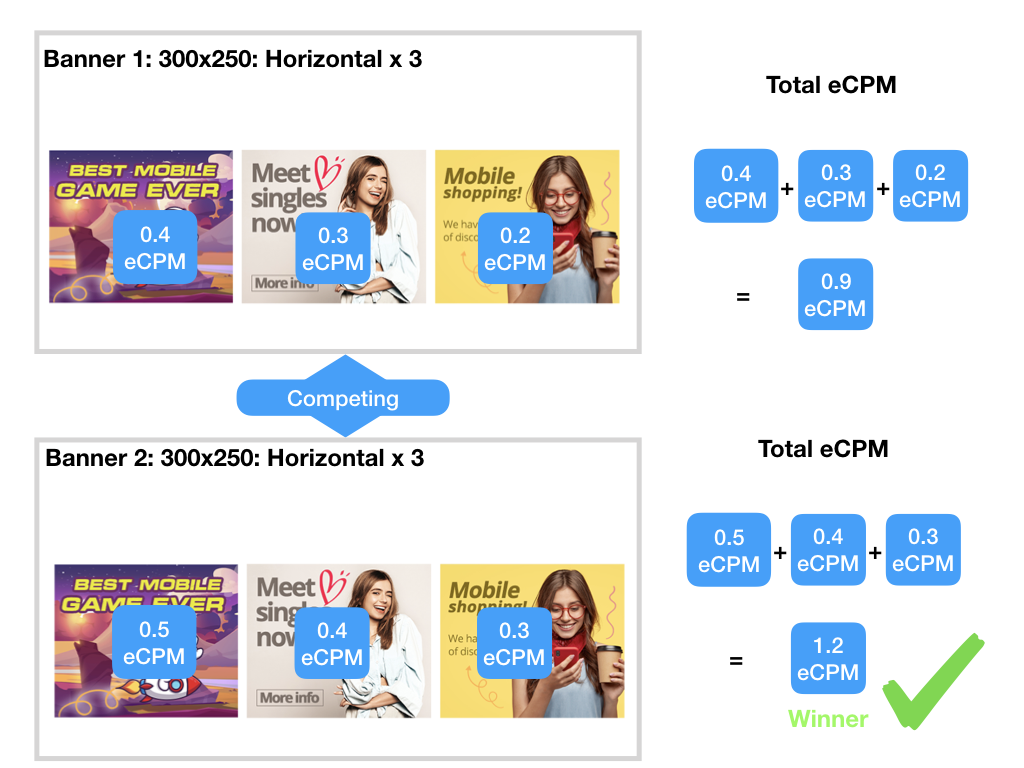
When you choose multiple zones to compete against each other, the zone that shows is the one that gets the highest eCPM price.
- In the case of Recommendation Widget, this eCPM price is the sum of the prices for each ad in the native widget.
- In the case of Banners, when a Multi-Zone layout is used, the eCPM price is the sum of the price for each ad zone in the Multi-Format ad zone. For instance, if you choose select Horizontal x 3, the eCPM price that wins is the sum of the eCPM price for each of the three ad zones that display.
- When a Banner ad zone using one of the Multi-Zone layout wins the bid to display in the Multi-Format ad zone, the ads that display will be the two, three or four ads with the highest eCPM price.
Show Selected only

You can tick the Show Selected checkbox to display only the zones that are running in this Multi-Format.
Additional notes on Multi-Format zones
When creating a Multi-Format zone, we recommend thinking in advance whether this zone will be used in Desktop or Mobile. This is important because wide layouts, such as Horizontal x 3 or Recommendation Widgets with 3 x 1 grids, can appear outside the mobile resolution. Note that Multi-Format only takes into consideration the highest bidder of the competition regardless of the appearance of the ads in the device resolution, so you should consider either having separate zones per device or have a zone layout that will work in all environments.
Also note that, although Ad Refresh does not appear in the Multi-Format settings, it will still apply if all the zones within the Multi-Format have Ad Refresh enabled.
Getting the ad zone code
Once you have filled in the details, click Create.
You will then see the code that you need to use on your site. Code should be placed into the 'body' tag of your site.
Once the code is implemented the traffic should start within a few minutes.

We recommend adding the code exactly as provided in the Admin Panel. Any customizations or alterations in the code could prevent your ad zones from displaying ads correctly.
The following section offers a list of potential "safe" edits in case you need additional features in your code.
Client Hints Meta Tag
Additionally, you have the option to add the Client Hints Meta Tag. This tag should be placed in the ‘head’ of the webpage where this zone is placed. The Client Hints Meta Tag, is required only once per page for each relevant Ad Serving Domain, which is highlighted for you in the implementation instructions.
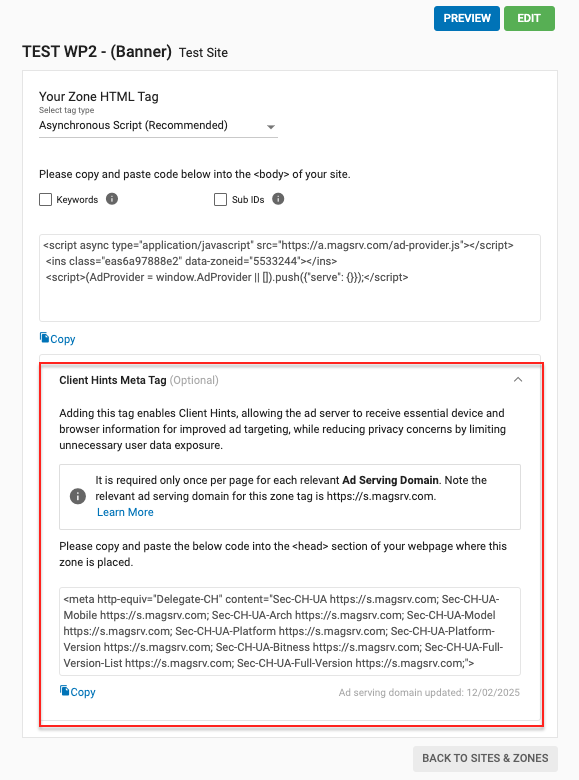
At times, the ad serving domain can change. The date of the last update is displayed under the tag. You should always ensure that the tags on your web pages are updated with the latest ad serving domain.
We recommend adding this tag to the section of the webpage as it ensures effective communication with the ad server using Client Hints. Client Hints allow the browser to selectively provide certain information about the device and environment, such as device type, browser name, version, and platform. By using Client Hints, publishers can enhance the accuracy of device detection, leading to better ad targeting and a more personalized user experience.
This approach directly addresses privacy concerns. Instead of exposing detailed user-agent strings, Client Hints offer a more privacy-conscious way to communicate essential information. As a result, advertisers and publishers can access just the necessary data to optimize ad delivery, without gathering excessive user information that may raise privacy issues. Thus, implementing this tag supports both effective ad serving and user privacy compliance.
Optional code changes for enhanced ad zone performance
Adding Tags/Keywords
In many cases your URL will not match a category precisely. In these cases, you can insert "tags" into the code in your ad zones to manually match them to the type of advertising you want.
For example, you could insert the tags 'games' and 'dating' into your ad zone code, to ensure that you receive this type of advertising.
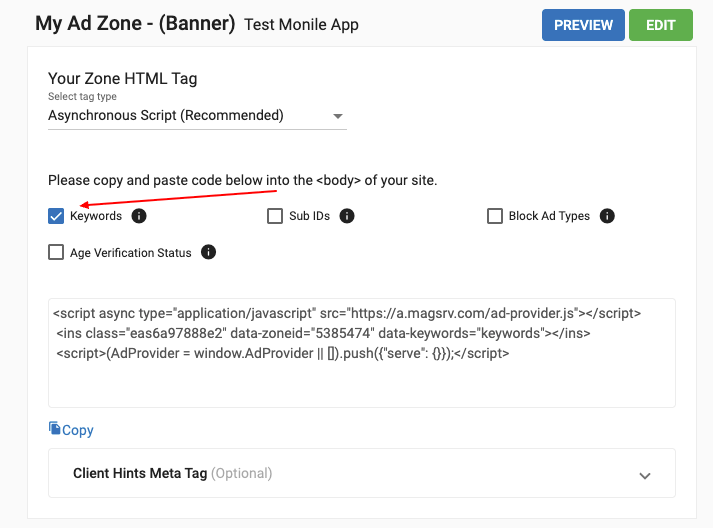
Note: It is highly recommended that each time you update your content, you adjust the keywords for the ad zone in order to continue receiving high demand for your contextual ad zones.
Find out more about adding tags here.
Adding Sub IDs
You can add Sub IDs to the ad zone code to segment the traffic even further, e.g: by traffic source.
This information will then be displayed in the Statistics tab, under the Sub IDs sub-tab.
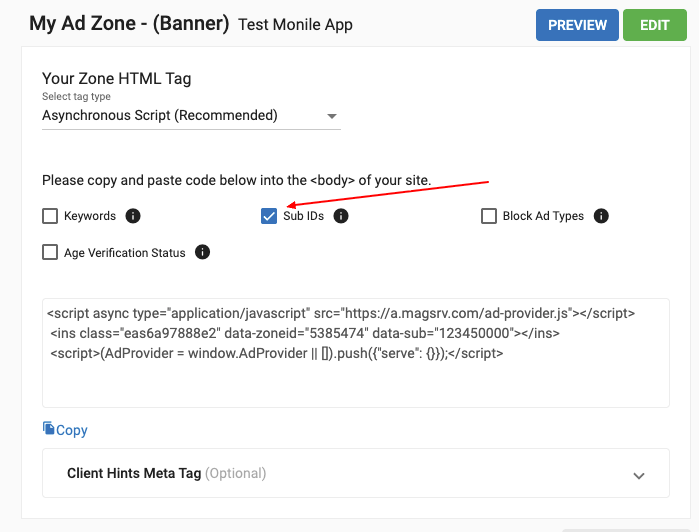
Find out more about using Sub IDs here.
Block Ad Types
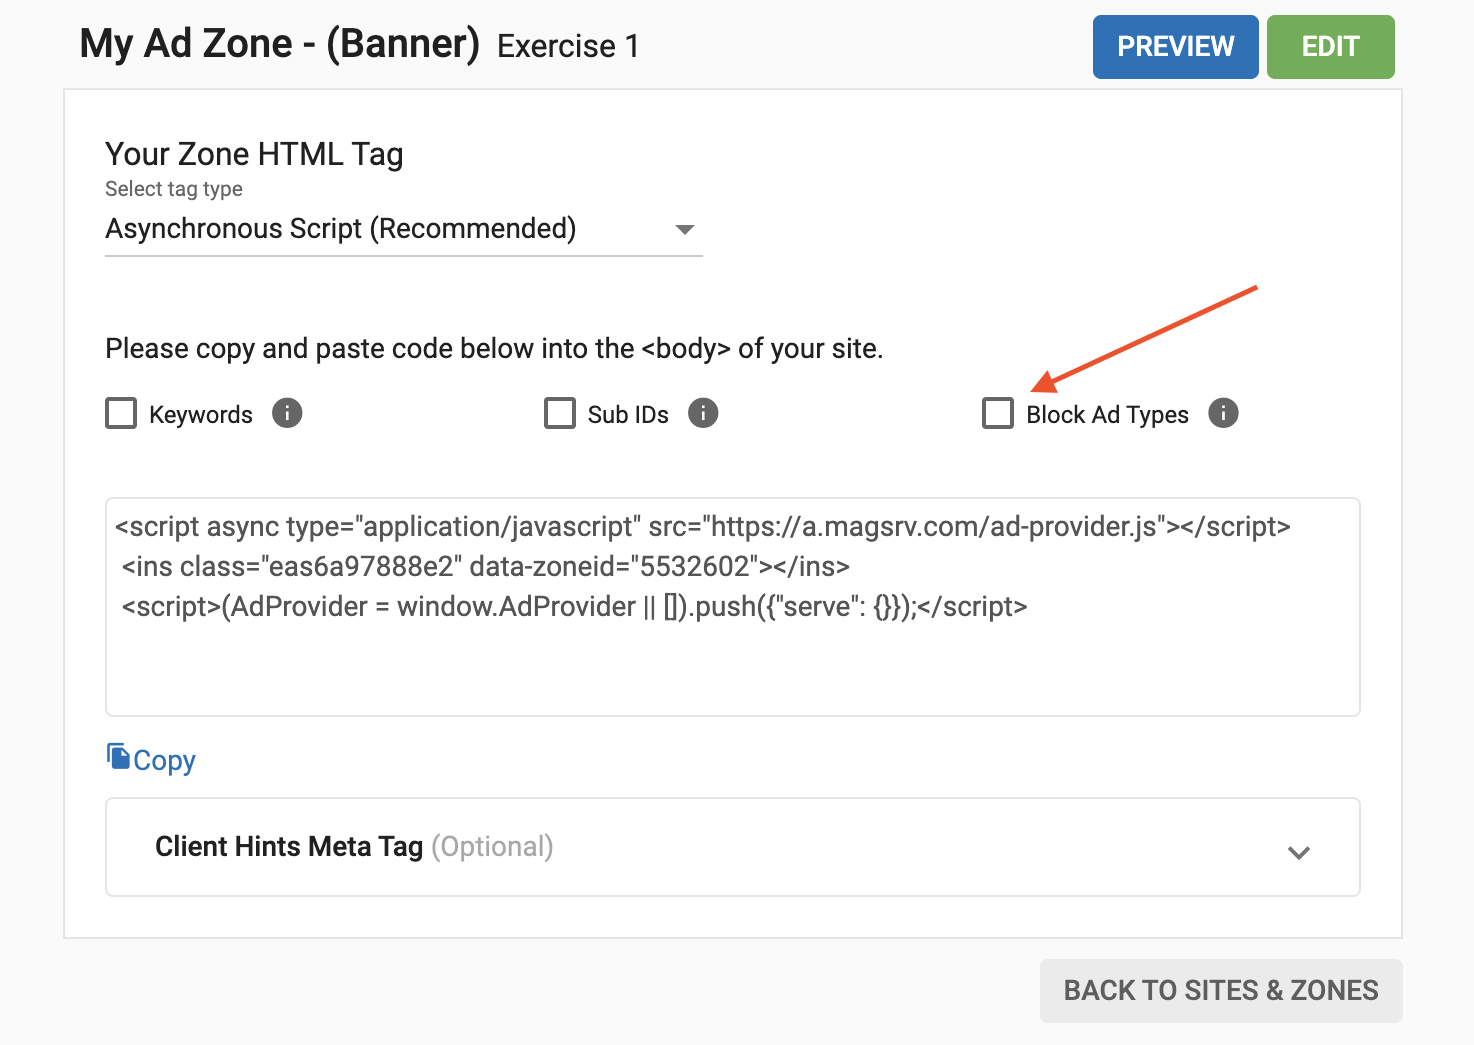
Checking this box will add a sample code snippet (data-block-ad-types="ad-type") to your zone tag. You can use this to prevent certain kinds of ads from appearing in your ad zone. For instance, if you use data-block-ad-types="banners-video", you will block video banners from being displayed.
Age Verification Status
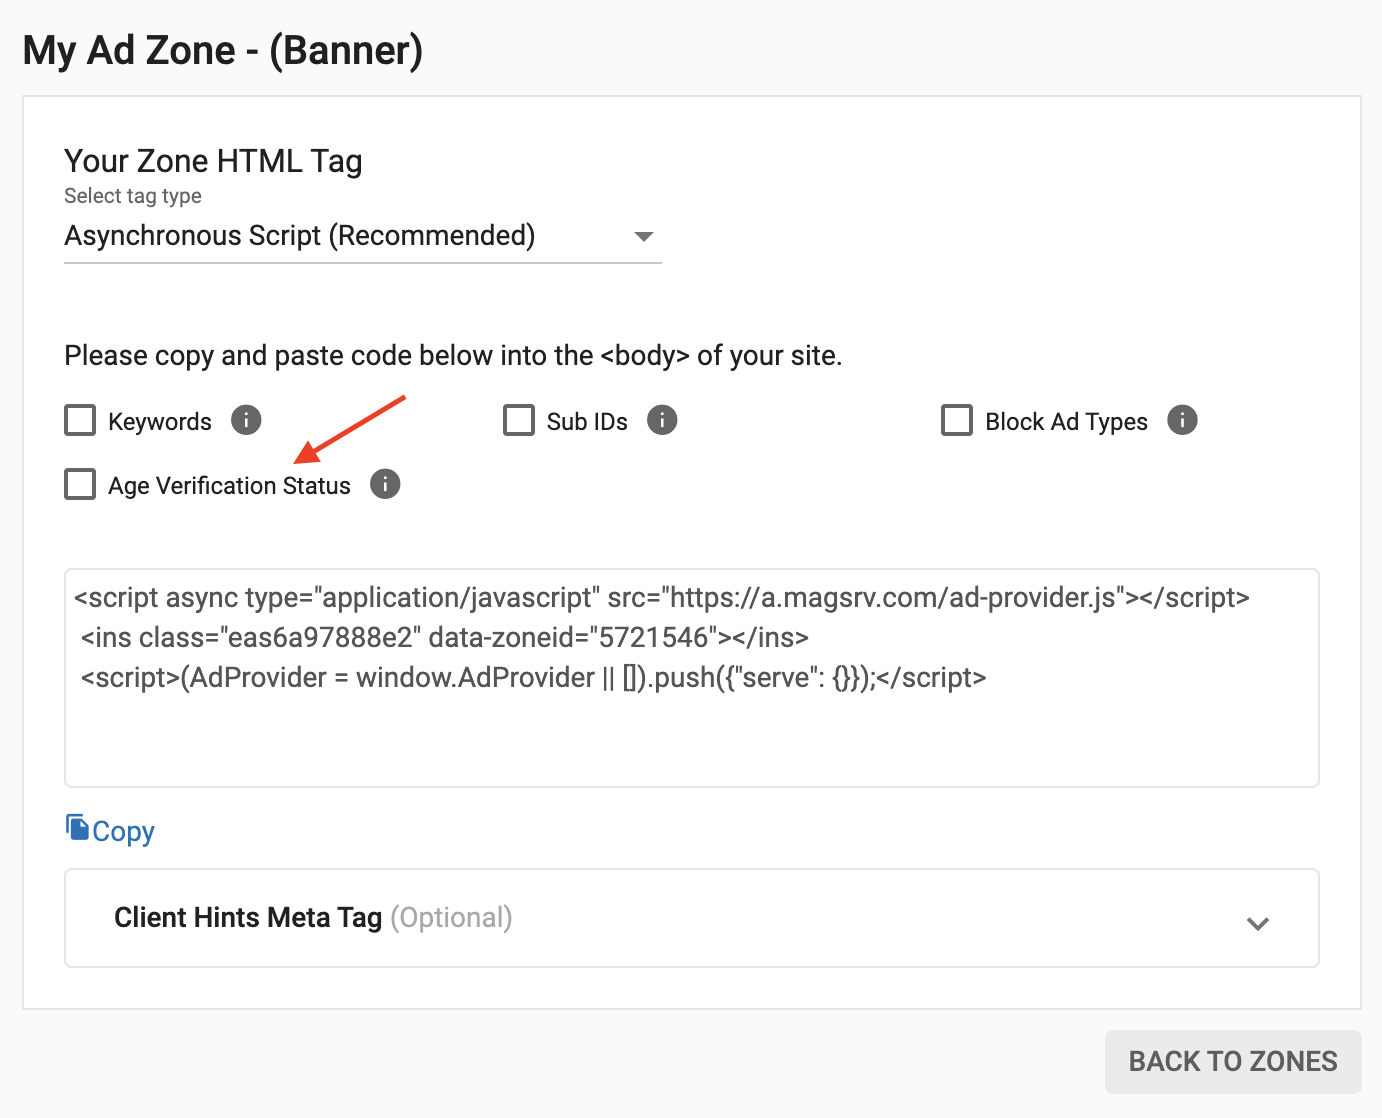
Checking this box will add a sample Age Verification Status data-ex_av="name" to your zone tag. This helps advertisers target users based on age verification status.
For a practical example of how to use this feature, see our AgeGO guide.
Adding multiple Zone IDs to the Asynchronous Script
When creating a zone that uses the asynchronous ad tag, such as a Banner or a Native zone, you can use this tag to ensure that zones are loaded on to the page asynchronously. This means that other content will be able to load while the ads are loading and also can be used to place multiple zones on the same page.
To use the script for a single zone, simply copy the code onto your site as usual.
<script async type="application/javascript" src="https://a.magsrv.com/ad-provider.js"></script>

 <ins class="eas6a97888e" data-zoneid="123456"></ins>

 <script>
(AdProvider = window.AdProvider || []).push({"serve": {}});
</script>
To use the script for multiple zones, copy the code onto your site and repeat the middle section for each zone you wish to put on the page. Replace the data-zoneid with the id for these existing zones (e.g. 111, 222, 333):
<script async type="application/javascript" src="https://a.magsrv.com/ad-provider.js"></script>

<ins class="eas6a97888e" data-zoneid="111"></ins>
<ins class="eas6a97888e" data-zoneid="222"></ins>
<ins class="eas6a97888e" data-zoneid="333"></ins>

 <script>
(AdProvider = window.AdProvider || []).push({"serve": {}});
</script>
Callback Function for Asynchronous Scripts
We don't track visibility for our Asynchronous Tags out of the box at the moment. However, it is possible to create a callback function based on our ad snippet, like lazyLoadAd in the example below.
This function can then be used in a callback to display the ad when the visibility detection code triggers an event.
<script async type="application/javascript" src="https://a.magsrv.com/ad-provider.js"></script>
<div id="banner1"></div>

<script>
    // Function to add individual ad to page at any time
    function lazyLoadAd() {
        let container = document.getElementById("banner1");
        container.innerHTML = "<ins class=\"eas6a97888e\" data-zoneid=\"12345\"></ins>";
        (AdProvider = window.AdProvider || []).push({"serve": {}});
    }

    //This visibility detection code is provided as an EXAMPLE and may be incompatible with some browsers.
    function respondToVisibility(element, callback) {
        let options = {
            root: null,
        };

        let observer = new IntersectionObserver((entries, observer) => {
            entries.forEach(entry => {
                callback(entry.intersectionRatio > 0, observer);
            });
        }, options);
        observer.observe(element);
    }

    let elementToObserve = document.getElementById("banner1");
    //This is supposed to check when banner1 div enters the current viewport
    respondToVisibility(
        elementToObserve,
        function (isVisible, observer) {
            if (isVisible) {
                lazyLoadAd(); // actual loading of ad called
                observer.unobserve(elementToObserve);
            }
        }
    );
</script>
Adding Email Passing to Asynchronous Scripts
Asynchronous scripts support the el parameter, which returns the Base64-encoded email of the user, as in this example:
<script async type="application/javascript" src="https://a.magsrv.com/ad-provider.js"></script>

 <ins class="eas6a97888e" data-zoneid="1234567"></ins>

 <script>
(AdProvider = window.AdProvider || []).push({"serve":  {"el": "dGVzdEBleGFkcy5jb20="}});
</script>
Using Trigger Classes

Some ad formats require a clickable element in order to be triggered:
- Popunder/Mobile Popunder
- Desktop Fullpage Interstitial/Mobile Fullpage Interstitial
Triggers can be any clickable element or elements with specific classes. When choosing the right class to trigger, make sure it does not interfere with any other advertising you may have on your site (e.g: setting a Popunder to trigger in the same class as a player with an In-Stream ad). Doing so might prevent your clicks from being attributed to the corresponding ad or decrease the quality of your clicks.
Desktop vs Mobile Popunder
You will see Desktop and Mobile Popunders as separate ad formats in the Admin Panel. However, they use the exact same ad zone code, meaning that Mobile Popunder ad zones can trigger in Desktop and vice versa.
If you want to deliver all your popunder traffic through one zone only, you can do so with either of the two popunder formats. However, if you want to offer separate device traffic, then please make sure that each popunder zone has a separate trigger, otherwise both popunder zones will trigger at the same time.
Adding Display Notification Events for Fullpage Interstitials
Once you have created your zone, you can add an event listener to catch the event ‘creativeDisplayed’. This event is suffixed with a zone id that is triggered when the ad is displayed to the user.
By adding an event listener to the event ‘creativeDisplayed’, you are able to programmatically execute any action you may need on your website, such as pause a playing video when the Fullpage Interstitial is being displayed to the user.
Find out more about adding Display Notification Events for Fullpage Interstitials here.
Adding Tokens to Fallback
You can click +Add Tokens to add dynamic tokens to the fallback URL or HTML, for items such as {country}, {sub} or {keyword}.
Available dynamic tokens
| Token | Explanation |
|---|---|
| {category_id} | The ID of the category detected. |
| {country} | The 3-character country code of the visitor. |
| {email_encoded} | Used to insert the emails of logged-in users. |
| {format} | The ad format size. Example: 300×250. |
| {keyword} | The keyword that was matched in case of targeting specific keywords. This will be empty if there is no match. |
| {language} | The language of the visitor. |
| {site_id} | The ID number of the site where the ad is displayed. |
| {src_hostname} | Your site name without HTTP protocol at the beginning (e.g. examplesite.com). |
| {sub} | Your Sub ID. |
| {tags} | The list of keywords that have been identified for that ad impression. |
| {time} | The timestamp, which is used as a cache buster. |
| {url} | The full URL of the site that you submitted to the Admin Panel for displaying ads (e.g. https://examplesite.com). Note: This token will not display the URL where the ad was displayed to the user; only the URL that is registered in our platform. |
| {zone_id} | The ID of the ad zone where the ad is displayed. |
The following tokens are exclusive to Native Ads. Note that they can be used for display purposes only, meaning that they will not be sent to any href or iframe src elements.
| Token | Explanation |
|---|---|
| {browser} | The browser being used by the visitor. |
| {carrier} | The carrier to which the visitor is connected to. |
| {city} | The city in which the visitor is in. |
| {country_name} | The 3-character country code of the visitor. |
| {device} | The device which the visitor is using. |
| {language name} | The language of the visitor. |
| {operating system} | The operating system being used by the visitor. |
| {region} | The region in which the visitor is located in. |
Reasons why ads are not displayed in your ad zones
Once you have created your ad zone, it should start showing ads immediately. However, if you are not getting any ads, then please consider the following:
- Since our ads are geo-targeted, sometimes there might not be any ads available to run in the user-environment from where you are accessing your site. If possible, check from a different device/country or wait a few hours to see if new ads come into rotation.
- Rejected sites won't display any ads.
- Any modifications to the ad zone code could prevent the ad-serving script from working as expected. Note that certain 3rd-party scripts or plugins (such as Cloudflare's Rocket-load) You didn't implement the ad code correctly, or you modified it. Please check your source code to make sure you followed all the steps correctly.
- Blocking too many labels under the Filter Ads section could reduce the amount of ads available to target your site. Here is an example:
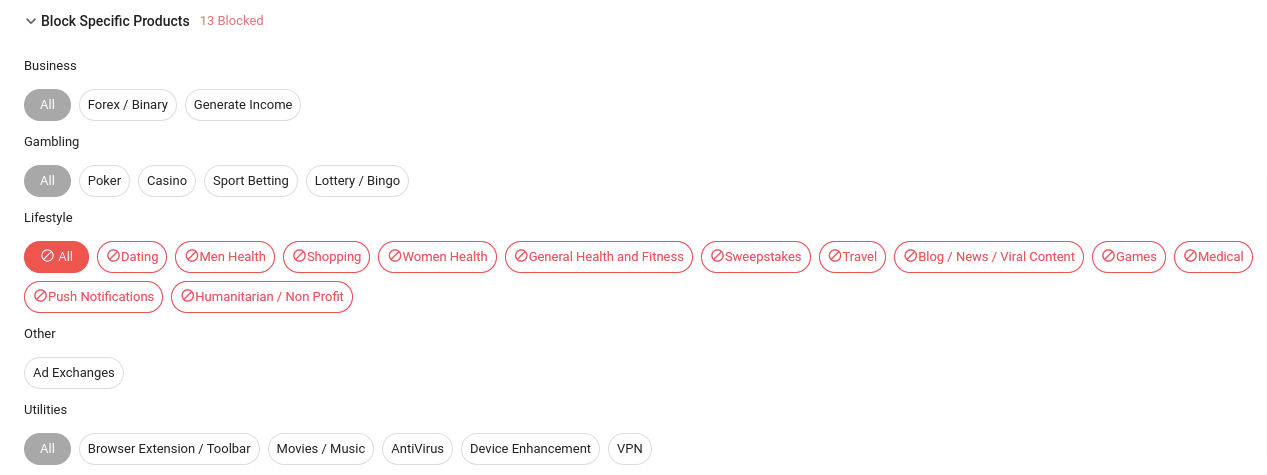
If your site is labeled as Entertainment & Lifestyle but you block all lifestyle-related product from the ad zone, then chances are your ad zone will always be blank.
If your ad zone is not displaying any ads for reasons other than the above, please reach out to your account manager or contact our Customer Success team.