Como acompanhar as conversões com o Skro
*Ce guide est uniquement destiné à Skro. Si vous souhaitez connaître les étapes génériques pour le suivi S2S, veuillez consulter la Section Announcers.
Este guia é composto por duas secções:
a) Como configurar o controlo de conversões no Skro. Esta secção centrar-se-á em saber como configurar o URL de retorno no Skro, como notificar as conversões ao Skro e como apresentar essas conversões no Skro e na ExoClick.
b) Como integrar a Exoclick no Skro via API. Esta secção vai mostrar como editar as campanhas da ExoClick a partir do Skro e como fazer corresponder os custos das suas campanhas em ambas as plataformas.
Se pretender receber informações adicionais, consulte o guia de integração do Skro
Como configurar o acompanhamento de conversões no Skro
Passo 1: Criar o ID do objetivo para o URL de postback
Inicie sessão no Painel de Administração da ExoClick e aceda a Campanhas > Acompanhamento de conversões. Isto permite-lhe criar o código de acompanhamento de conversões a ser utilizado no seu postback URL:

Clique em "Novo objetivo de conversão". Existem vários campos que deve preencher:
- Nome: O nome que pretende dar à sua conversão.
- Tipo de conversão: O tipo de ação ou oferta que está a ser rastreada através desta conversão.
- Valor de conversão: O método com o qual irá controlar o pagamento das suas conversões. Existem três opções:
- No Value: o valor é 0
- Corrigido: determina o pagamento da conversão manualmente ao definir o objetivo.
- Dinâmico: o valor do pagamento será passado através do URL de Postback. A transmissão de valores dinâmicos será explicada em pormenor mais adiante neste guia.
- Ordem: utilizada para organizar os diferentes objectivos que criou na sua conta. Se tiver criado vários Objectivos de conversão, a Ordem irá ajudá-lo a organizar a forma como estes objectivos são apresentados nas suas Estatísticas e na Lista de campanhas.
Depois de ter adicionado todos estes campos, clique no botão "Criar". O painel de administração apresentará a estrutura do URL de postback, bem como o ID do objetivo correspondente ao objetivo que acabou de criar. Deve ter um aspeto semelhante a este:
http://s.magsrv.com/tag.php?goal=66a8605e6cce49fbb8056f273f8e1a2e&tag=
Também pode consultar a nossa página Acompanhamento de conversões para obter mais informações sobre o nosso processo de criação de objectivos.
Passo 2: Adicionar a ExoClick como fonte de tráfego no Skro e configurar o Postback
Para acompanhar as conversões na ExoClick, terá de adicionar ao URL da sua campanha um rastreador dinâmico chamado {conversions_tracking}, que identifica cada conversão de forma única.
Deve armazenar este tracker no Skro e fazê-lo notificar o servidor da ExoClick cada vez que um utilizador gera uma conversão. Isto é feito muito facilmente configurando a ExoClick como fonte de tráfego, utilizando o modelo pré-definido. Para o fazer:
- Inicie sessão no seu painel de controlo Skro.
- Clique no separador "Traffic Sources " e, em seguida, clique em "+Create ".
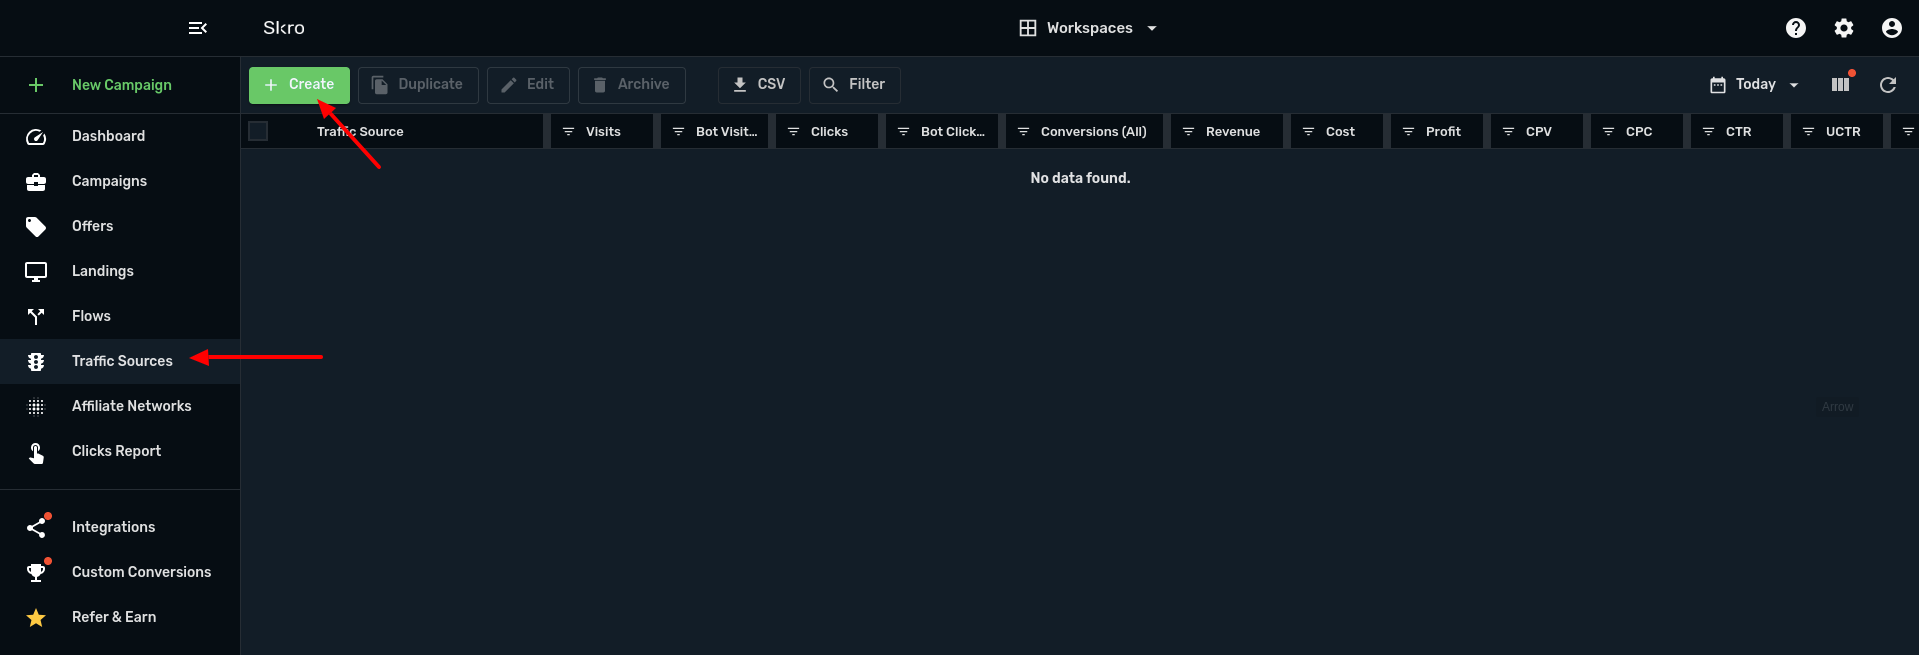
- Selecione ExoClick na lista de modelos. O Skro irá preencher previamente todas as definições da fonte de tráfego.
- Na secção "Traffic Source postback URL" (URL de postback da fonte de tráfego), cole a estrutura do URL de postback que copiou do painel de administração na ExoClick.
- Substitua {conversions_tracking} por {externalId}. O seu URL de postback deve agora ser parecido com o seguinte:
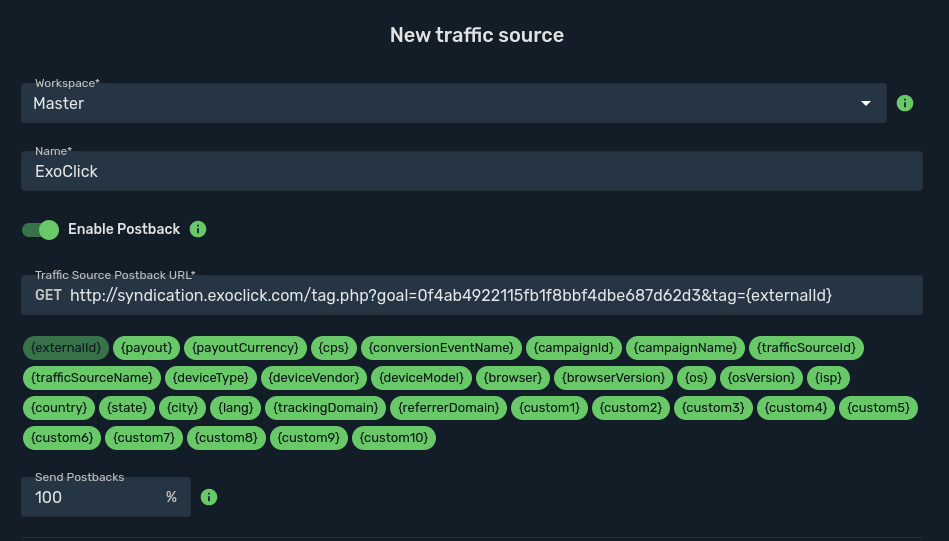
Nota: Se selecionou o valor "Dinâmico" ao criar o seu objetivo de Conversão PASSO 1, então deve adicionar value={payout} no final do URL de postback. Neste caso, o seu URL de postback será parecido com o seguinte:
http://s.magsrv.com/tag.php?goal=66a8605e6cce49fbb8056f273f8e1a2e&tag={externalId}&value={payout}
- Clique em "Criar" para guardar o postback.
Passo 3: Adicionar uma fonte de rede de afiliados ao Skro (opcional)
Se não estiver a utilizar uma Oferta de uma plataforma de Afiliados, por favor, salte para Passo 4
- Clique no separador "Redes de afiliados " e, em seguida, clique em "+Criar":
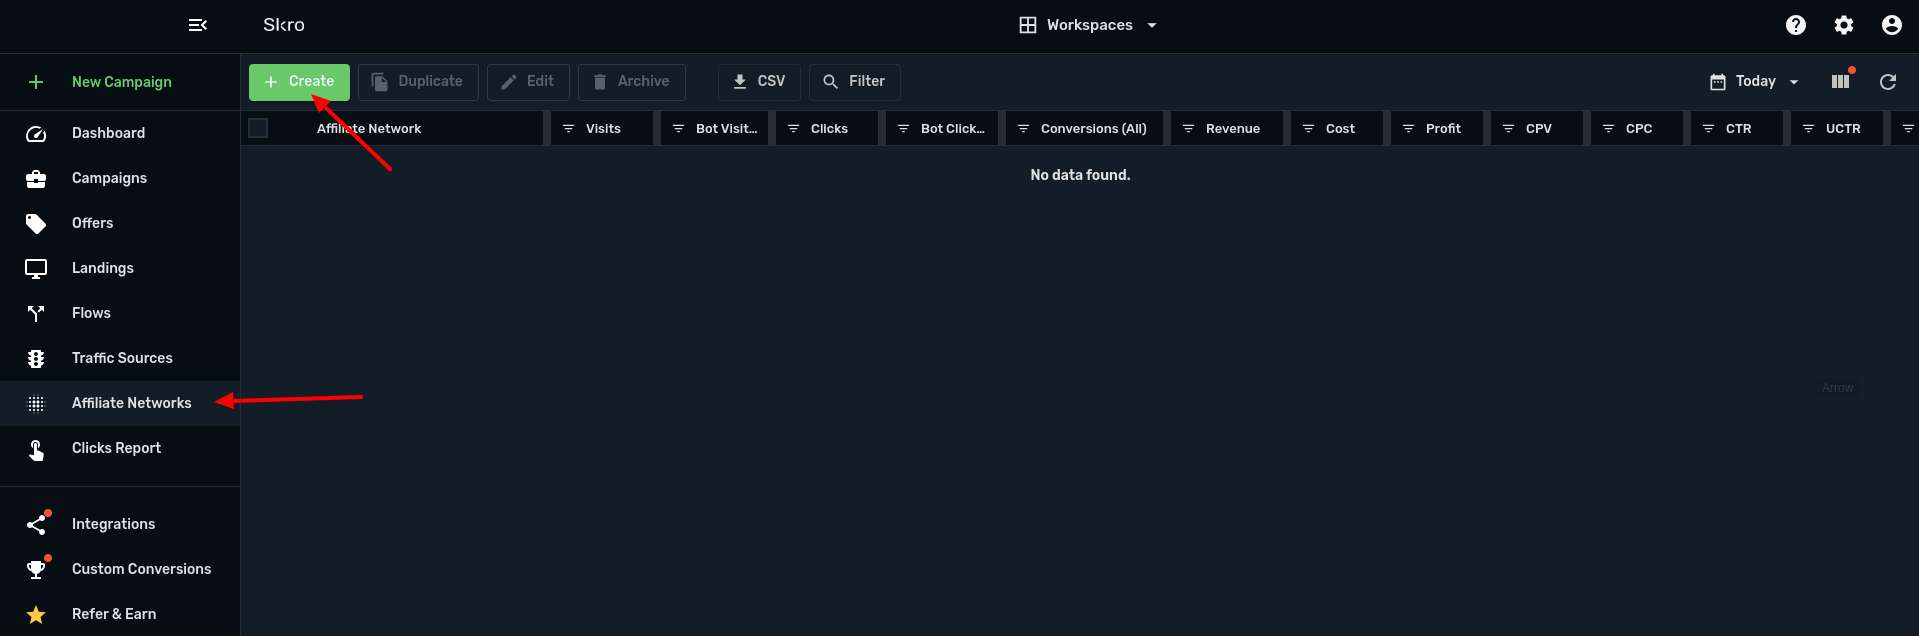
- Selecione uma Rede de afiliados na lista. Se a sua rede de afiliados não estiver na lista, pode definir manualmente as definições da sua plataforma de afiliados clicando em "Criar personalizado ".
- Copie o URL de postback fornecido pelo Skro e cole-o nas definições da rede de afiliação que está a utilizar. O URL de postback conterá os tokens necessários à sua plataforma de afiliação.
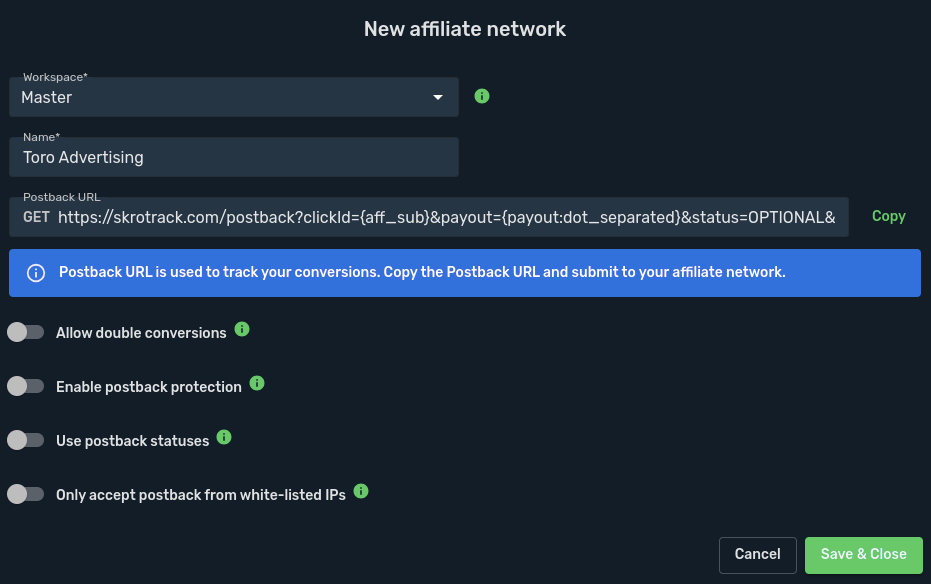
Nota: Lembre-se que o URL de retorno que vê aqui corresponde à plataforma de afiliação. Este não é o mesmo URL de postback que utilizou nas definições da Fonte de Tráfego.
Clique em "Guardar e fechar " para concluir o processo.
Passo 4: Adicionar uma oferta ao Skro
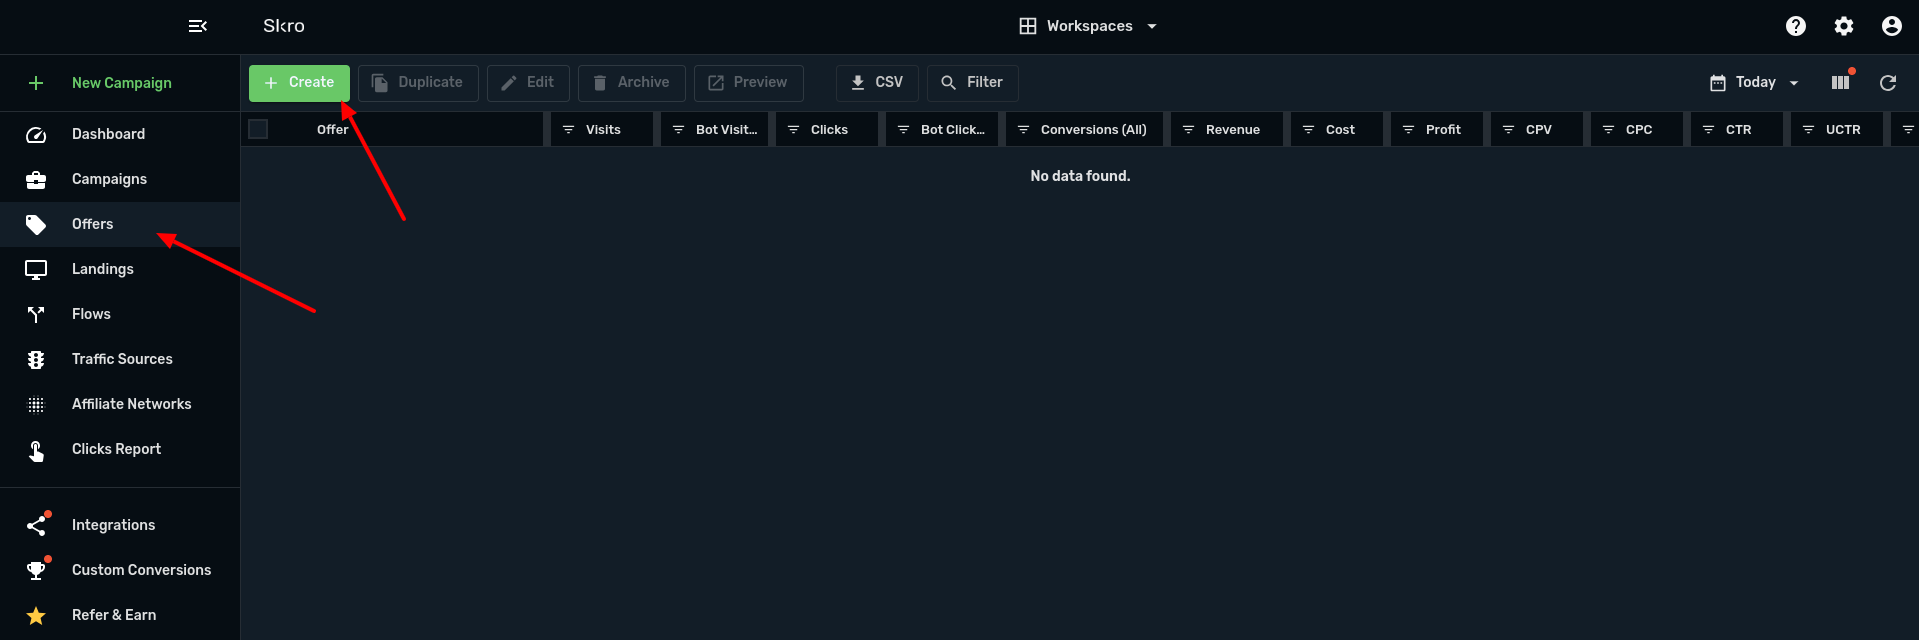
- Clique no separador "Ofertas " e, em seguida, clique em "+Criar".
- Adicione um "Nome da oferta" e o URL da oferta.
Por exemplo
http://mypage.com/?a=14030&c=64375&s1=
Se tiver adicionado uma Rede de afiliados, selecione-a aqui. Os parâmetros da rede de afiliados serão inseridos no URL da oferta
Por fim, na secção "Pagamento ", mantenha a opção "Automático" se a sua plataforma de Afiliados puder receber pagamentos dinamicamente através do postback. Caso contrário, clique em "Manual" e adicione o valor do Pagamento.
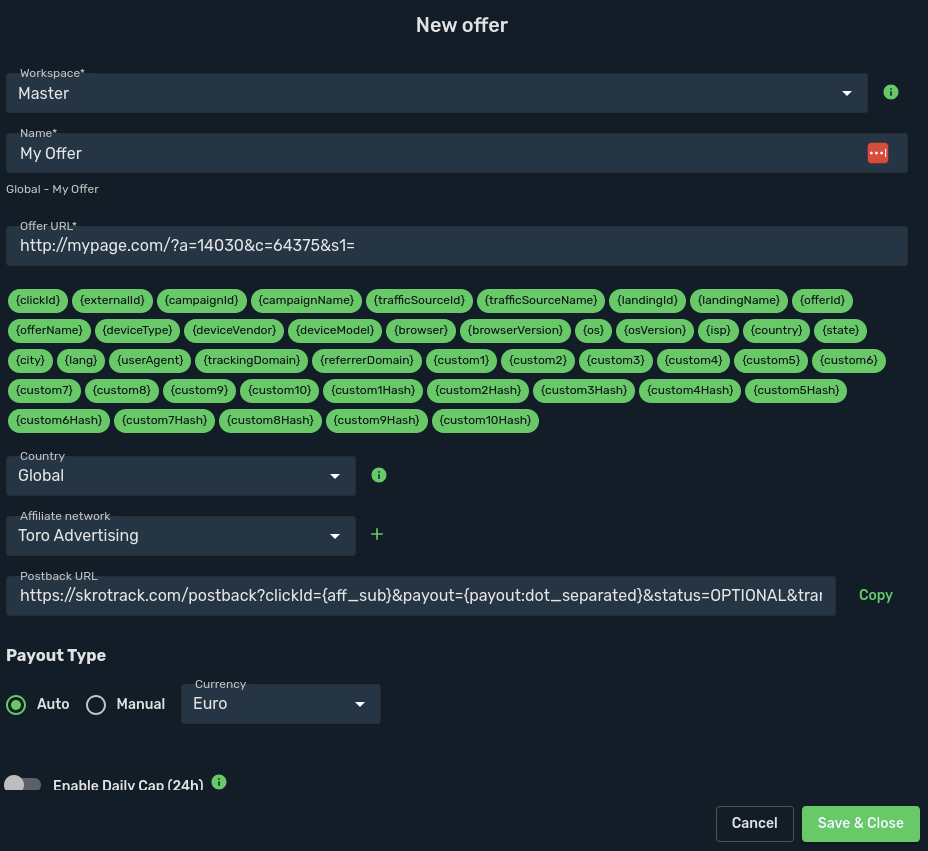 Once you are done with the Offer settings, click "Create offer".
Passo 5: Criar uma campanha no skro
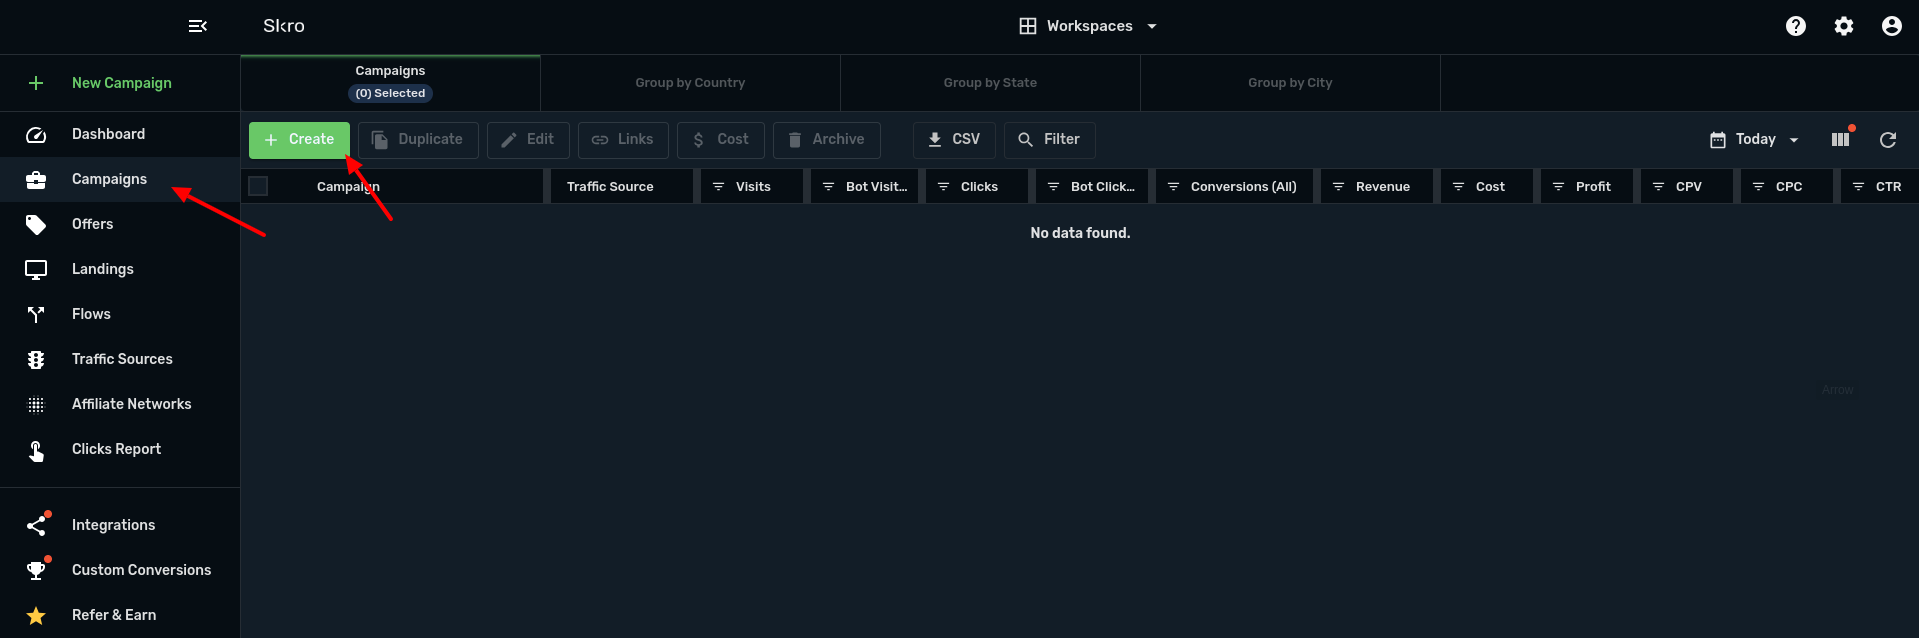
Quando estiver pronto para criar uma campanha, clique no separador "Campanhas " e, em seguida, clique em "+Novo".
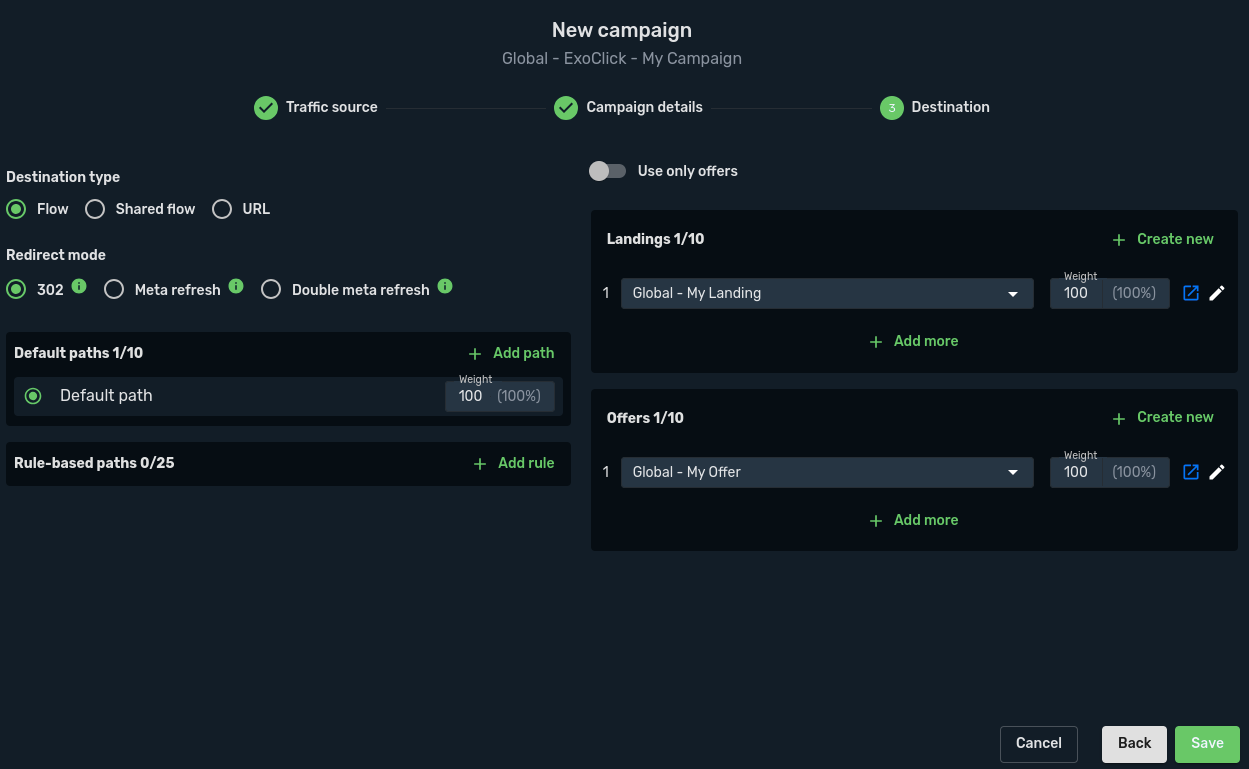
Para criar a campanha, siga estes passos:
- Selecione ExoClick como Fonte de tráfego e "Auto" como Modelo de custo. Certifique-se também de que escolhe a moeda correta.
- Escreva seu Nome da campanha. Skro também recomenda adicionar um domínio de rastreamento personalizado em vez do padrão para evitar problemas com ferramentas antivírus.
- Adicione os últimos pormenores da campanha (tipo de destino, oferta, etc.) e clique em "Guardar "
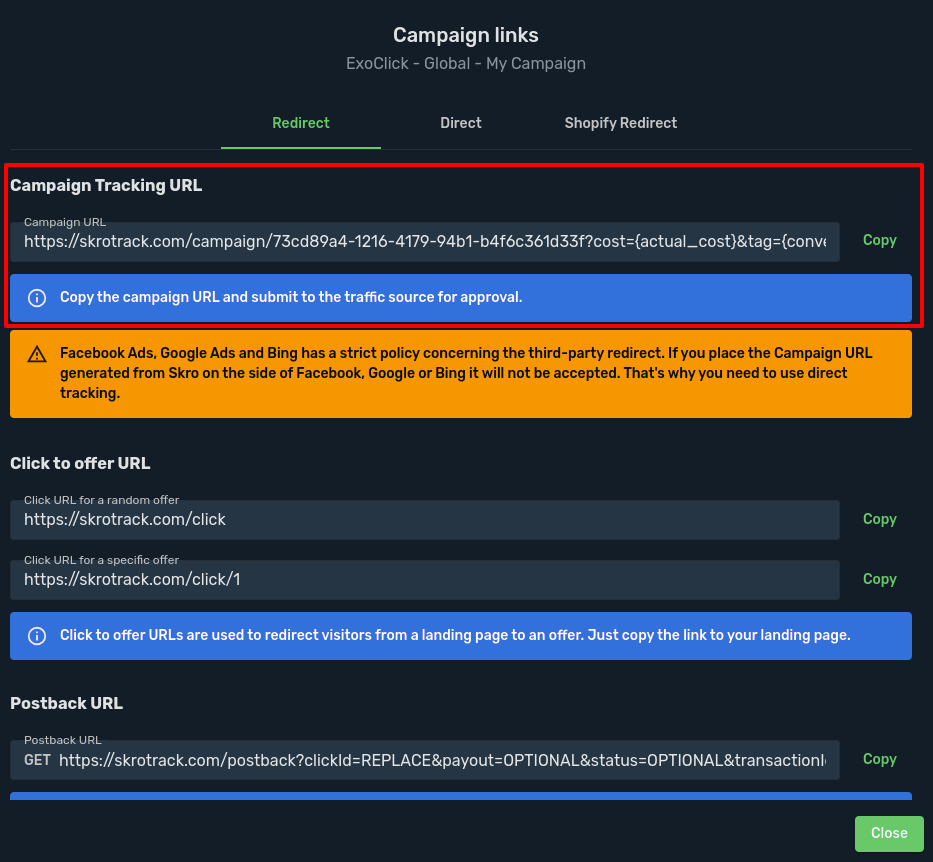
- A secção "Ligações da campanha" será desbloqueada e poderá obter o URL da campanha. Deve ser semelhante ao seguinte:
https://skrotrack.com/campaign/73cd89a4-1216-4179-94b1-b4f6c361d33f?cost={actual_cost}&tag={conversions_tracking}&site_id={site_id}&zone_id={zone_id}&campaign_id={campaign_id}&variation_id={variation_id}&src_hostname={src_hostname}&category_id={category_id}&country={country}&format={format}&keyword={keyword}&tags={tags}
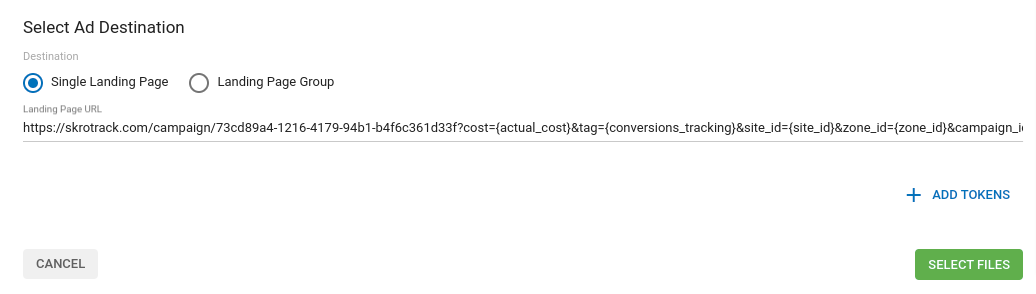
Passo 6: Configurar a campanha na ExoClick
Cole o URL da campanha criado no passo anterior como a sua "Variação" na sua campanha ExoClick. Certifique-se de que contém a etiqueta {conversions_tracking} para enviar os detalhes da conversão para o Skro.
Concluir a configuração da campanha. Pode encontrar um guia detalhado sobre como criar uma campanha na Exoclick aqui.
Se a configuração tiver sido feita corretamente, começará a ver conversões tanto no Skro como na Exoclick. Não se esqueça de ativar a coluna Objetivo correspondente na sua Campaigns List e nas suas Statistics
Integração da API Skro da ExoClick
Ao integrar o Skro com o ExoClick através da API, poderá gerir certos aspectos das suas campanhas ExoClick e, ao mesmo tempo, utilizar as ferramentas de relatório do Skro.
Cada alteração que fizer no Skro terá um efeito instantâneo na ExoClick. Eis algumas das acções que pode realizar através da integração da API Skro
- Sincronizar custos: Sincronizar custos de campanhas, variações, zonas e sites a cada 30 minutos.
- Verificar o estado das campanhas integradas: Verificar o estado das suas campanhas, variações, zonas e sítios...
- Pausa ou retoma de uma campanha integrada: Pausa ou retoma de campanhas, variações, zonas e sítios.
- Alterar as licitações de uma campanha integrada: Alterar o valor do lance para campanhas e zonas
Requisitos
Antes de se poder integrar com o Skro, é necessário gerar um API Token na ExoClick.
Inicie sessão na sua conta Exoclick e, em seguida, clique no seu nome de utilizador para aceder ao seu perfil. Clique em New API Token (Novo token de API), dê um nome a esse token e, em seguida, clique em Save (Guardar). Verá o token da API na coluna "Token":


Instruções
Para iniciar a integração, eis os passos simples a seguir:
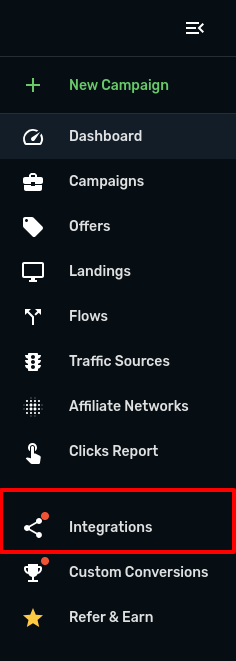
- Inicie sessão na sua conta Skro e selecione o separador "Integrações "
- Na secção Traffic Source Integrations (Integrações de fontes de tráfego), clique no botão "Add" (Adicionar) e selecione ExoClick.
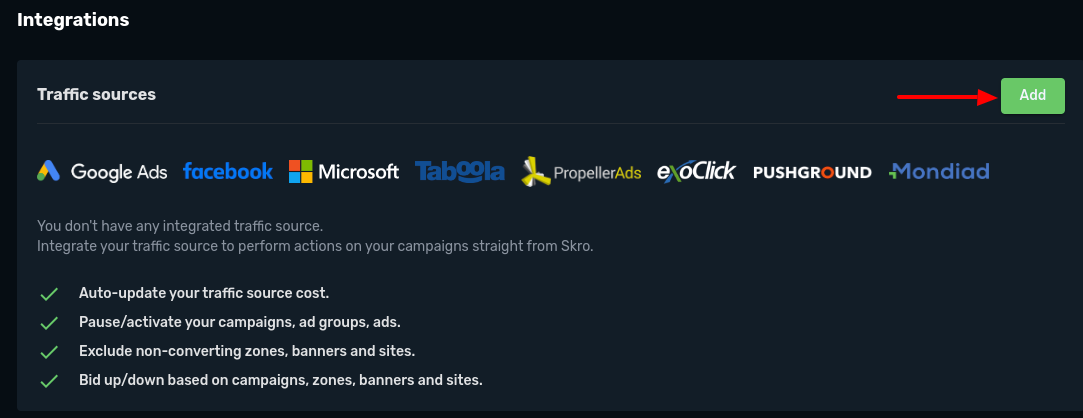
- Introduza o valor do seu token da API ExoClick e clique em "Create Integration" (Criar integração).
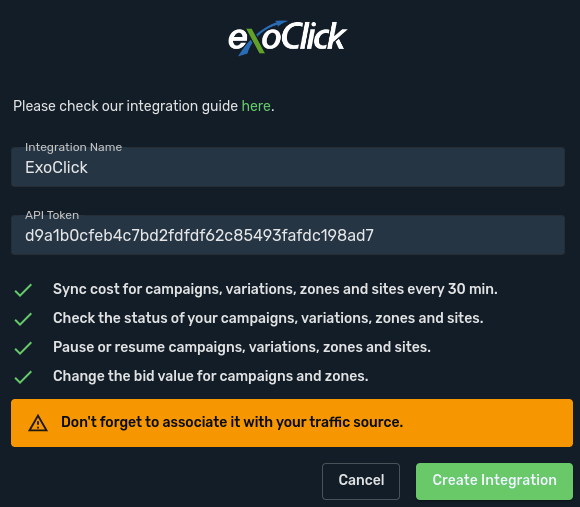
Se a integração tiver sido efectuada com sucesso, o Skro mostrará uma mensagem de confirmação e será redireccionado para o separador Integração do Skro.
Comentários adicionais sobre a comparação entre a Skro e a ExoClick
Para além do acompanhamento das conversões e da integração da API, existem algumas definições no Skro que deve ter em conta para garantir que obtém os mesmos resultados em ambas as plataformas:
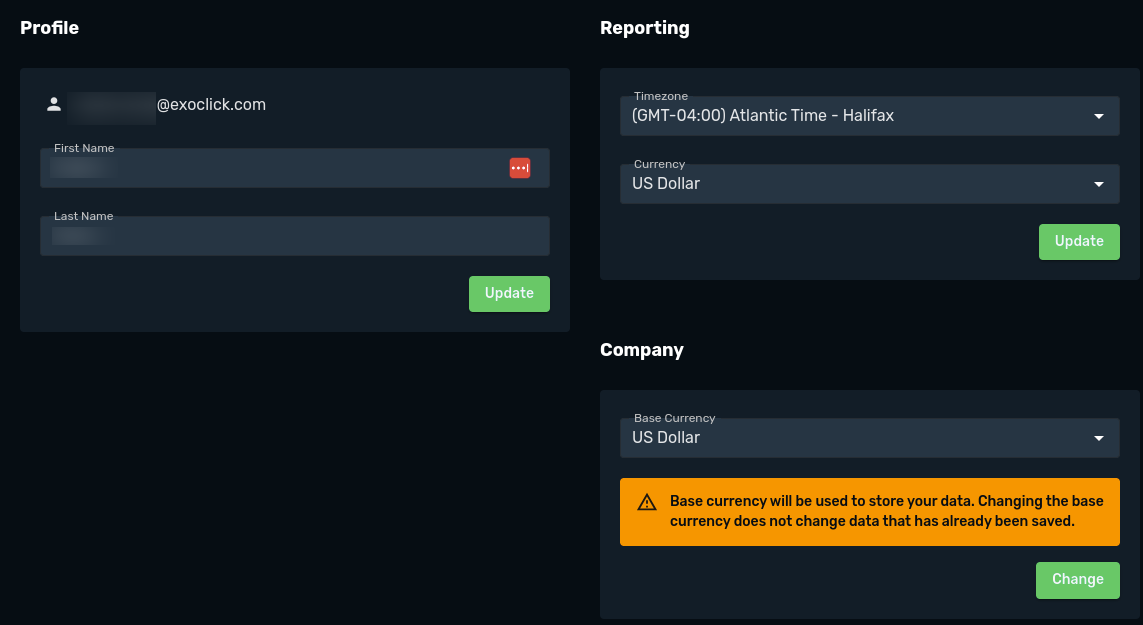
- Fuso horário: Existe uma opção no Skro para escolher um fuso horário para os relatórios.
Sugerimos que utilize o fuso horário EST (Estados Unidos - Nova Iorque) para coincidir com o fuso horário do servidor da ExoClick
- Moeda: Por favor, selecione USD ou Euro de forma a corresponder à moeda da sua conta ExoClick.
Se precisar de mais orientações sobre como configurar o acompanhamento de conversões no Skro, não hesite em contactar o suporte do Skro enviando uma mensagem para support@skro.eu. Também pode contactar o Exoclick's Customer Success para rever estes passos.