Como acompanhar as conversões com a Peerclick
Este guia é apenas para a Peerclick. Se pretender conhecer os passos genéricos para o rastreio S2S, consulte a secção Anunciantes.
A ExoClick dá-lhe acesso a fontes de tráfego globais, funcionalidades de segmentação, grandes volumes de dados e ferramentas de análise estatística para filtrar resultados e otimizar as suas campanhas. Este manual explica como acompanhar as conversões na rede ExoClick quando está a utilizar o software de acompanhamento Peerclick. Para acompanhar a sua oferta, é necessário que o Peerclick e a ExoClick falem entre si através dos seus servidores.
Se pretender receber informações adicionais, consulte o guia de integração da Peerclick
Passo 1: Criar o ID do objetivo para o URL de postback
Inicie sessão no Painel de Administração da ExoClick e aceda a Campanhas > Acompanhamento de conversões. Isto permite-lhe criar o código de acompanhamento de conversões a ser utilizado no seu postback URL:

Clique em "Novo objetivo de conversão". Existem três campos que deve preencher: Nome, Valor de conversão e Pedido. Em Nome, basta adicionar um nome para o objetivo, por exemplo: "Postback".
Os valores de conversão disponíveis são:
- No Value: o valor é 0
- Corrigido: determina o pagamento da conversão manualmente ao definir o objetivo.
- Dinâmico: o valor do pagamento será passado através do URL de Postback. A transmissão de valores dinâmicos será explicada em pormenor mais adiante neste guia.
a Ordem** é utilizada para organizar os diferentes objectivos que criou na sua conta. Se criou vários Objectivos de Conversão, a Ordem irá ajudá-lo a organizar a forma como estes objectivos são apresentados nas suas Estatísticas e na Lista de Campanhas.
Depois de ter adicionado todos estes campos, clique no botão "Criar". O painel de administração apresentará a estrutura do URL de postback, bem como o ID do objetivo correspondente ao objetivo que acabou de criar. Deve ter um aspeto semelhante a este:
http://s.magsrv.com/tag.php?goal=66a8605e6cce49fbb8056f273f8e1a2e&tag=
Também pode consultar a nossa página Acompanhamento de conversões para obter mais informações sobre o nosso processo de criação de objectivos.
Passo 2: Adicionar a ExoClick como fonte de tráfego na Peerclick e configurar o Postback
Para acompanhar as conversões na ExoClick, terá de adicionar ao URL da sua campanha um rastreador dinâmico chamado {conversions_tracking}, que identifica cada conversão de forma única.
É necessário armazenar este tracker no Peerclick e fazê-lo notificar o servidor da ExoClick cada vez que um utilizador gera uma conversão. Isto é feito de forma muito simples, configurando a ExoClick como fonte de tráfego, utilizando o modelo pré-definido. Para o fazer:
- Inicie sessão no seu painel de controlo Peerclick.
- Clique no separador "Sources " e, em seguida, clique em "+New ".

- Selecione ExoClick na lista de modelos. O Peerclick irá preencher previamente todas as definições de origem de tráfego.
- Clique em "URL de postback da origem de tráfego". Substitua o valor REPLACE pelo goal ID que gerou no PASSO 1.
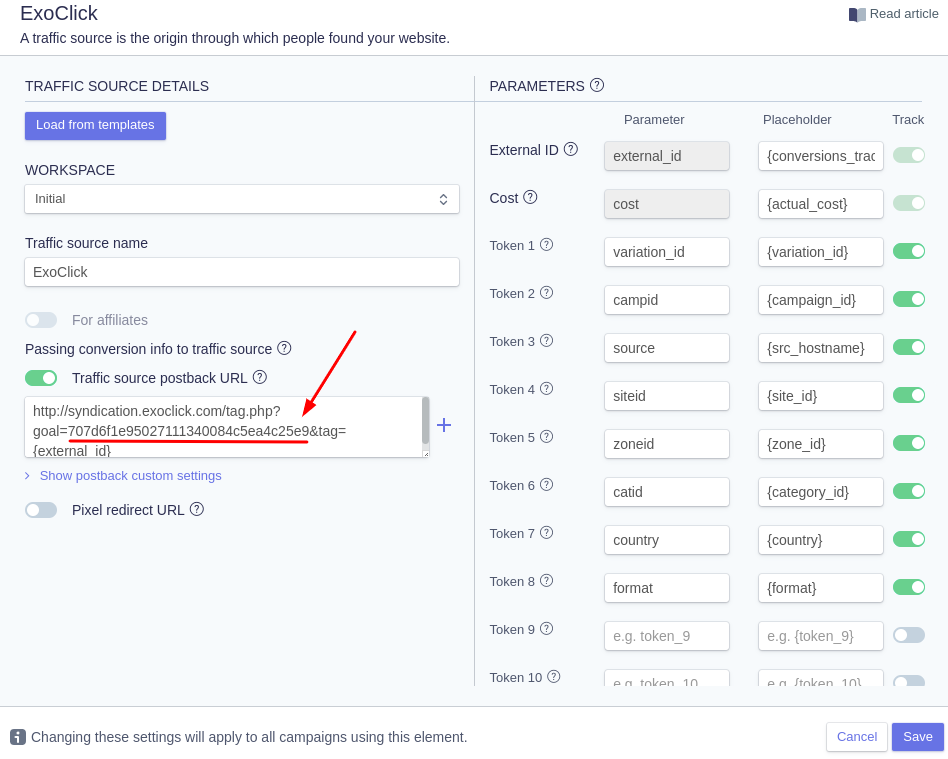
Nota: Se selecionou o valor "Dinâmico" ao criar o seu objetivo de Conversão PASSO 1, então deve adicionar value={payout} no final do URL de Postback. Neste caso, o seu URL de postback será parecido com o seguinte:
http://s.magsrv.com/tag.php?goal=66a8605e6cce49fbb8056f273f8e1a2e&tag={external_id}&value={revenue}
- Clique em "Criar" para guardar o postback.
Passo 3: Adicionar uma fonte de rede de afiliados à Peerclick (opcional)
Se não estiver a utilizar uma oferta de uma plataforma de afiliados, passe à etapa 4
Clique no separador "Affiliate Networks" (Redes de afiliados) e, em seguida, clique em "+New" (Novo):

Selecione uma Rede de afiliados na lista. Se a sua rede de afiliados não constar da lista, pode definir manualmente as definições da sua plataforma de afiliados clicando em "Criar modelo personalizado ".
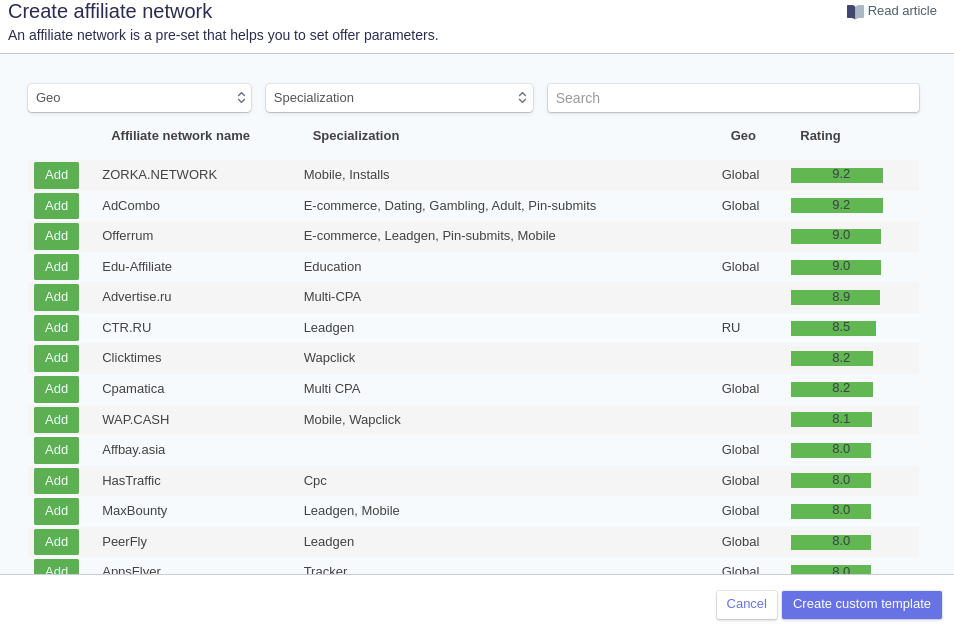
O "Modelo de url de oferta " será preenchido com os tokens associados a esta rede. Estes parâmetros serão posteriormente adicionados a todas as ofertas associadas a esta rede de afiliados.
Depois, copie o URL do Postback e coloque-o na sua rede de afiliados.
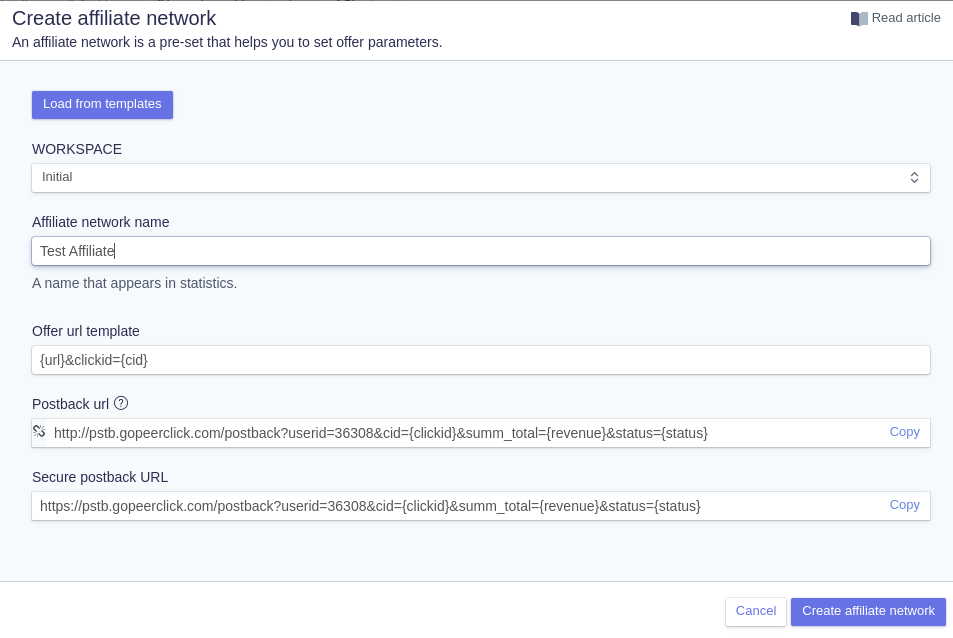
Nota: Lembre-se que o URL de retorno que vê aqui corresponde à plataforma de afiliação. Este não é o mesmo URL de postback que utilizou nas definições da Fonte de Tráfego.
Clique em "Criar rede de afiliados " para concluir o processo.
Passo 4: Adicionar uma oferta à Peerclick
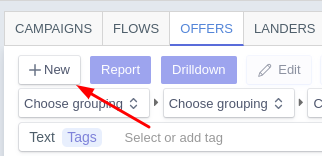
Clique no separador "Ofertas" e, em seguida, clique em "+Novo".
Adicione um "Nome da oferta" e o URL da oferta.
Por exemplo
http://mypage.com/?a=14030&c=64375&s1=
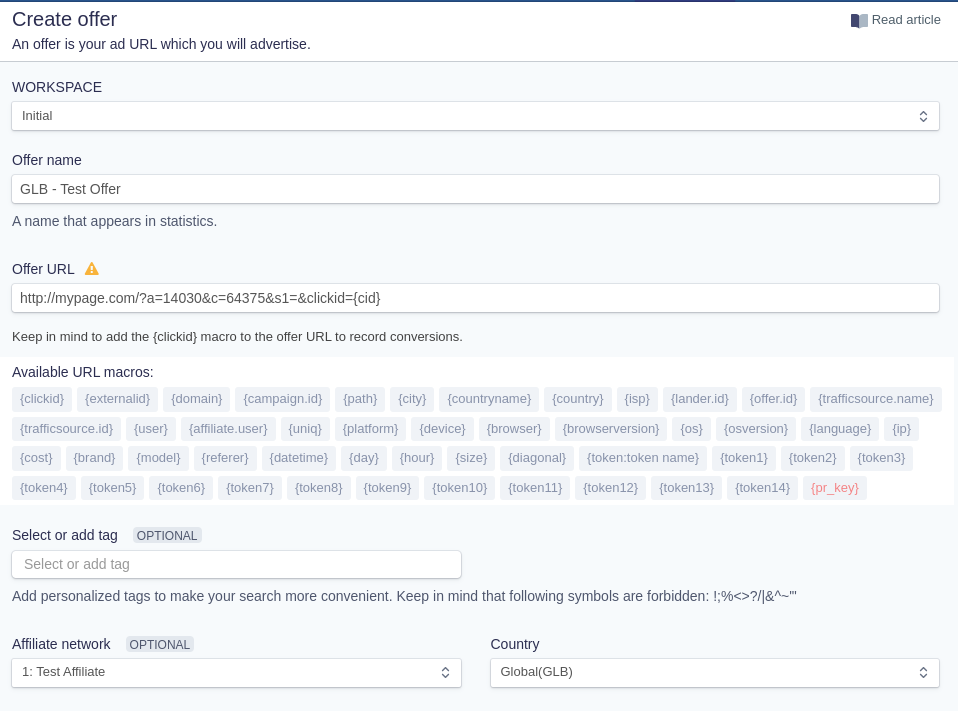
Se tiver adicionado uma Rede de afiliados, selecione-a aqui. Os parâmetros da rede de afiliados serão inseridos no URL da oferta
Por fim, na secção "Pagamento ", mantenha a opção "Automático" se a sua plataforma de Afiliados puder receber pagamentos dinamicamente através do postback. Caso contrário, clique em "Manual" e adicione o valor do Pagamento.

Quando tiver terminado as definições da oferta, clique em "Criar oferta ".
Passo 5: Criar uma campanha no Peerclick
Antes de criar uma campanha, a Peerclick recomenda a criação de um domínio personalizado para ser utilizado como URL da sua campanha, especialmente se for criar uma campanha de "Redireccionamento ". As instruções completas sobre como criar um domínio de rastreamento para sua campanha estão listadas aqui.
Quando estiver pronto para criar uma campanha, clique no separador "Campanhas" e, em seguida, clique em "+Novo".
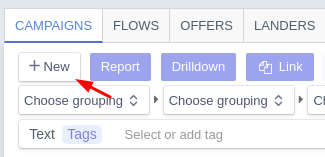
Para criar a campanha, siga estes passos:
- Adicione um nome à sua nova campanha. Depois, em "Fonte de tráfego ", selecione ExoClick
- Em "Tipo de custo", selecionar "Auto ".
- Em "Caminhos por defeito ", selecione a Oferta que criou na secção anterior.
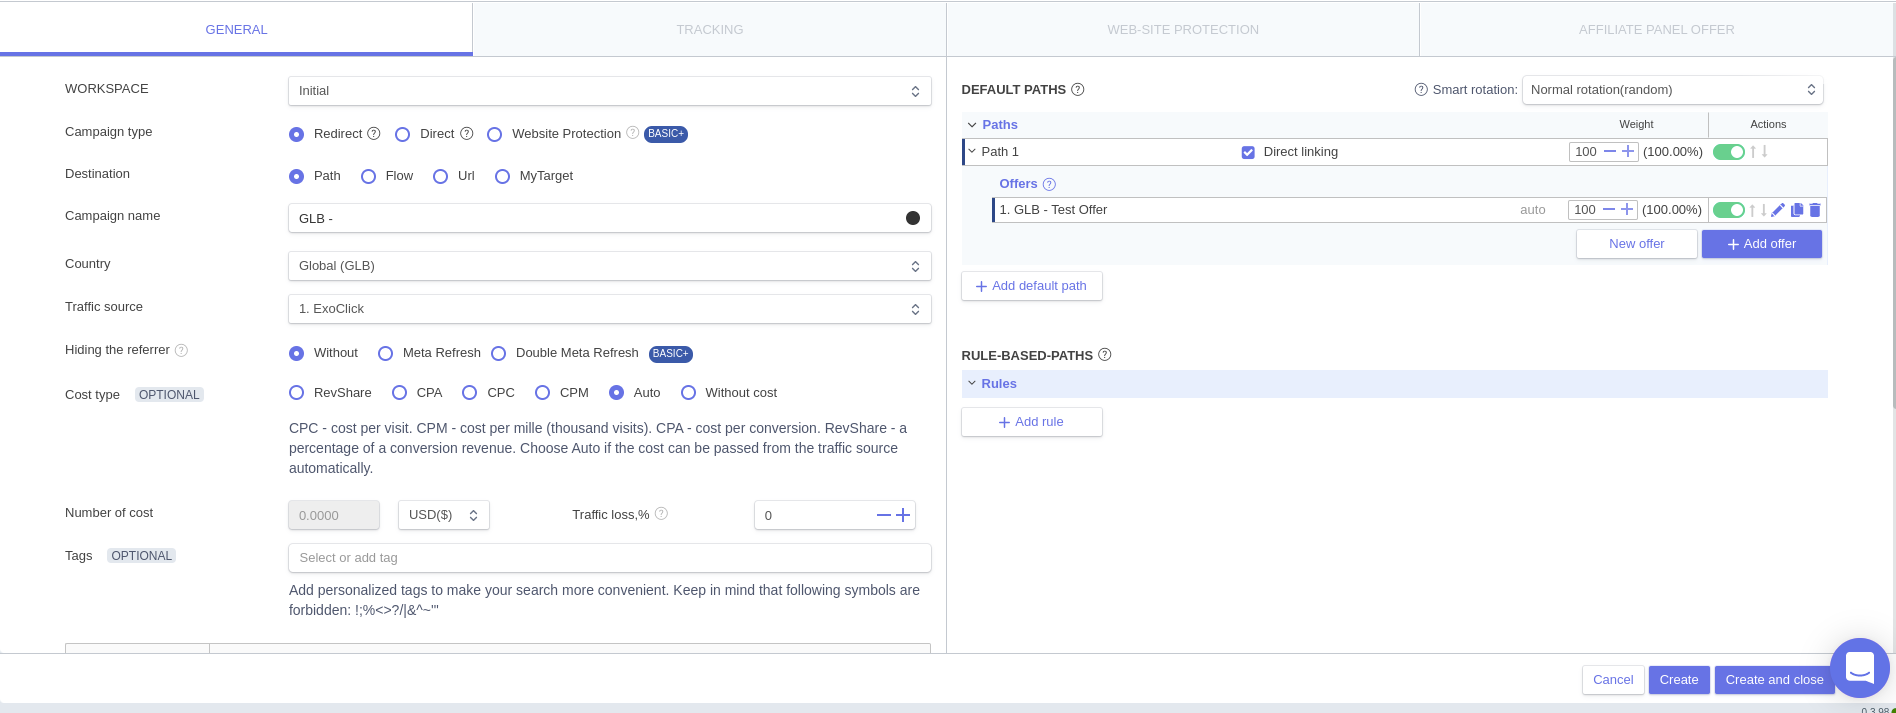
- Clique em "Criar ". As definições de "Rastreio" ficarão desbloqueadas e poderá obter o URL da campanha. Deve ser semelhante ao seguinte:
http://3715196523.gopeerclick.com/15GFcZ?variation_id={variation_id}&campid={campaign_id}&source={src_hostname}&siteid={site_id}&zoneid={zone_id}&catid={category_id}&country={country}&format={format}&cost={actual_cost}&external_id={conversions_tracking}
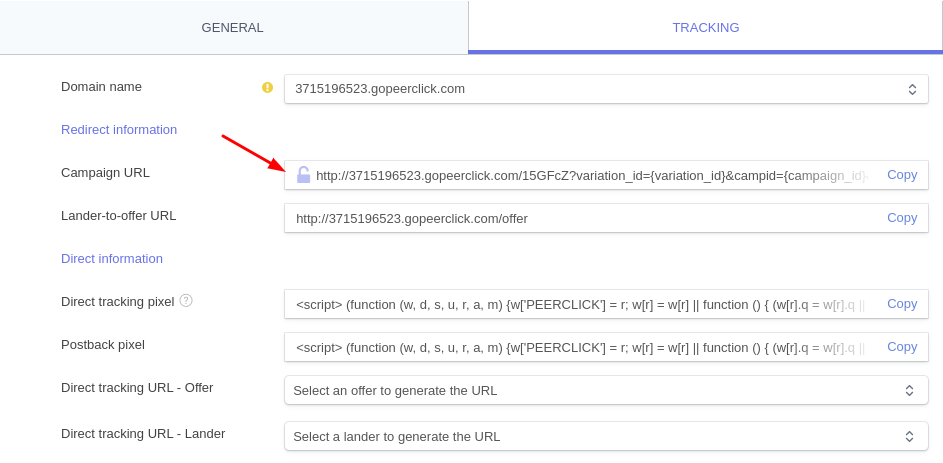
Se criou um domínio personalizado, pode alterá-lo aqui. Certifique-se de Salvar as alterações depois.
Passo 6: Configurar a campanha na ExoClick
Cole o URL da campanha criado no passo anterior como a sua "Variação" para a sua campanha ExoClick. Certifique-se de que contém a etiqueta {conversions_tracking} para enviar os detalhes da conversão para a Peerclick.

Concluir a configuração da campanha. Pode encontrar um guia detalhado sobre como criar uma campanha na Exoclick aqui.
Se a configuração tiver sido feita corretamente, começará a ver conversões tanto no Peerclick como no Exoclick. Não se esqueça de ativar a coluna do objetivo correspondente na sua Campaigns List e nas suas Statistics
Se precisar de mais orientações sobre como configurar o acompanhamento de conversões na Peerclick, não hesite em contactar o suporte da Peerclick utilizando o botão Chat no painel de controlo da Peerclick. Também pode contactar Exoclick's Customer Success para rever estes passos.