Como acompanhar as conversões com o AdsBridge
Este guia é apenas para o AdsBridge. Se pretender conhecer os passos genéricos para o acompanhamento S2S, consulte a secção Anunciantes.
A ExoClick dá-lhe acesso a fontes de tráfego globais, funcionalidades de segmentação, grandes volumes de dados e ferramentas de análise estatística para filtrar resultados e otimizar as suas campanhas. Este manual explica como acompanhar as conversões na rede ExoClick quando está a utilizar o software de acompanhamento AdsBridge. Para acompanhar a sua oferta, é necessário que o AdsBridge e a ExoClick falem entre si através dos seus servidores.
Se pretender receber informações adicionais, consulte o Guia de integração da Adsbridge
Passo 1: Criar o ID do objetivo para o URL de postback
Inicie sessão no Painel de Administração da ExoClick e aceda a Campanhas > Acompanhamento de conversões. Isto permite-lhe criar o código de acompanhamento de conversões a ser utilizado no seu postback URL:

Clique em "Novo objetivo de conversão". Existem três campos que deve preencher: Nome, Valor de conversão e Pedido. Em Nome, basta adicionar um nome para o objetivo, por exemplo: "Postback".
Os valores de conversão disponíveis são:
- No Value: o valor é 0
- Corrigido: determina o pagamento da conversão manualmente ao definir o objetivo.
- Dinâmico: o valor do pagamento será passado através do URL de Postback. A transmissão de valores dinâmicos será explicada em pormenor mais adiante neste guia.
a Ordem** é utilizada para organizar os diferentes objectivos que criou na sua conta. Se criou vários Objectivos de Conversão, a Ordem irá ajudá-lo a organizar a forma como estes objectivos são apresentados nas suas Estatísticas e na Lista de Campanhas.
Depois de ter adicionado todos estes campos, clique no botão "Criar". O painel de administração apresentará a estrutura do URL de postback, bem como o ID do objetivo correspondente ao objetivo que acabou de criar. Deve ter um aspeto semelhante a este:
http://s.magsrv.com/tag.php?goal=66a8605e6cce49fbb8056f273f8e1a2e&tag=
Também pode consultar a nossa página Acompanhamento de conversões para obter mais informações sobre o nosso processo de criação de objectivos.
Passo 2: Adicione a ExoClick como uma fonte de tráfego no AdsBridge e configure o Postback
Para rastrear as conversões na ExoClick, é necessário adicionar um rastreador dinâmico ao URL da sua campanha {conversions_tracking} que identifica cada conversão de forma exclusiva. É necessário armazenar esse rastreador no AdsBridge e fazer com que ele notifique a API da ExoClick sempre que um usuário gerar uma conversão.
Isto é conseguido em AdsBridge configurando ExoClick como a fonte de tráfego, usando o modelo pré-definido.
- Iniciar sessão na sua conta AdsBridge
- Clique no separador "Fontes de tráfego "
- Clique no botão "Criar fonte de tráfego ".
- Clique em "Choose from templates " e selecione "ExoClick ".

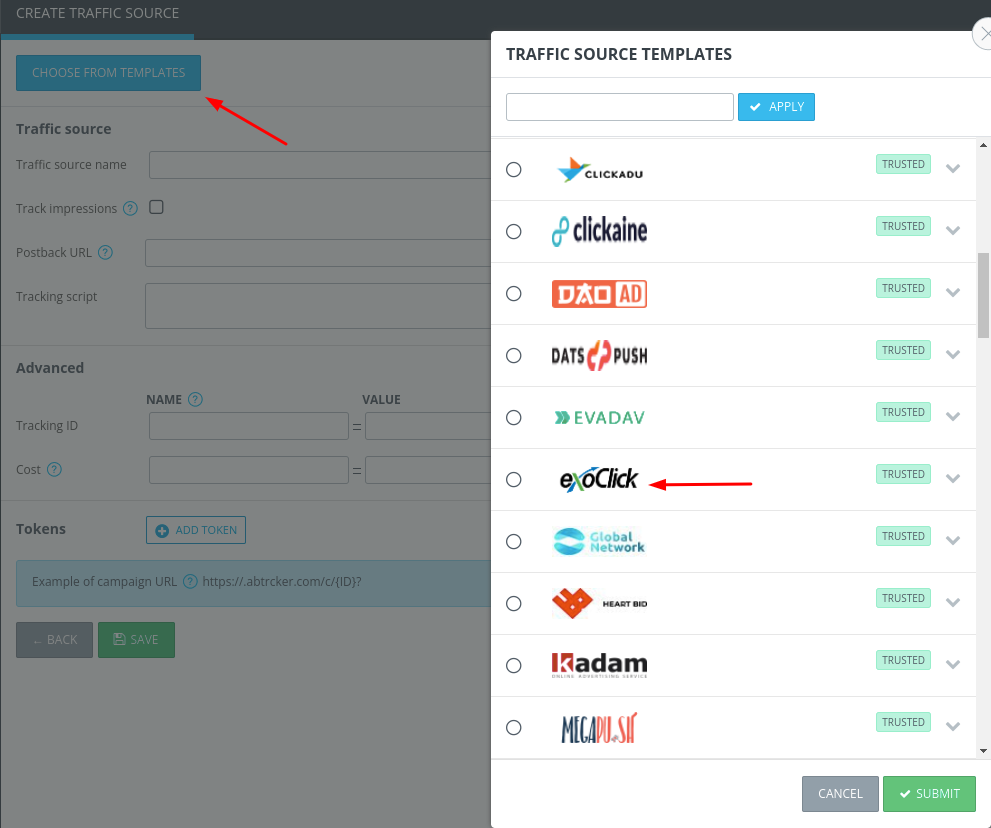
O AdsBridge preencherá previamente todas as definições de origem de tráfego. A única alteração que precisa de fazer aqui é atualizar o valor "REPLACE" com o ID do objetivo que criou na ExoClick:
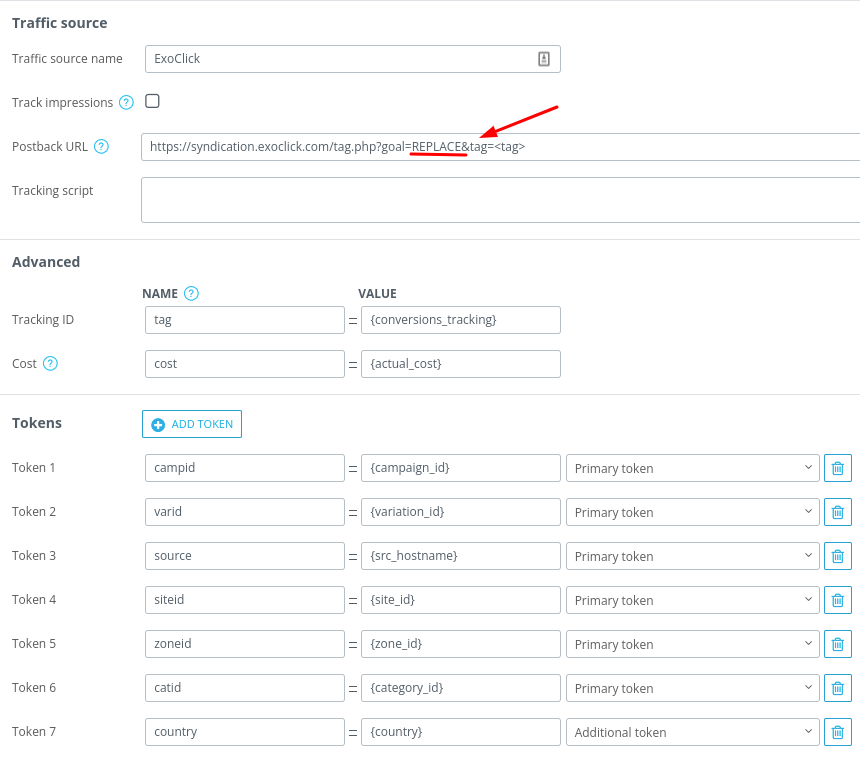
O único parâmetro obrigatório para acompanhar as conversões é o Tracking ID; todos os outros são opcionais. Pode sempre encontrar todos os tokens disponíveis para a Exoclick aqui.
Nota1: Nosso token {actual_cost} retorna o lance real pago por clique ou por impressão a cada impressão. Quando configurar a sua campanha no AdsBridge (explicado mais à frente no guia), recomendamos que escolha "CPM", independentemente do modelo de preço na sua campanha ExoClick, de modo a utilizar o valor predefinido de {actual_cost}.
Nota2: Se selecionou o valor Dynamic ao configurar o seu objetivo na ExoClick, também terá de adicionar &value=payout no final do URL de postback para passar o valor da conversão. Neste caso, o seu URL de postback será parecido com o seguinte:
Etapa 3 (opcional): Configurar uma rede de afiliados no AdsBridge
Se não estiver a utilizar uma oferta de uma plataforma de afiliados, passe à etapa 4
Clique no separador "Redes de afiliados " e, em seguida, clique em "Criar rede de afiliados ":

Clique em "Modelos de redes de afiliados " e selecione a rede com a qual está trabalhando. Note que AdsBridge tem alguns "Afiliados integrados ", o que lhe permite integrar todas as suas ofertas desta rede de afiliados na sua conta AdsBridge.
Se a sua rede de afiliados não estiver na lista, pode configurar manualmente o URL de retorno do afiliado. A partir deste URL, o parâmetro mais importante para a ExoClick é o amt=REPLACE
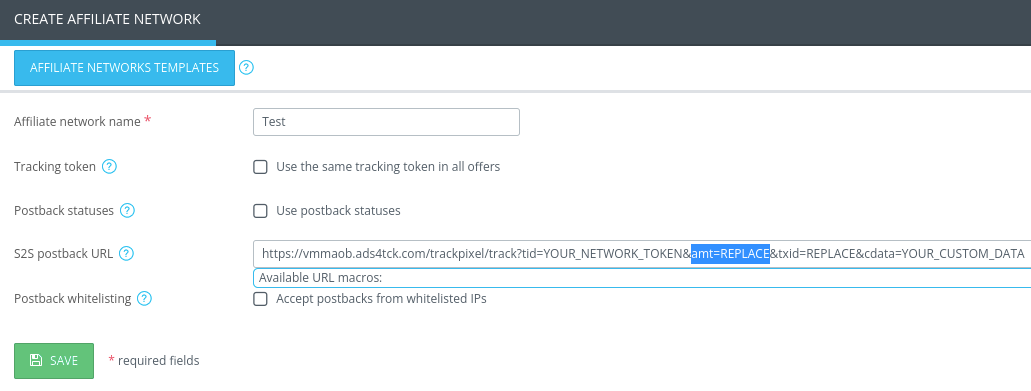
Para fins de acompanhamento dos seus resultados financeiros, a AdsBridge utilizará o valor dinâmico do pagamento de "amt=" no pixel de acompanhamento localizado no URL da oferta. Se o URL da oferta não contiver o parâmetro "amt=" no pixel, então terá de colocar o valor do pagamento manualmente quando configurar a oferta no AdsBridge
Depois de ter criado a rede de afiliados, copie este URL de retorno e cole-o no campo correspondente da sua rede de afiliados.
Nota: Este URL de postback não é o mesmo que o criado para a ExoClick.
Passo 4: Configurar a oferta no AdsBridge
Clique em Ofertas > Gerir ofertas e, em seguida, clique em Criar oferta.

Selecione o tipo de produto vertical e, em seguida, adicione o URL da sua oferta.
Por exemplo:
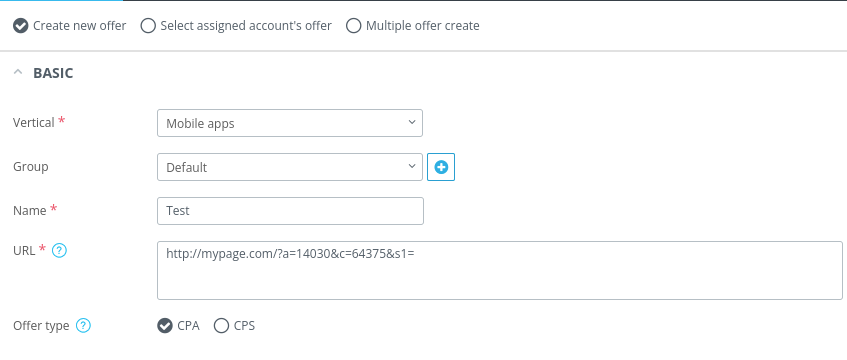
Se tiver adicionado uma rede de afiliados, selecione-a aqui. Se adicionar uma rede de afiliados, a definição Token de rastreio será activada automaticamente para enviar as conversões do AdsBridge para a sua plataforma de afiliados.
Por fim, se a sua rede de afiliados não tiver um parâmetro amt ou não transmitir informações de pagamento, adicione o pagamento manualmente aqui:
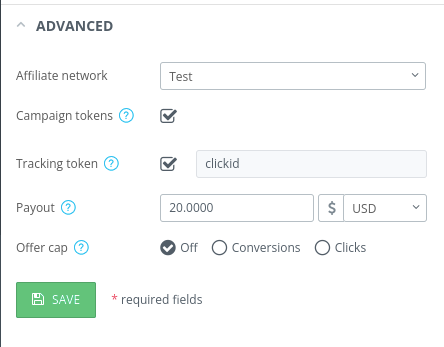
Carregue em Guardar para guardar a sua oferta.
Passo 5: Criar uma campanha no AdsBridge
Clique no separador Campanhas e, em seguida, clique em Criar campanha.

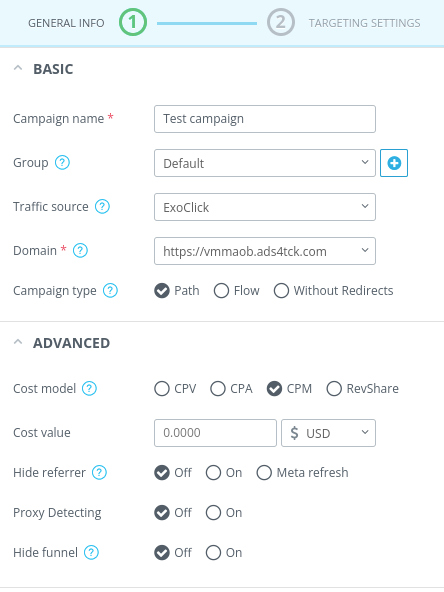
Adicione um nome à campanha, selecione o Domínio do seu URL de seguimento e selecione ExoClick como Fonte de tráfego.
Em seguida, selecione CPM como modelo de custo, mas deixe o Valor do custo vazio.
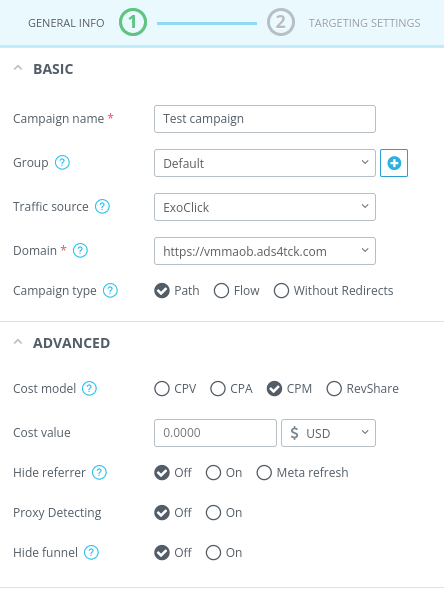
Clique em Seguinte. Aqui selecionará a página de destino e a oferta da campanha. Se pretender enviar o tráfego diretamente para a oferta, basta clicar no botão Link direto e, em seguida, selecionar a oferta que criou no menu Adicionar oferta:
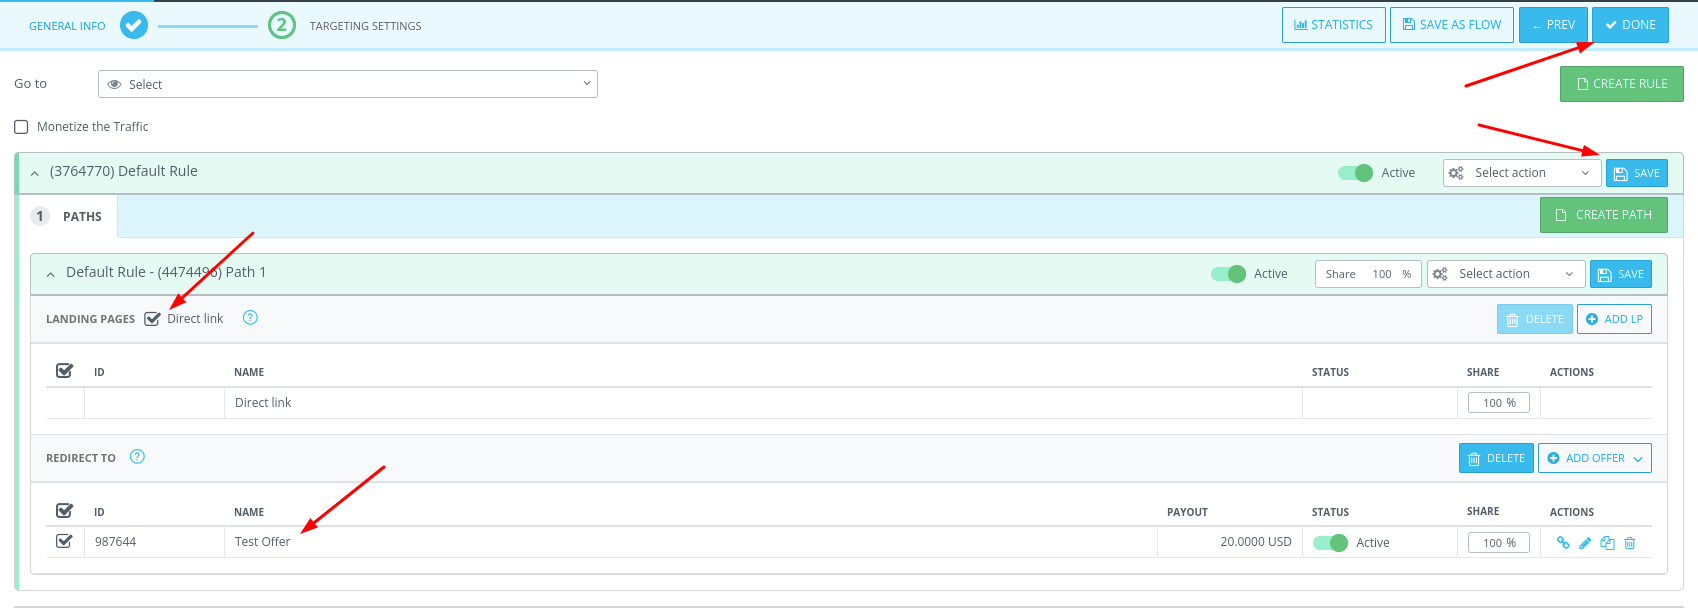
Para obter um guia detalhado sobre como criar campanhas na campanha AdsBridge, consulte o tutorial Criar uma campanha.
Quando tiver terminado de configurar a sua campanha, clique em "Concluído". O AdsBridge fornecer-lhe-á o URL da campanha, que utilizará para configurar a campanha da ExoClick na etapa seguinte.
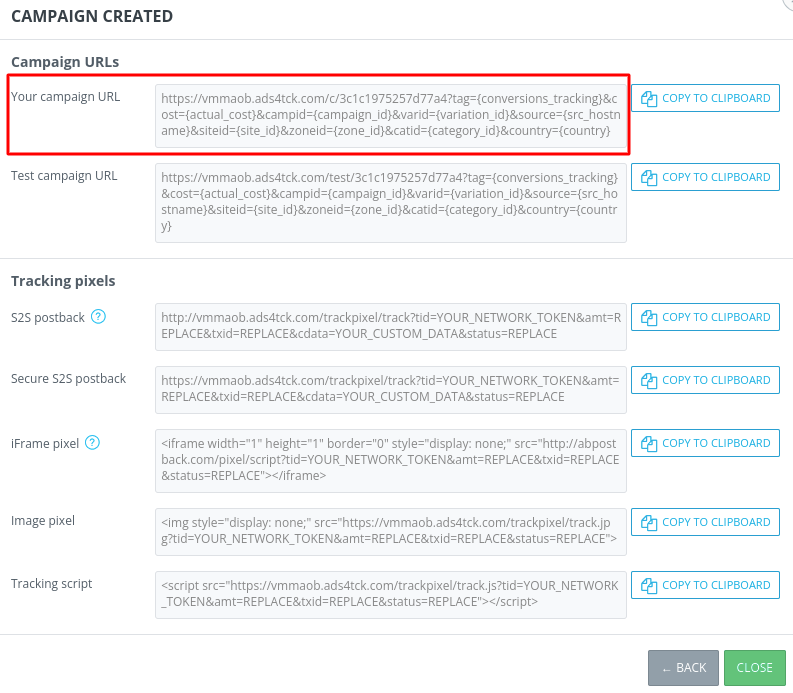
Passo 6: Configurar a campanha na ExoClick
Cole o URL da campanha criado no passo anterior como a sua "Variação" para a sua campanha ExoClick:

Certifique-se de que o URL da campanha contém a etiqueta {conversions_tracking} para transmitir as informações da conversão.
Pode encontrar um guia detalhado sobre como criar uma campanha na ExoClick aqui
Se a configuração tiver sido feita corretamente, começará a ver conversões tanto no AdsBridge como na ExoClick. Não se esqueça de ativar a coluna Objetivo correspondente na sua Lista de Campanhas e nas suas Estatísticas
Se precisar de mais orientações sobre como configurar o rastreamento de conversões no AdsBridge, não hesite em visitar o guia do usuário ou a página do FQA. Também pode contactar o Sucesso do cliente da ExoClick para rever estes passos.