Notificaciones Push: Cómo implementar la zona de anuncios de Notificaciones Push
El formato de anuncio de Notificación Push ya está disponible en ExoClick, en este paseo por la plataforma le mostramos cómo crear una zona de anuncios de Notificación Push.
Cómo configurar una zona de anuncios de notificaciones push
Paso 1 : Crear zona
En su panel de administración, en Editor, vaya a "Sitios y zonas" y haga clic en "Nueva zona". Aparecerá un menú desplegable con una lista de sus sitios web, seleccione el sitio web para el que desea activar las notificaciones push.

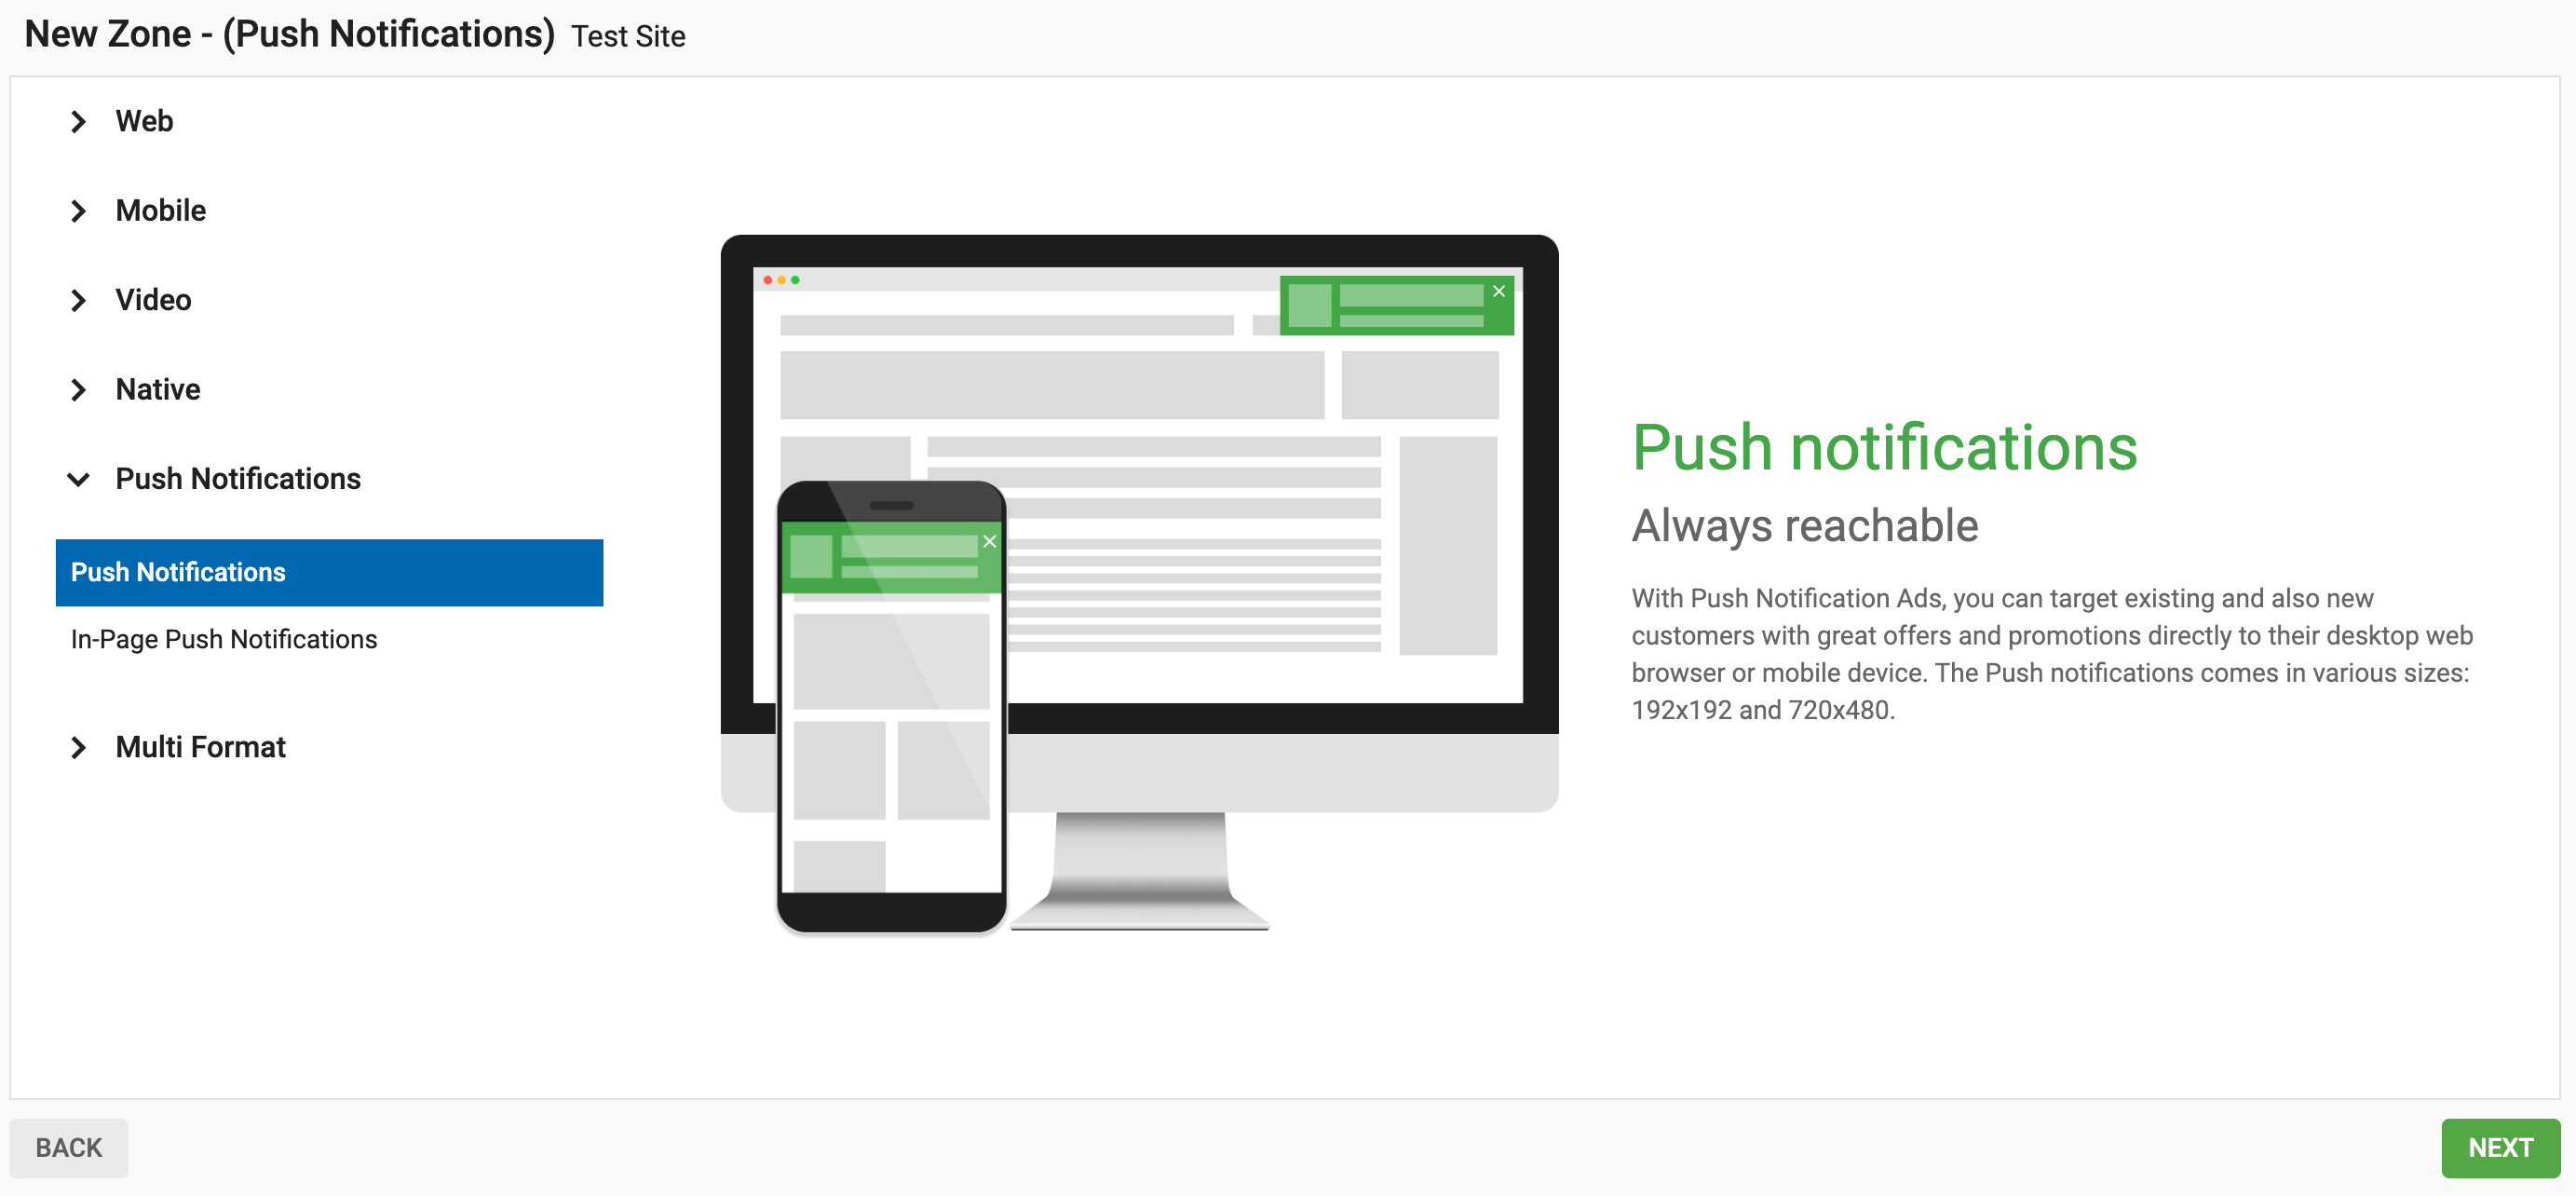
Esto abrirá la página de selección de formato de anuncio. Haga clic en el menú desplegable "Nativo", seleccione "Notificaciones push" y haga clic en "Siguiente"
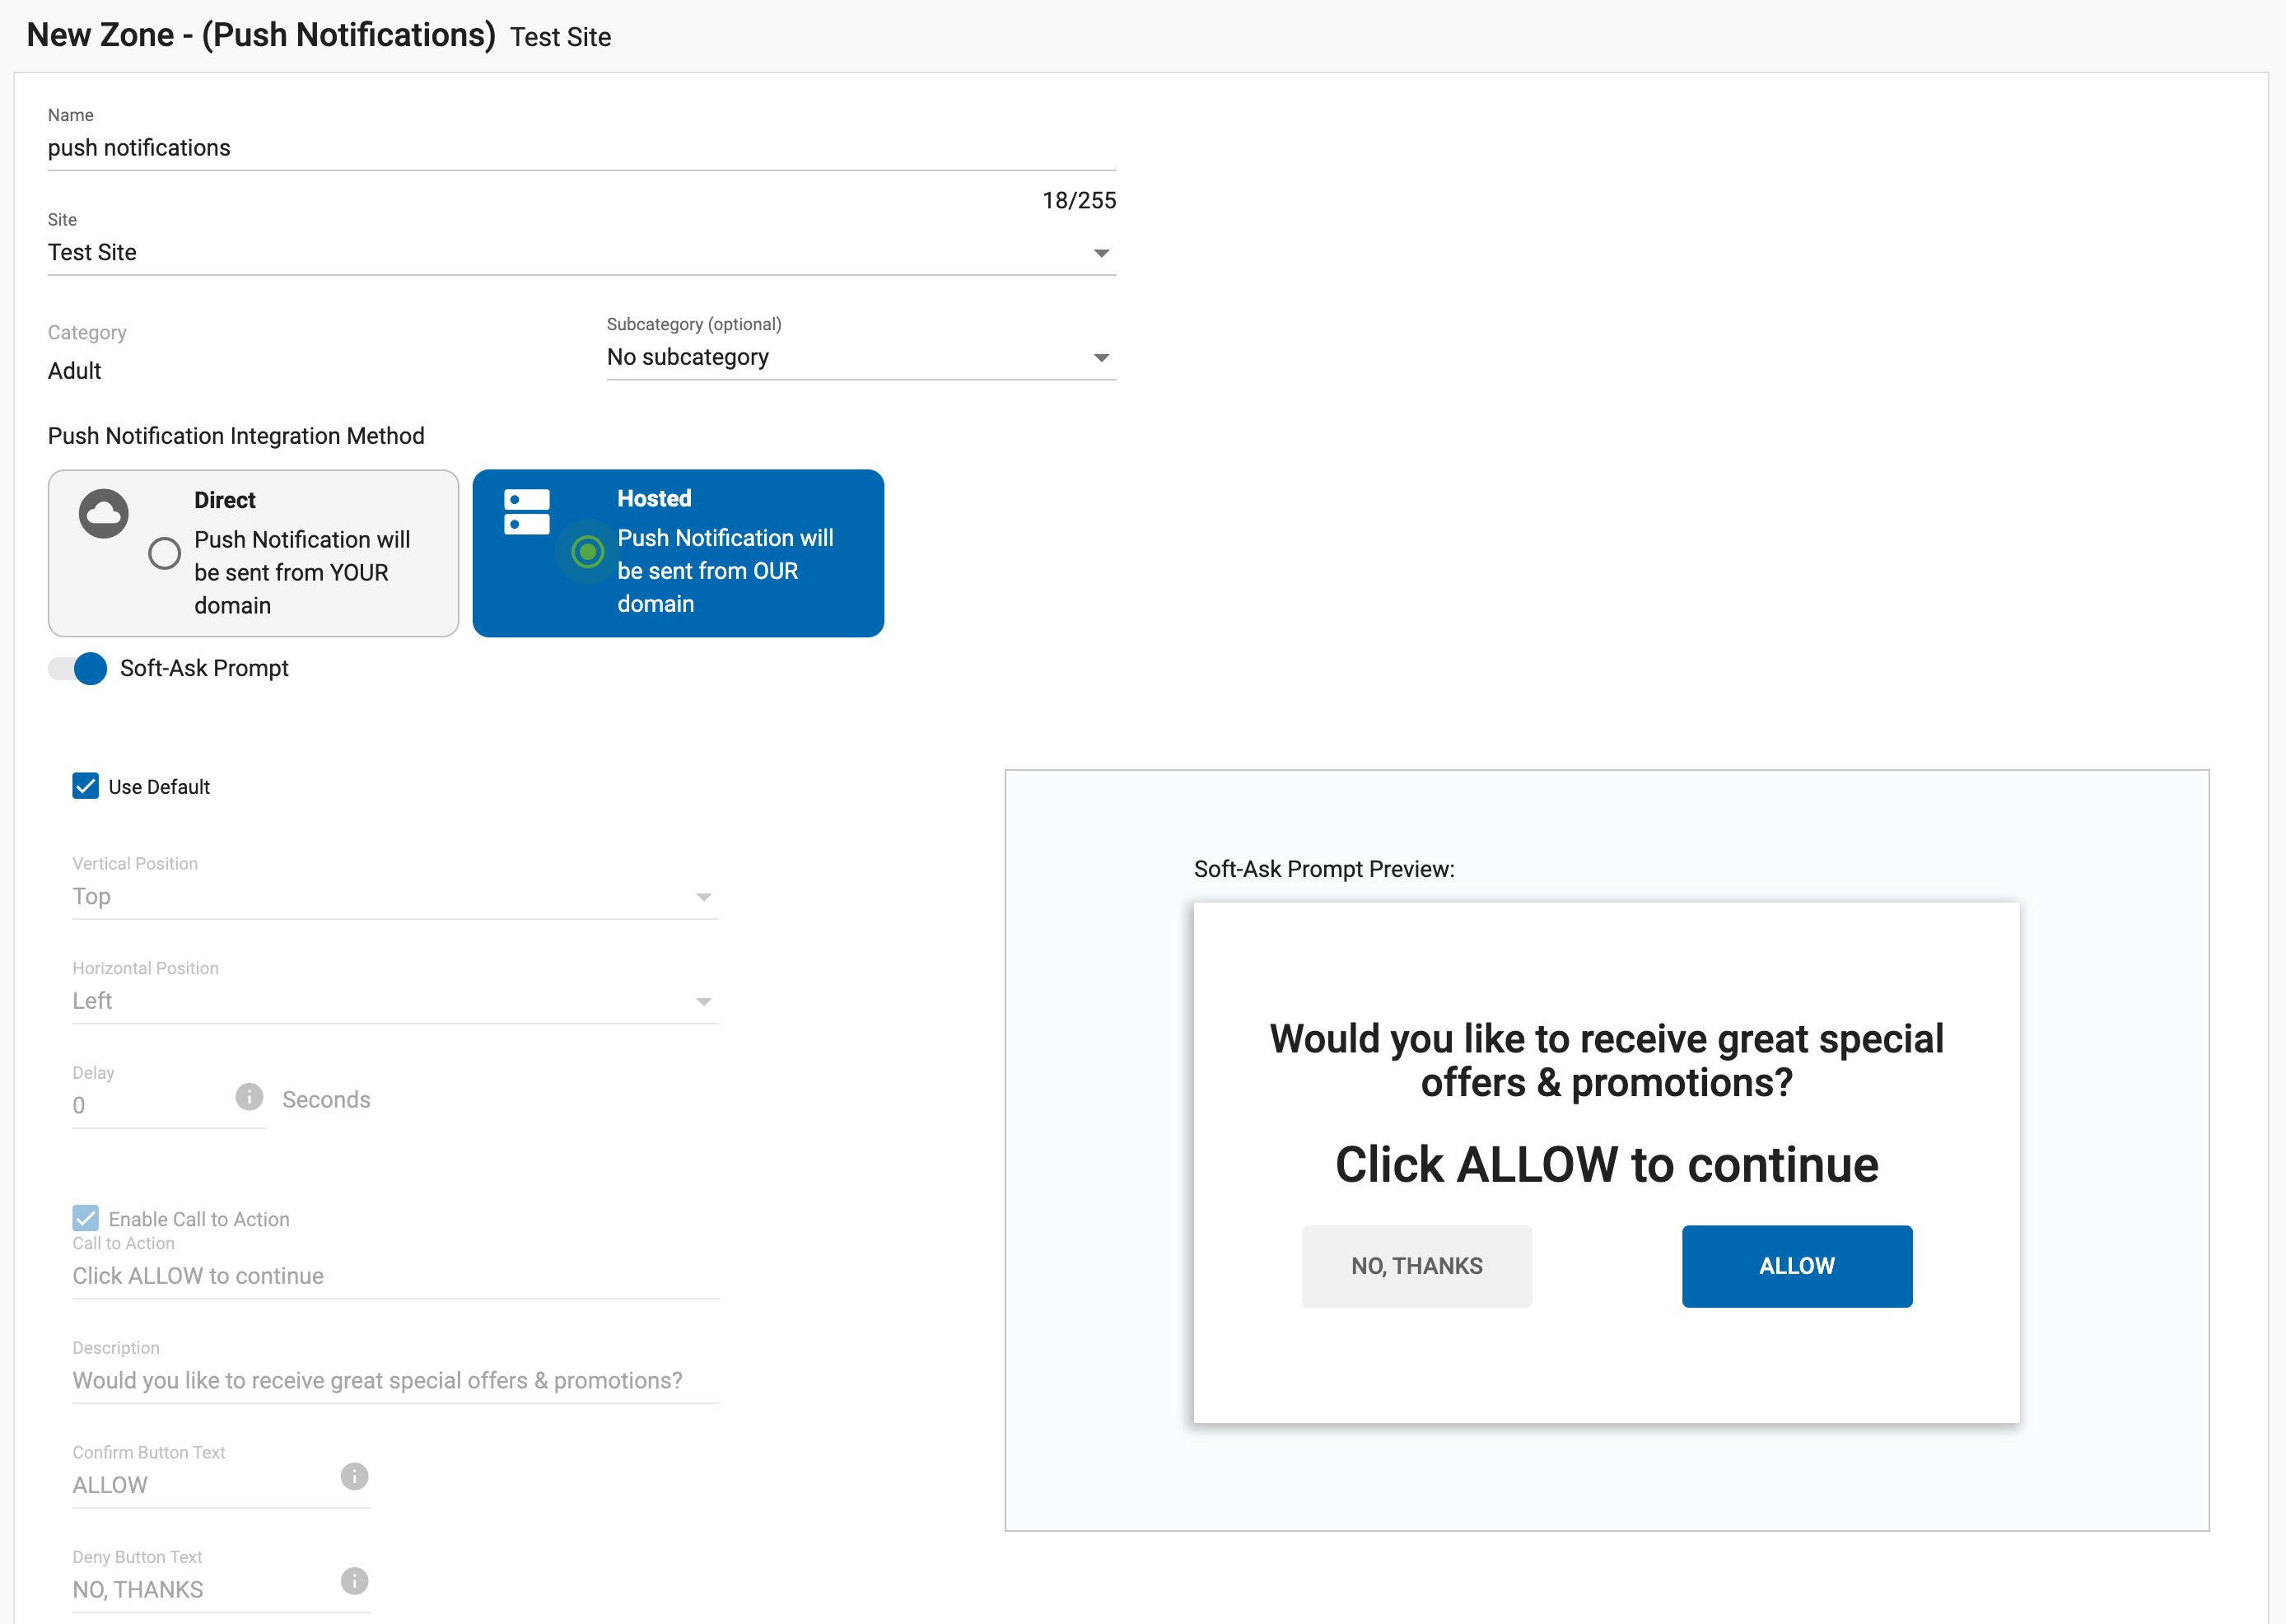
Paso 2: Elegir el método de integración
Ahora tiene que decidir cómo desea recopilar los usuarios para enviarles notificaciones push. Hay tres opciones:
Para utilizar su propio dominio cuando se envían las notificaciones push, puede elegir entre dos métodos de implementación. Puede elegir entre 'Directo' y 'Directo con una solicitud de soft-ask':
- Directo: Esto mostrará un cuadro de opt-in (Directo) a los usuarios en su sitio. Dentro de la casilla, el usuario puede elegir entre "Permitir" o "Bloquear" las notificaciones push

- Dirigir con una pregunta suave: Este es un proceso de dos pasos y mostrará dos casillas consecutivas en su sitio web. La primera (Soft-ask) preguntará al usuario si desea recibir notificaciones Push, dentro de la caja el usuario puede elegir 'No gracias' o 'Permitir.' Si el usuario hace clic en Permitir, aparecerá una segunda caja (Directa) donde el usuario puede elegir 'Permitir' o 'Bloquear' Para ello, seleccione Directo y active el botón Preguntar en pantalla

Para utilizar el dominio de ExoClick existe un método de implementación:
- Alojado: Esto mostrará sólo la casilla Soft-ask en su sitio, preguntando si al usuario le gustaría recibir Notificaciones Push, dentro de la casilla el usuario puede elegir 'No gracias' o 'Permitir'
Nota: Si un usuario hace clic en la casilla "No, gracias**" de la ventana "Soft-Ask", se le volverá a dirigir automáticamente en un plazo de 2 días. Si aplica la implementación directa, si el usuario hace clic en el botón "Bloquear", no se le volverá a enviar el mensaje.
Utilizando su propio dominio: Esto se traducirá en una mayor tasa de suscripción, ya que los usuarios directos de su sitio están optando. Su dominio aparecerá en el cuadro de notificación cuando se envíen las notificaciones push.
Utilizando el dominio de ExoClick: Esto beneficia a los editores porque el usuario no asociará las notificaciones push con el editor sino con la red publicitaria de ExoClick. El dominio de Exoclick aparecerá en los anuncios de las notificaciones push. Este método también le permite implementar Notificaciones Push de su sitio con otras redes además de ExoClick. Lea esta entrada de blog para una explicación detallada.
Paso 3: Personalización de Soft-Ask Prompt
Si se marca la casilla "Usar por defecto", aparecerán los siguientes ajustes.
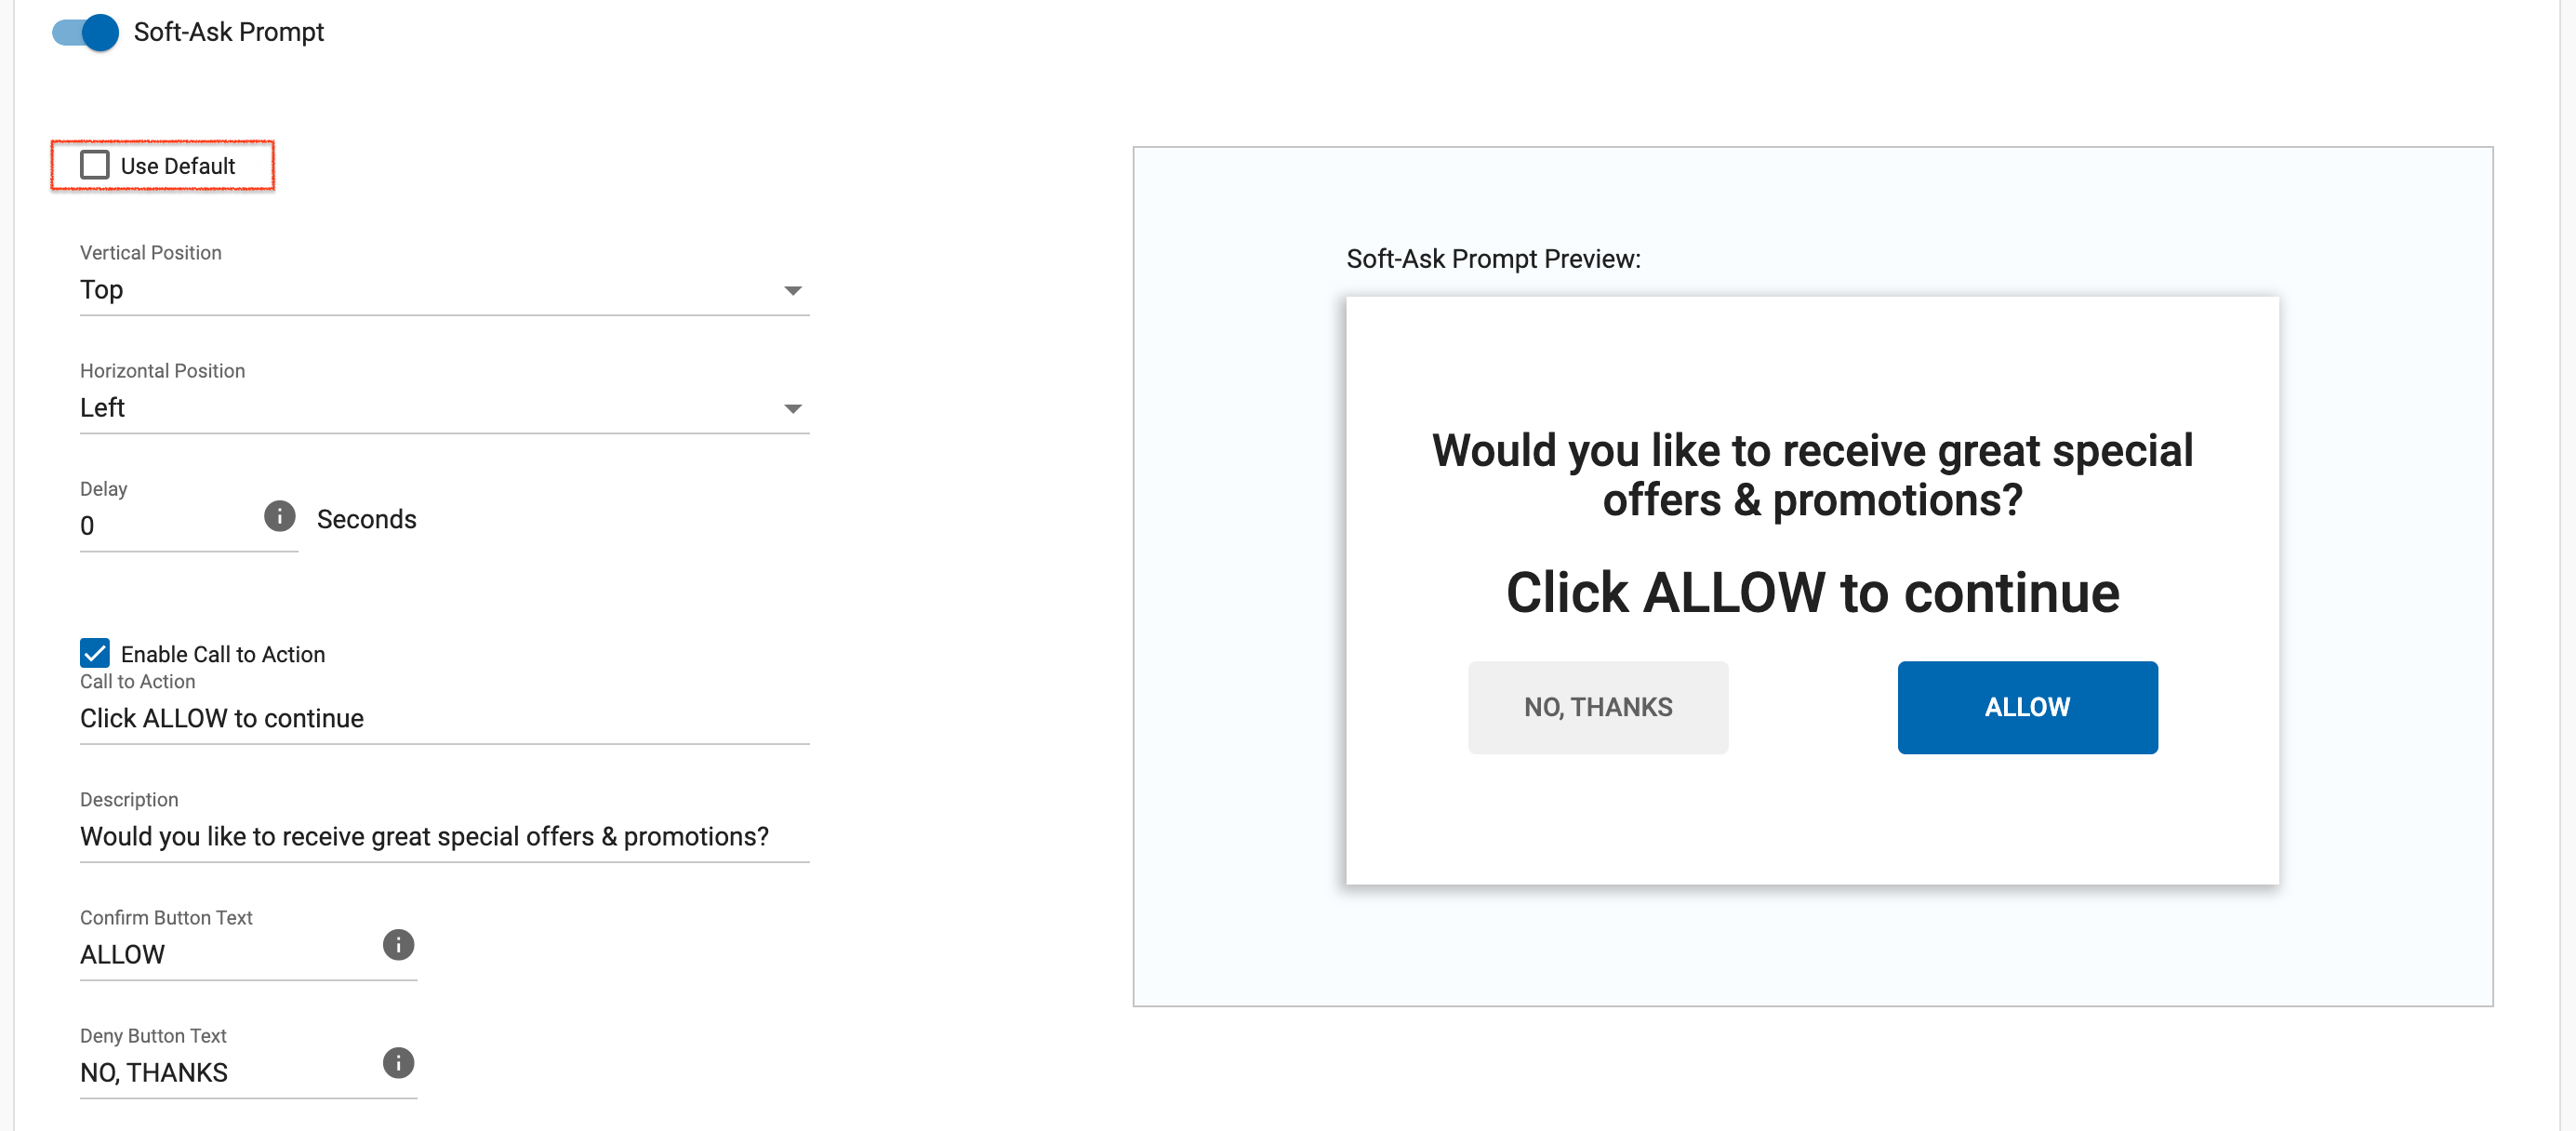
Con la casilla "Usar por defecto" sin marcar, puedes personalizar los siguientes ajustes:
- Posición: Aquí puede elegir la posición en la que aparecerá el cuadro de solicitud de Soft-ask en la pantalla del usuario, las opciones son:
- Vertical: Superior, Medio, Inferior
- Horizontal: Izquierda, centro o derecha
- Retraso: Le recomendamos que lo configure por debajo de 5 segundos para que el usuario vea el cuadro de solicitud de Soft-Ask en cuanto llegue a su sitio web
También puede editar el texto que aparece en el cuadro a partir del texto predeterminado proporcionado: Llamada a la acción, Descripción, Texto del botón Confirmar, Texto del botón Rechazar
Nota: Los textos predeterminados se alojan en el servidor de ExoClicks y están en 12 idiomas: inglés, español, francés, alemán, italiano, portugués, checo, húngaro, croata, eslovaco, ruso y chino. Los textos se mostrarán automáticamente en el idioma configurado para el navegador del usuario final. Si introduce sus propios textos, el cuadro de preguntas de Soft-Ask se mostrará siempre en el idioma que haya introducido y no activará los idiomas predeterminados que hayamos establecido.
Paso 4: Generar el código de zona publicitaria
Una vez que haya hecho clic en "Crear", se generará automáticamente el código de la zona publicitaria para que pueda cortarlo y pegarlo en su sitio web.
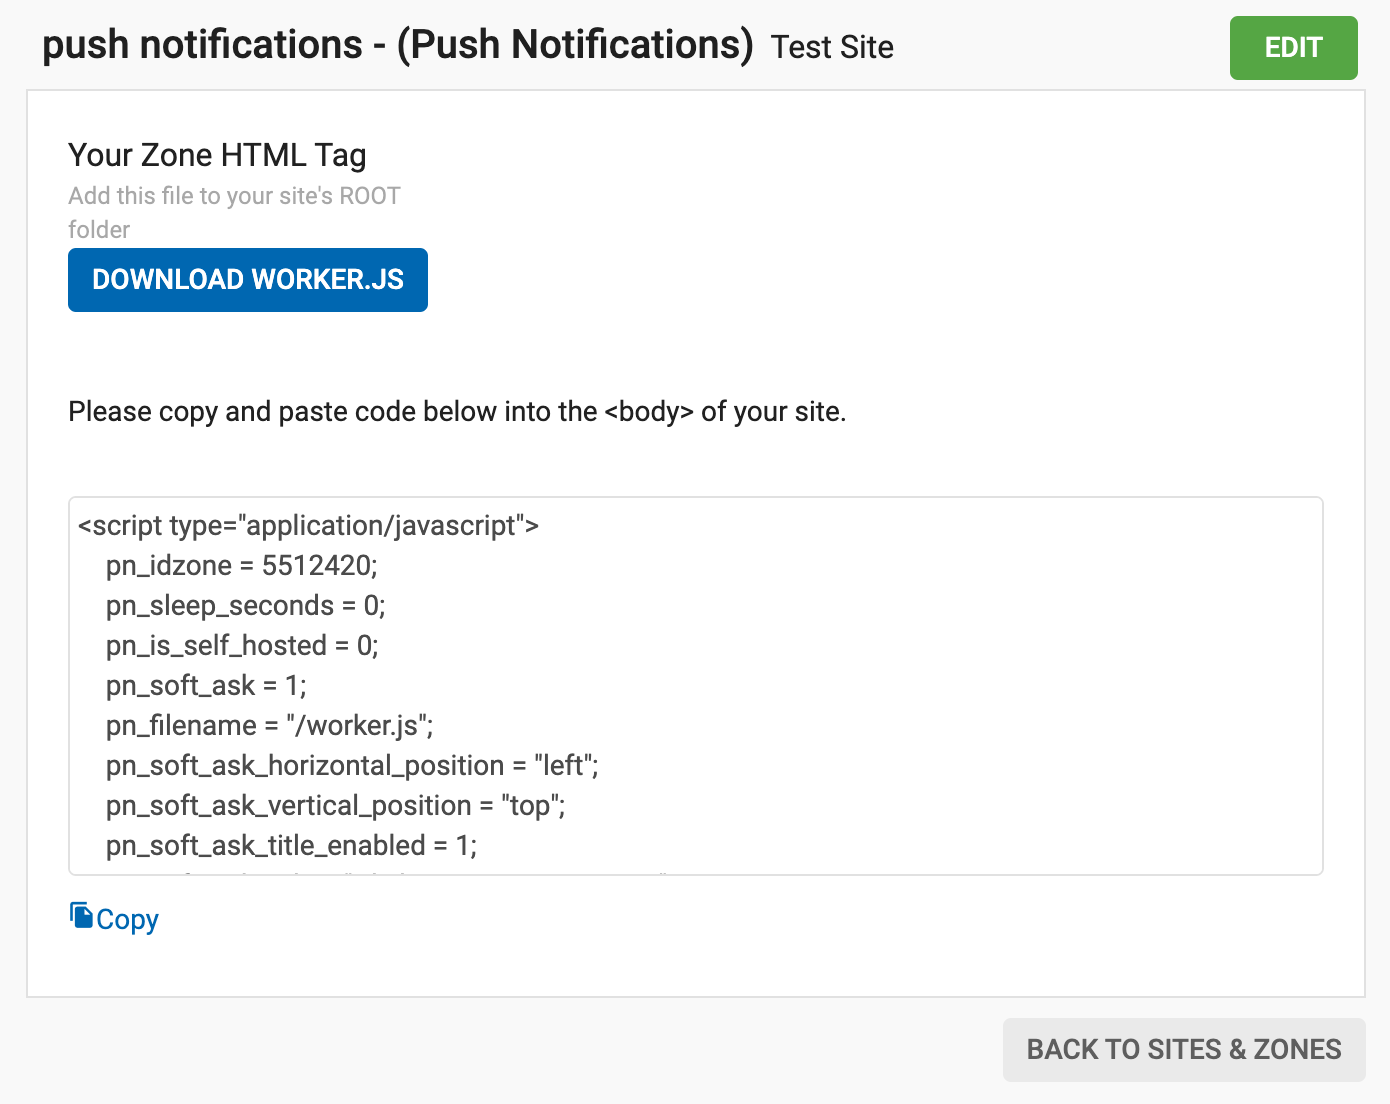
Nota: Debe colocar el archivo proporcionado worker.js en la carpeta raíz del directorio de su sitio web para asegurarse de que funciona correctamente.
Paso 5: Estadísticas
Una vez que un abonado ha optado por recibir notificaciones push, transcurren hasta 2 horas antes de que reciba su primer anuncio.
A partir de ese momento, el suscriptor recibirá una notificación push cada 3 horas. Por ejemplo, si un usuario se suscribe a las 7 de la mañana, recibirá la primera notificación entre las 7 y las 9 de la mañana
Por tanto, téngalo en cuenta al consultar sus estadísticas.
Nota: Las notificaciones push no funcionan en los navegadores Safari y Mobile Safari, así como en cualquier sitio web que no sea HTTP.
Si tiene algún problema al configurar su zona de anuncios de notificaciones push, comuníquese con su gerente de cuenta o con un especialista en éxito del cliente aquí.