Como acompanhar as conversões com a Appsflyer
Este guia é apenas para a Appsflyer. Se pretender conhecer os passos genéricos para o acompanhamento S2S, consulte a secção Anunciantes.
A ExoClick dá-lhe acesso a fontes de tráfego globais, funcionalidades de segmentação, big data e ferramentas de análise estatística para filtrar resultados e otimizar as suas campanhas. Este manual explica como acompanhar as conversões na rede ExoClick quando está a utilizar o software de acompanhamento Appsflyer. Para acompanhar a sua oferta, é necessário que a Appsflyer e a ExoClick falem entre si através dos seus servidores.
Se pretender receber informações adicionais, consulte o guia de integração da Appsflyer
Passo 1: Criar o ID do objetivo para o URL de postback
Inicie sessão no Painel de Administração da ExoClick e aceda a Campanhas > Acompanhamento de conversões. Isto permite-lhe criar o código de acompanhamento de conversões a ser utilizado no seu postback URL:

Clique em "Novo objetivo de conversão". Existem três campos que deve preencher: Nome, Valor de conversão e Pedido. Em Nome, basta adicionar um nome para o objetivo, por exemplo: "Postback".
Os valores de conversão disponíveis são:
- No Value: o valor é 0
- Corrigido: determina o pagamento da conversão manualmente ao definir o objetivo.
Nota: Atualmente não é possível passar Valor de conversão dinâmico na Appsflyer.
a Ordem** é utilizada para organizar os diferentes objectivos que criou na sua conta. Se criou vários Objectivos de Conversão, a Ordem irá ajudá-lo a organizar a forma como estes objectivos são apresentados nas suas Estatísticas e na Lista de Campanhas.
Depois de ter adicionado todos estes campos, clique no botão "Criar". O painel de administração apresentará a estrutura do URL de postback, bem como o ID do objetivo correspondente ao objetivo que acabou de criar. Deve ter um aspeto semelhante a este:
http://s.magsrv.com/tag.php?goal=66a8605e6cce49fbb8056f273f8e1a2e&tag=
Também pode consultar a nossa página Acompanhamento de conversões para obter mais informações sobre o nosso processo de criação de objectivos.
Passo 2: Adicionar a ExoClick como fonte de tráfego na Appsflyer
Para acompanhar as conversões na ExoClick, terá de adicionar ao URL da sua campanha um rastreador dinâmico chamado {conversions_tracking}, que identifica cada conversão de forma única.
Deve armazenar este tracker na Appsflyer e fazer com que notifique o servidor da ExoClick sempre que um utilizador gerar uma conversão. Isto é feito de forma muito simples, configurando a ExoClick como a fonte de tráfego, utilizando o modelo pré-definido. Para o fazer:
- Inicie sessão no seu painel de controlo da Appsflyer.
- Clique no separador "Parceiros integrados ". Em seguida, na barra de pesquisa, procure ExoClick.
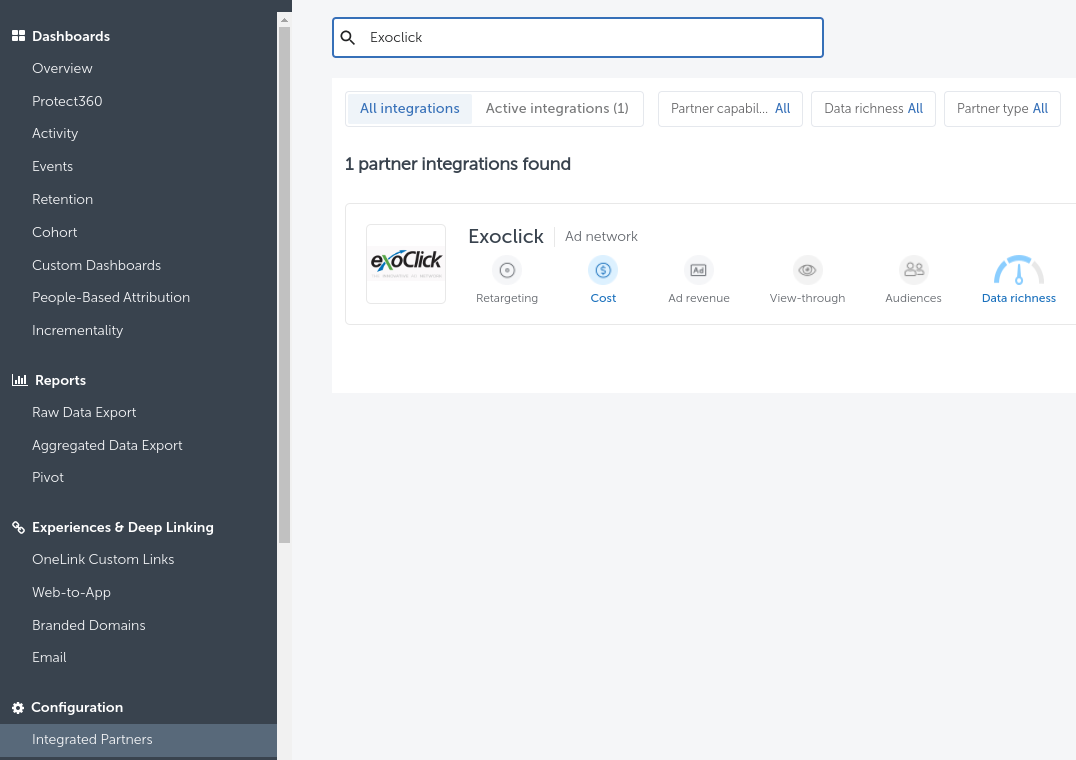
- Escolha ExoClick na lista de modelos e clique em "Activate Partner ".
- Na caixa "goalid ", adicione o Goal ID do objetivo que gerou anteriormente.
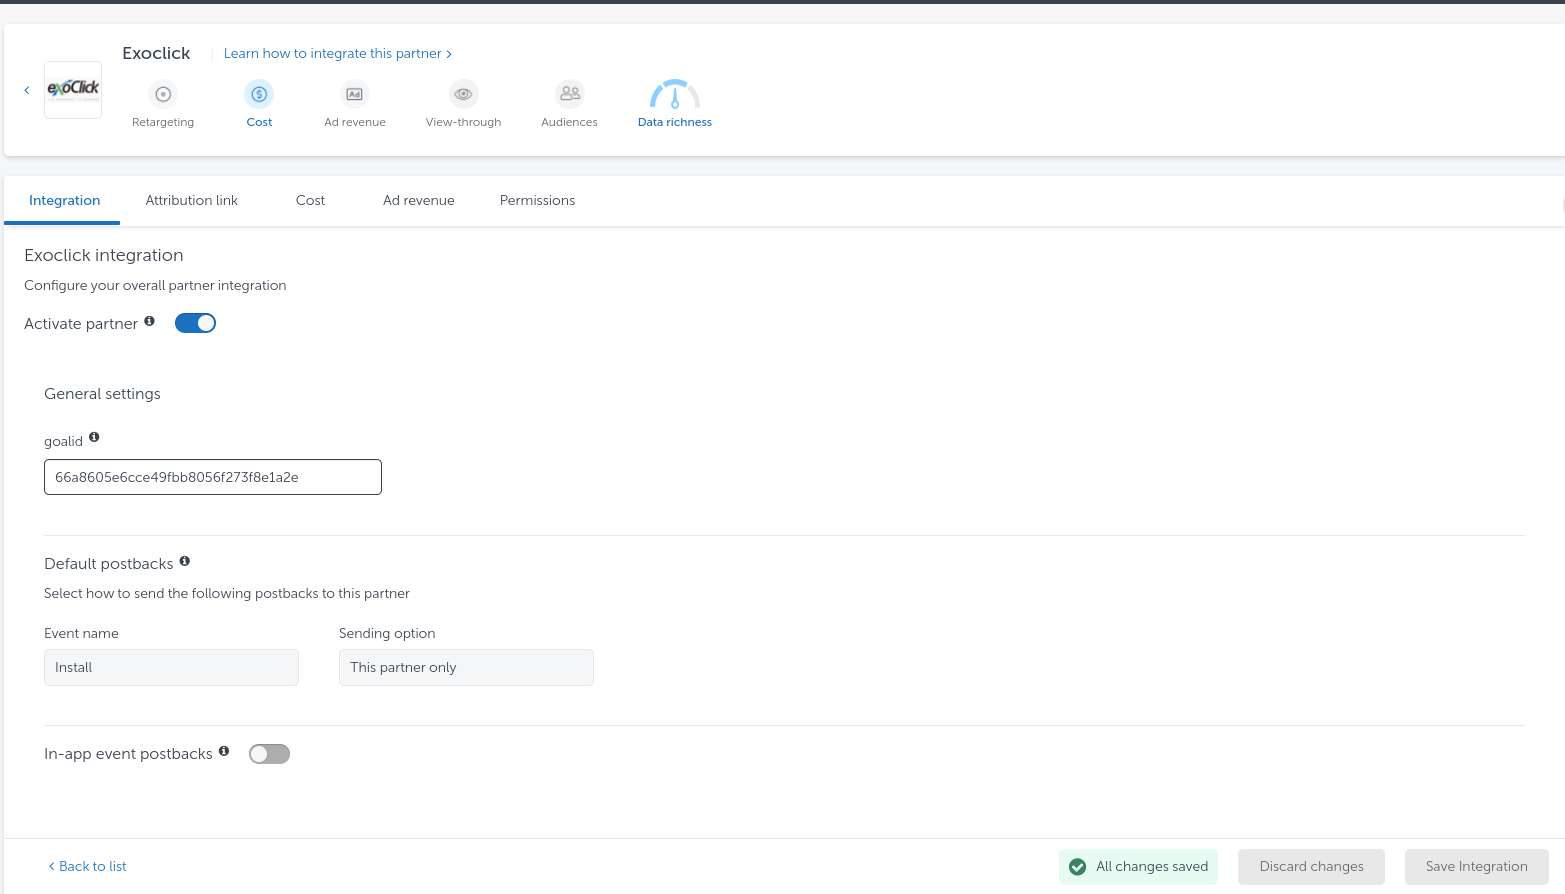
- Clique em "Salvar integração" para salvar essas alterações. Se quiser, também pode adicionar um ID de objetivo separado para cada ação in-app que ocorra na sua aplicação. Por exemplo, se o seu aplicativo tiver um evento de "compra no aplicativo", você pode criar uma meta separada e adicioná-la na seção "Postbacks de eventos no aplicativo".
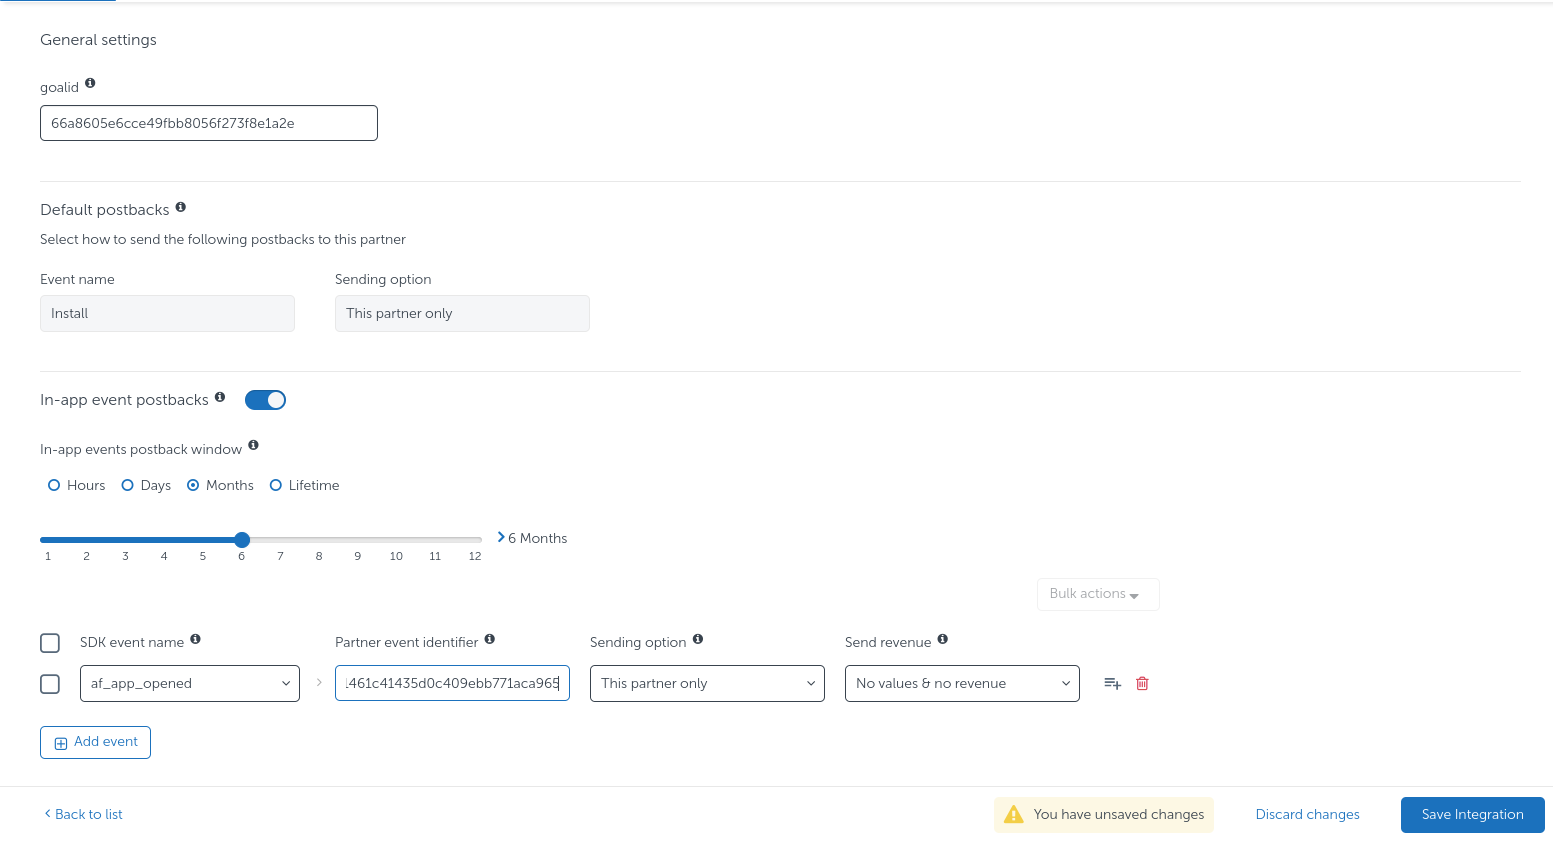
Quando a integração estiver concluída, obterá um "Attribution link ", que será utilizado como URL da sua campanha na ExoClick. Deve ter um aspeto semelhante a este:
https://app.appsflyer.com/XXXXX?pid=exoclick_int&af_siteid={site_id}&af_cost_value={actual_cost}&af_ad_id={variation_id}&af_c_id={campaign_id}&af_ad_type={format}&af_channel={src_hostname}&af_click_lookback=7d&clickid={conversions_tracking}&zoneid={zone_id}&catid={category_id}&country={country}
Passo 3: Configurar a campanha na ExoClick
Cole o URL da campanha criado na etapa anterior como sua "Variação" para sua campanha ExoClick. Certifique-se de que ele contém a tag {conversions_tracking} para enviar os detalhes da conversão para a Appsflyer.
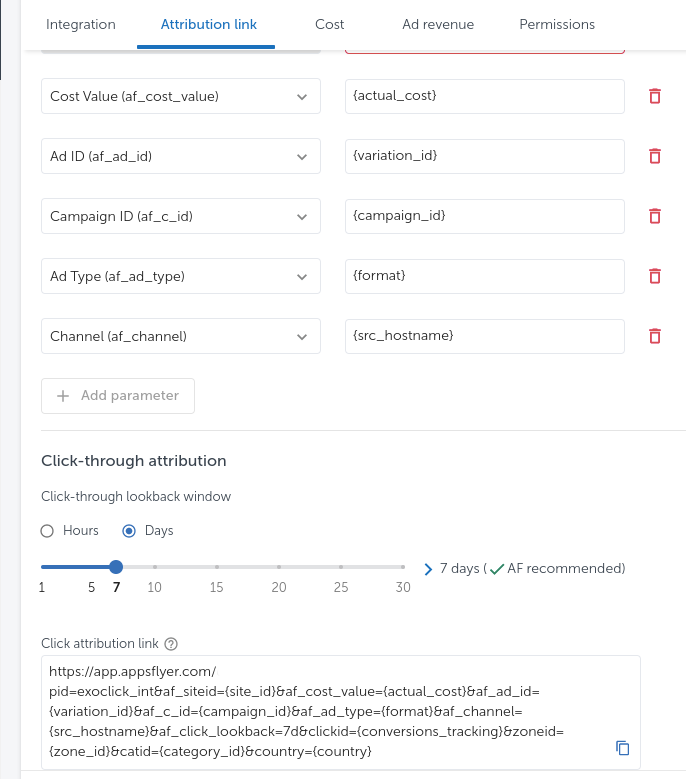
Concluir a configuração da campanha. Pode encontrar um guia detalhado sobre como criar uma campanha na Exoclick aqui.
Passo 4: Forneça-nos o nome da sua agência para ativar a sua integração
Como parte das alterações de segurança do Appsflyer, os anunciantes precisam ser aprovados pela rede de anúncios para notificar as conversões. Para concluir sua integração, entre em contato com seu gerente de conta ou com o Sucesso do cliente da Exoclick e forneça o Agency ID da Appsflyer, que é o valor que vem após o parâmetro af_prt em seu link de atribuição de cliques.

Se a configuração tiver sido feita corretamente, começará a ver conversões tanto na Appsflyer como na Exoclick. Não se esqueça de ativar a coluna Goal correspondente na sua Campaigns List e nas suas Statistics
Comentários adicionais ao comparar a Appsflyer com a ExoClick
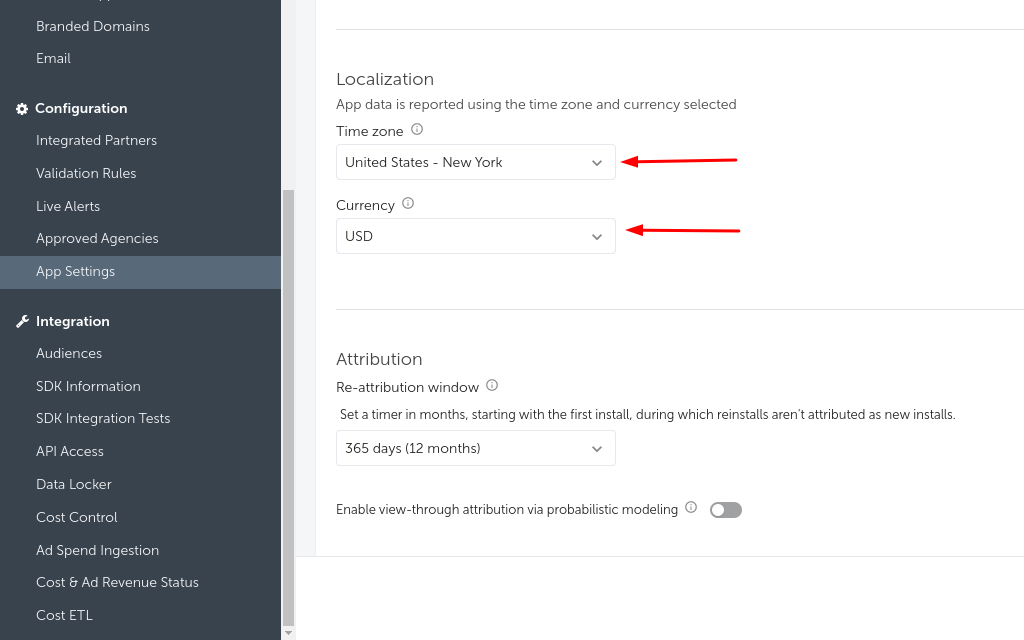
Deixando de lado o rastreamento de conversões, existem algumas configurações na Appsflyer que você deve ter em mente para garantir que você veja os mesmos resultados em ambas as plataformas:
- Fuso horário: Existe uma opção na Appsflyer para escolher um fuso horário para os relatórios.
Sugerimos que utilize o fuso horário EST (Estados Unidos - Nova Iorque) para coincidir com o fuso horário do servidor da ExoClick
- Moeda: Por favor, selecione USD ou Euro de forma a corresponder à moeda da sua conta ExoClick.
Se precisar de mais orientações sobre como configurar o acompanhamento de conversões na Appsflyer, não hesite em contactar o suporte da Appsflyer em support@appsflyer.io. Também pode contactar o Sucesso do cliente da Exoclick para rever estes passos.