Cómo realizar un seguimiento de las conversiones con CPVLab Pro
Esta guía es sólo para CPVLab Pro. Si desea conocer los pasos genéricos para el seguimiento S2S, consulte la sección Anunciantes.
ExoClick le ofrece acceso a fuentes de tráfico globales, funciones de segmentación, big data y herramientas de análisis estadístico para filtrar los resultados y optimizar sus campañas. Este manual explica cómo realizar el seguimiento de las conversiones en la red ExoClick cuando se utiliza el software de seguimiento CPVLab Pro. Para realizar el seguimiento de su oferta, necesita que CPVLab Pro y ExoClick se comuniquen entre sí a través de sus servidores.
Si desea recibir información adicional, consulte la Guía de integración de CPVLab
Paso 1: Crear el Goal ID para la URL Postback
Acceda a su panel de administración de ExoClick y vaya a Campañas > Seguimiento de conversiones. Esto le permite crear el código de seguimiento de conversiones que se utilizará en su URL de retroceso:

Haga clic en "Nuevo objetivo de conversión". Hay tres campos que debe rellenar: Nombre, Valor de Conversión y Orden. En Nombre, simplemente añada un nombre para el objetivo, por ejemplo: "Postback".
Los Valores de Conversión disponibles son:
- Sin valor: el valor es 0
- Corregido: se determina el pago de la conversión manualmente al configurar el Objetivo.
- Dinámico: el valor del pago se pasará a través de la URL de Postback. El paso de valores dinámicos se explicará en detalle más adelante durante la guía.
el Orden** se utiliza para organizar los diferentes objetivos que ha creado en su cuenta. Si ha creado múltiples Objetivos de Conversión, el Orden le ayudará a organizar cómo se muestran estos objetivos en sus Estadísticas y en la Lista de Campañas.
Una vez que haya añadido todos estos campos, haga clic en el botón "Crear". El Panel de Administración mostrará la estructura de la URL de Postback así como el Identificador de Meta correspondiente a la Meta que acaba de crear. Debería verse algo similar a esto:
http://s.magsrv.com/tag.php?goal=66a8605e6cce49fbb8056f273f8e1a2e&tag=
También puede consultar nuestra página Seguimiento de conversiones para obtener más detalles sobre nuestro proceso de creación de objetivos.
Paso 2: Añadir ExoClick como fuente de tráfico en CPVLab Pro y configurar el Postback
Para realizar un seguimiento de las conversiones en ExoClick, deberá añadir a la URL de su campaña un rastreador dinámico denominado{conversions_tracking}, que identifica cada conversión de forma única.
Debes almacenar este tracker en CPVLab Pro y hacer que notifique al servidor de ExoClick cada vez que un usuario genere una conversión. Esto se hace de forma muy sencilla configurando ExoClick como fuente de tráfico, utilizando la plantilla predefinida. Para ello
- Inicie sesión en su cuenta CPVLab Pro.
- Haga clic en la pestaña "Fuentes " y, a continuación, en "Fuentes de tráfico "
- Pulse el botón "Importar del catálogo "

- Seleccione ExoClick.
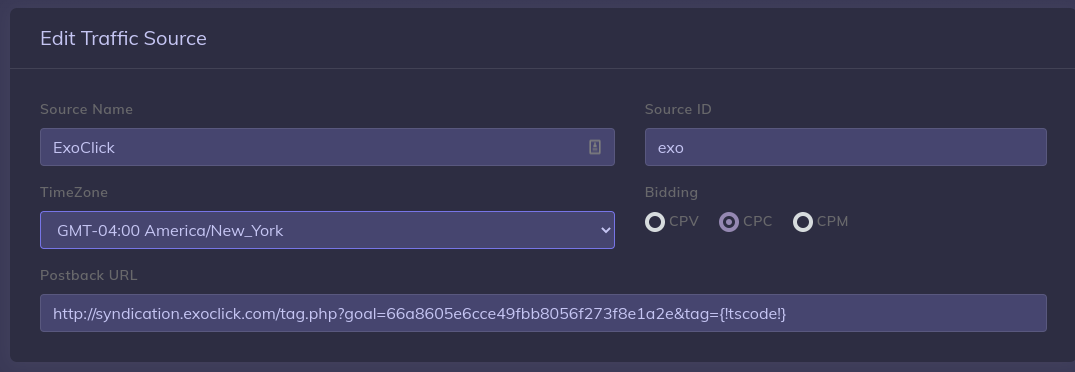
- CPVLab Pro rellenará previamente todos los ajustes de la fuente de tráfico. El primer cambio que necesita hacer es reemplazar el valor UNIQUEGOALID con el ID de objetivo que generamos en el Paso 1 de esta guía.

Nota: Si ha seleccionado el valor "Dinámico" al crear su objetivo de Conversión PASO 1, entonces debe añadir value={!revenue!} al final de la URL de Postback. En este caso, su URL de postback tendrá el siguiente aspecto:
http://s.magsrv.com/tag.php?goal=66a8605e6cce49fbb8056f273f8e1a2e&tag={!tscode!}&value={!revenue!}
- Cambie el TimeZone a GMT-04:00 America/New_York para que coincida con la zona horaria de ExoClick.
- Por último, seleccione su modelo de precios preferido en "Puja ". Ten en cuenta que podrás volver a cambiar la Puja en los ajustes de tu campaña.
La configuración de su Fuente de Tráfico debería tener ahora el siguiente aspecto:
Paso 3: Añadir una fuente de oferta a CPVLab Pro(opcional)
Si no utiliza una oferta de una plataforma de afiliación, vaya al paso 4
Haga clic en "Fuentes" > "Fuentes de ofertas". En "Importar del catálogo", encontrará una lista de redes de afiliados que puede integrar. Si su red de afiliación no está en la lista, puede definir manualmente los parámetros utilizados por la plataforma de afiliación de su elección.

Desde esta página, lo que realmente importa a ExoClick es el Revenue Placeholder. Si desea utilizar el valor de conversión dinámico de sus objetivos, debe asegurarse de que el token de pago de la plataforma de afiliación llegue a la URL de devolución de ExoClick.
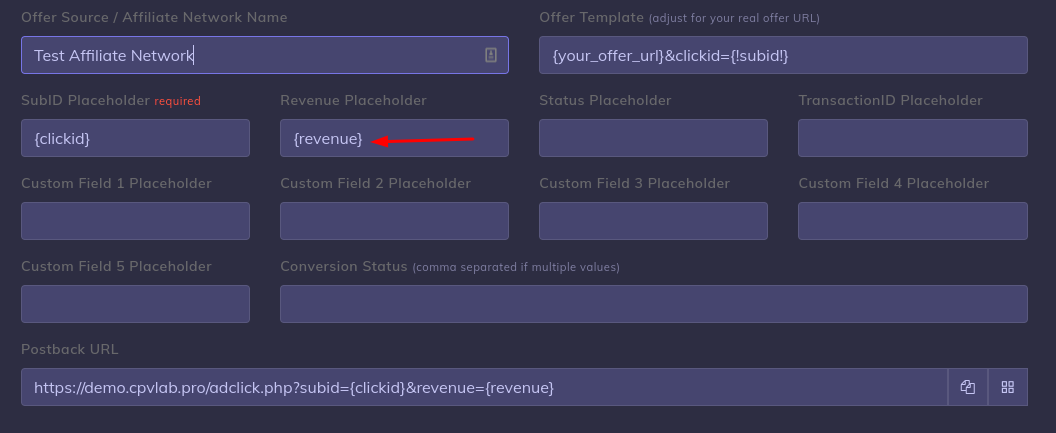
La URL de Postback mostrada aquí es la que tendrás que añadir en tu Plataforma de Afiliados para notificarles las conversiones. Importante: ¡no confundas esta URL de Postback con la que creaste en la configuración de la Fuente de Tráfico!
Para más información sobre cómo configurar la red de afiliados en CPVLab Pro, consulte su manual.
Paso 4: Añadir una oferta a CPVLab Pro
Haga clic en la pestaña "LP y ofertas" y, a continuación, en "Gestión de ofertas".
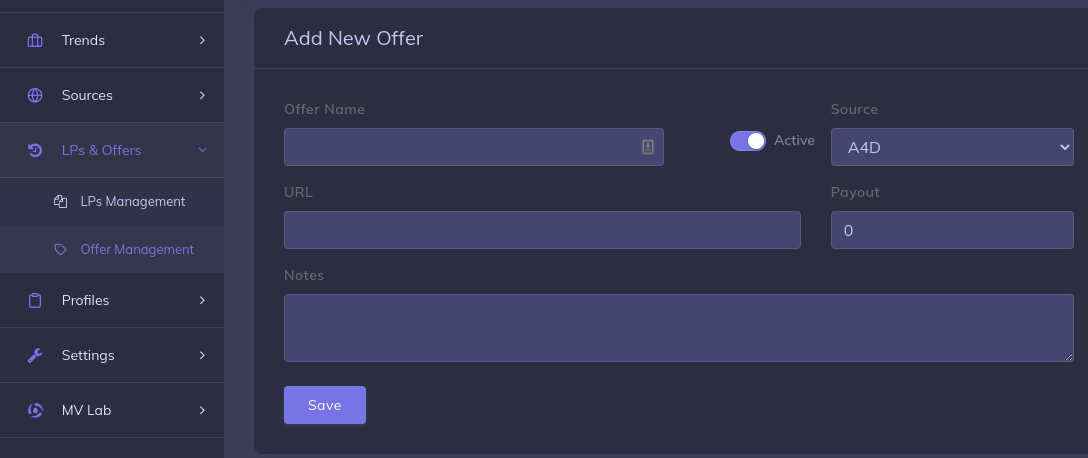
Añada un "Nombre de la oferta" y seleccione la "Fuente de la oferta" (si la tiene). A continuación, añada la URL de la oferta.
Por ejemplo
http://mypage.com/?a=14030&c=64375&s1=
Si su oferta no puede pasar pagos dinámicamente a través de la URL de Postback, entonces tendrá que especificar el Pago aquí:
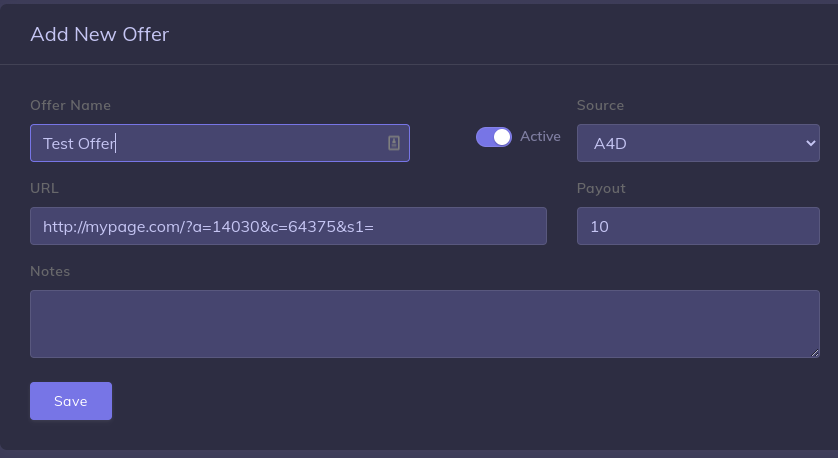
Una vez guardada la oferta, podrá utilizarla en sus campañas en CPVLab.
Paso 5: Configure su campaña en CPVLab Pro.
Cuando haga clic en la pestaña "Campañas" en CPVLab Pro, verá un menú que le permite crear una campaña de su elección. Alternativamente, puede hacer clic en Lista de campañas y elegir allí su campaña:
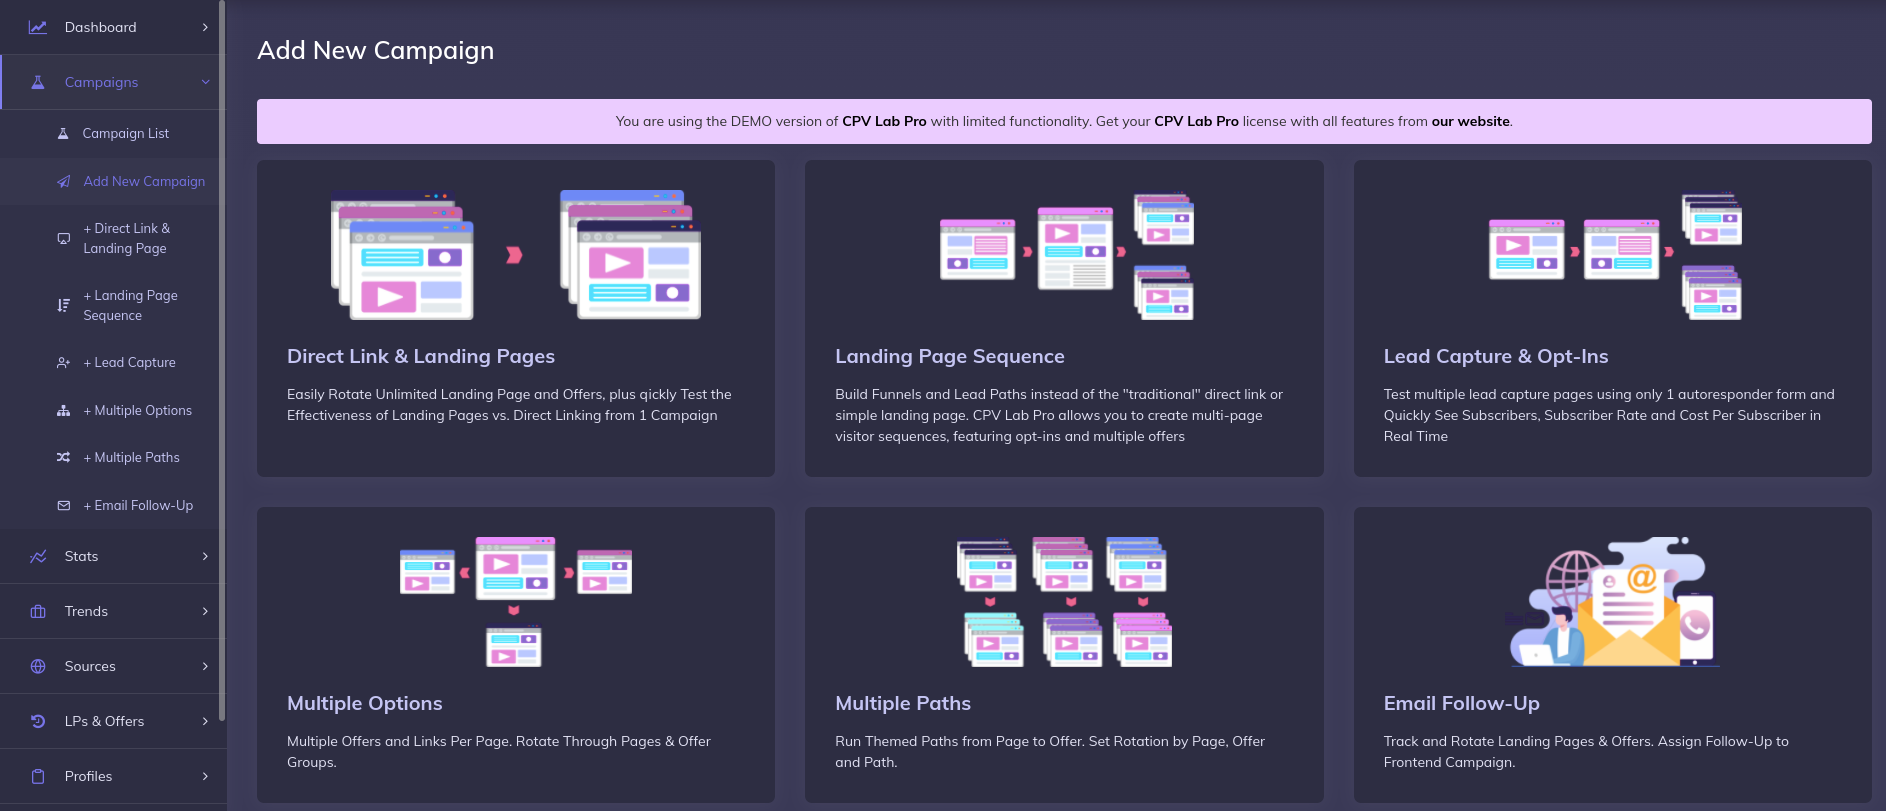
Para este tutorial, utilizaremos una configuración de "Enlace directo y página de destino". Añada un "Nombre" a la campaña y desplácese hasta "Macros & Tokens ".
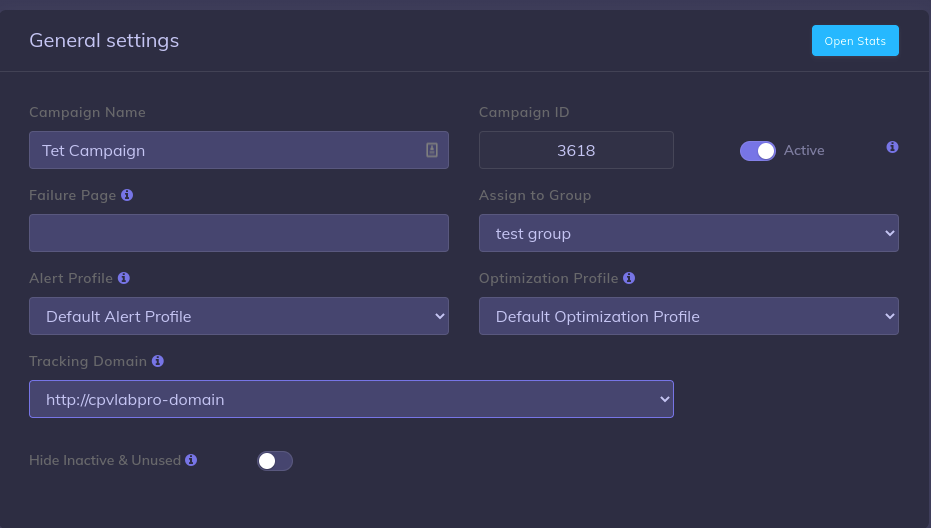
Seleccione ExoClick como fuente de tráfico. Puede cambiar el modelo de precios para esta campaña específica si lo desea (pero no añada un Coste ya que este valor se pasará a través del token {actual_cost} )

Continúe desplazándose hacia abajo. Si ha creado una página de destino, puede añadirla aquí.
En "Ofertas", haga clic en "Seleccionar oferta predefinida " y seleccione la oferta que ha creado en la sección anterior. El resto de los parámetros se rellenarán con la configuración de la Oferta:

Por último, en la sección "Píxel de seguimiento: Añadir píxel a la fuente de la oferta", marque la opción "Usar URL de retorno de la fuente de tráfico para marcar conversiones en su fuente de tráfico ". Asegúrese de que la URL de retorno que se muestra aquí coincide con la que creó en la sección 2 de esta guía.
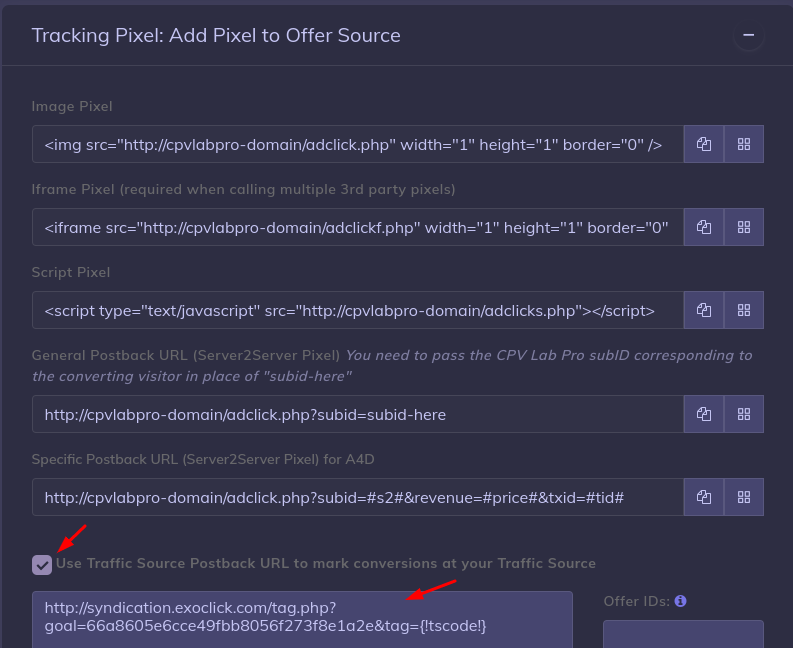
Guarde la campaña. Ahora debería obtener una URL de campaña similar a la siguiente:
https://demo.cpvlab.pro/base.php?c=3615&key=84050c38daaaee73e4e537d74f43cdef&sdom={src_hostname}&cost={actual_cost}&clkid={conversions_tracking}&varid={variation_id}
Tenga en cuenta que, dependiendo de la configuración de su campaña en CPVLab Pro, su dominio de seguimiento puede ser diferente. No obstante, la URL de la campaña debería ser similar a la anterior.
Utilizará esta URL cuando configure su campaña en ExoClick
Paso 6: Configurar la campaña en ExoClick
Pegue la URL de la campaña creada en el paso anterior como su "Variación" para su campaña ExoClick. Asegúrese de que contiene la etiqueta {conversions_tracking} para enviar los detalles de la conversión a CPVLab Pro.

Finalice la configuración de la campaña. Puede encontrar una guía detallada sobre cómo crear una campaña en Exoclick aquí.
Si la configuración se ha realizado correctamente, empezará a ver conversiones tanto en CPVLab Pro como en Exoclick. No olvide activar la columna Goal correspondiente en su Campaigns List y en sus Statistics
Si necesita más información sobre cómo configurar el seguimiento de conversiones en CPVLab Pro, no dude en ponerse en contacto con el servicio de asistencia de CPVLab Pro en support@cpvlab.pro. También puede ponerse en contacto con Exoclick's Customer Success para revisar estos pasos.