Cómo realizar un seguimiento de las conversiones con BeMob
Esta guía es sólo para Bemob. Si desea conocer los pasos genéricos para el seguimiento S2S, por favor consulte la sección Anunciantes.
Esta guía consta de dos secciones:
a) Cómo configurar el seguimiento de conversiones en Bemob. Esta sección se centrará en saber cómo configurar la URL de Postback en Bemob, cómo notificar las conversiones a Bemob y cómo mostrar estas conversiones tanto en Bemob como en ExoClick.
b) Cómo integrar Exoclick en Bemob vía API.
Si desea recibir información adicional, consulte la Guía de integración de Bemob
Cómo configurar el seguimiento de conversiones en Bemob
ExoClick le ofrece acceso a fuentes de tráfico globales, funciones de segmentación, big data y herramientas de análisis estadístico para filtrar los resultados y optimizar sus campañas. Este manual explica cómo realizar el seguimiento de las conversiones en la red de ExoClick cuando se utiliza el software de seguimiento BeMob. Para realizar el seguimiento de su oferta, necesita que BeMob y ExoClick se comuniquen entre sí a través de sus servidores.
Paso 1: Crear el Goal ID para la URL Postback
Acceda a su panel de administración de ExoClick y vaya a Campañas > Seguimiento de conversiones. Esto le permite crear el código de seguimiento de conversiones que se utilizará en su URL de retroceso:

Haga clic en "Nuevo objetivo de conversión". Hay tres campos que debe rellenar: Nombre, Valor de Conversión y Orden. En Nombre, simplemente añada un nombre para el objetivo, por ejemplo: "Postback".
Los Valores de Conversión disponibles son:
- Sin valor: el valor es 0.
- Corregido: se determina el pago de la conversión manualmente al configurar el Objetivo.
- Dinámico: el valor del pago se pasará a través de la URL de Postback. El paso de valores dinámicos se explicará en detalle más adelante durante la guía.
el Orden** se utiliza para organizar los diferentes objetivos que ha creado en su cuenta. Si ha creado múltiples Objetivos de Conversión, el Orden le ayudará a organizar cómo se muestran estos objetivos en sus Estadísticas y en la Lista de Campañas.
Una vez que haya añadido todos estos campos, haga clic en el botón "Crear". El Panel de Administración mostrará la estructura de la URL de Postback así como el Identificador de Meta correspondiente a la Meta que acaba de crear. Debería verse algo similar a esto:
http://s.magsrv.com/tag.php?goal=66a8605e6cce49fbb8056f273f8e1a2e&tag=
También puede consultar nuestra página Seguimiento de conversiones para obtener más detalles sobre nuestro proceso de creación de objetivos.
Paso 2: Añadir ExoClick como fuente de tráfico en BeMob y configurar el Postback
Para realizar un seguimiento de las conversiones en ExoClick, deberá añadir a la URL de su campaña un rastreador dinámico denominado{conversions_tracking}, que identifica cada conversión de forma única.
Debes almacenar este tracker en BeMob y hacer que notifique a la API de ExoClick cada vez que un usuario genere una conversión. Esto se hace de forma muy sencilla configurando ExoClick como fuente de tráfico, utilizando la plantilla predefinida. Para ello:
- Accede a tu cuenta BeMob
- Haga clic en la pestaña "Fuentes de tráfico
- Pulse el botón "Nuevo a partir de plantilla"
- Seleccione ExoClick entre las plantillas de fuentes de tráfico y pulse el botón "Siguiente".

BeMob rellenará previamente todos los ajustes de la fuente de tráfico. El parámetro {externalId} se añadirá automáticamente a la URL de postback para pasar la información de la etiqueta {conversions_tracking} de la URL de su campaña. El único cambio que necesitas hacer es actualizar el valor REPLACE con el goal ID que generamos en el PASO 1.
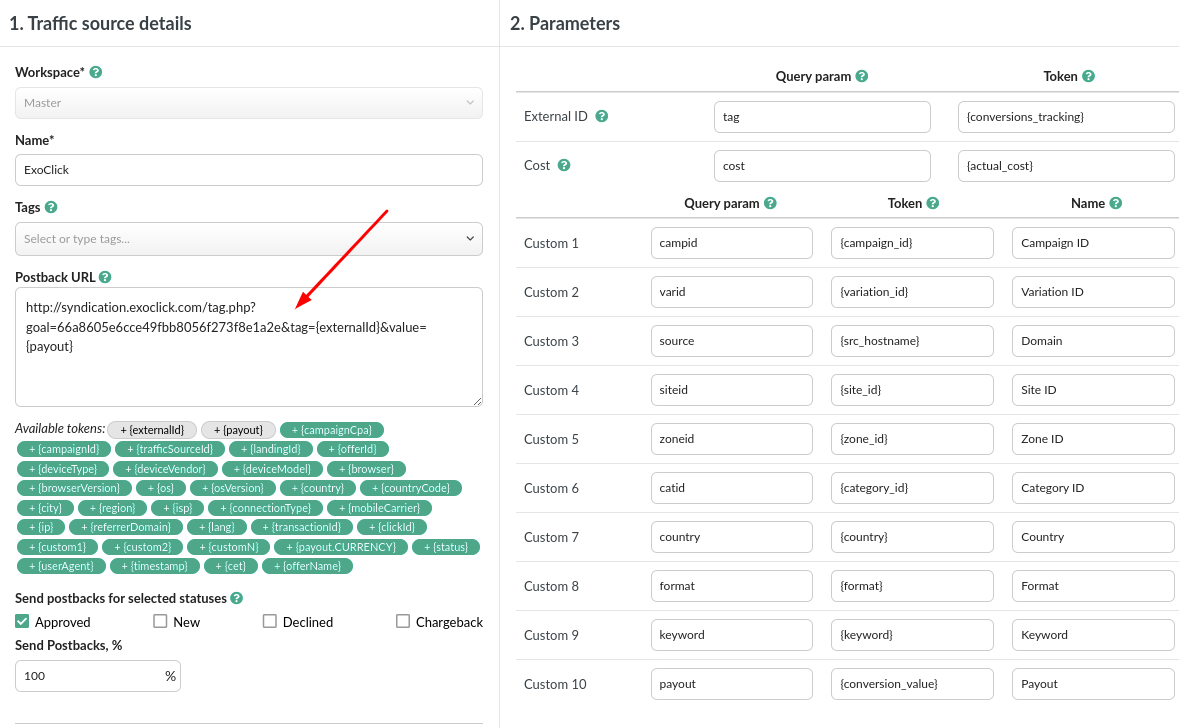
Nota: Si ha seleccionado el valor "Dinámico" al crear su objetivo de Conversión, entonces debe añadir value={payout} al final de la URL de Postback. En este caso, su URL de postback tendrá el siguiente aspecto:
http://s.magsrv.com/tag.php?goal=66a8605e6cce49fbb8056f273f8e1a2e&tag={externalId}&value={payout}
En la sección Parámetros de Bemob, el único parámetro obligatorio necesario para realizar el seguimiento de las conversiones es el ID externo, todos los demás son opcionales. Siempre puedes encontrar todos los tokens disponibles en nuestra sección de Anunciantes
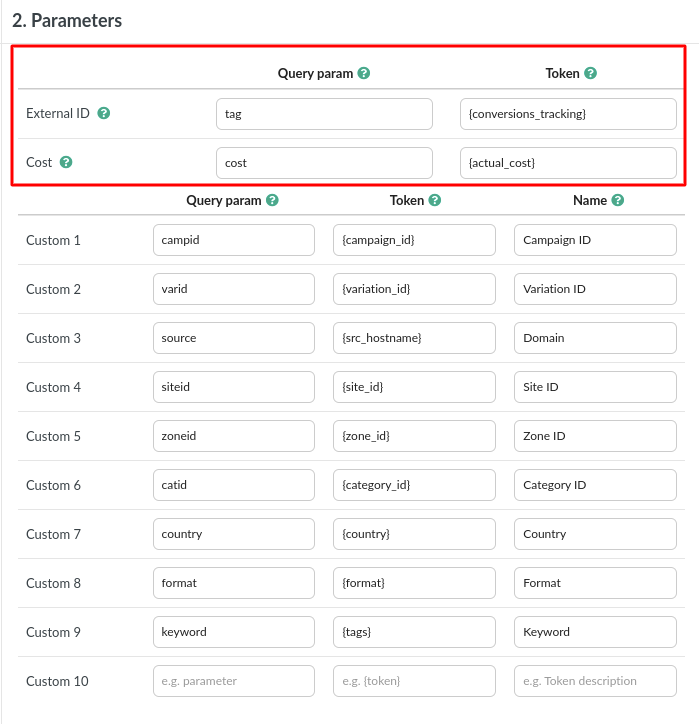
Parámetro de coste {actual_cost} se define como el coste para el CPM/CPC real pagado por cada impresión/clic. Por lo tanto, este parámetro debe utilizarse para Banners CPC y Popunders CPM/Smart CPM.
Si desea realizar un seguimiento de las conversiones para campañas CPM de banners o cualquier otro formato en CPM, considere la posibilidad de utilizar API de seguimiento de Bemob.
Si no desea añadir más parámetros, haga clic en "Guardar". Puede realizar cambios en cualquier momento seleccionando su fuente de tráfico de la lista.
Paso 3: Crear una campaña con ExoClick como fuente de tráfico en BeMob
Antes de seguir estos pasos, asegúrese de que la configuración de su oferta y de la red de afiliados (si es necesario) están configuradas correctamente.
Una vez que confirme que los detalles del producto/oferta son correctos, entonces:
- Haga clic en la pestaña **"Campañas
- Pulse "Nuevo " para abrir el menú de configuración de la nueva campaña
- Seleccione "ExoClick " como fuente de tráfico para esta campaña y rellene el resto de campos obligatorios. Si se selecciona la opción "Auto", el coste de un clic se tomará del parámetro "{actual_cost}" que se define en el Paso 2 de esta guía. De lo contrario, si su proveedor de tráfico no pasa el parámetro click cost, tendrá que establecer los costes manualmente

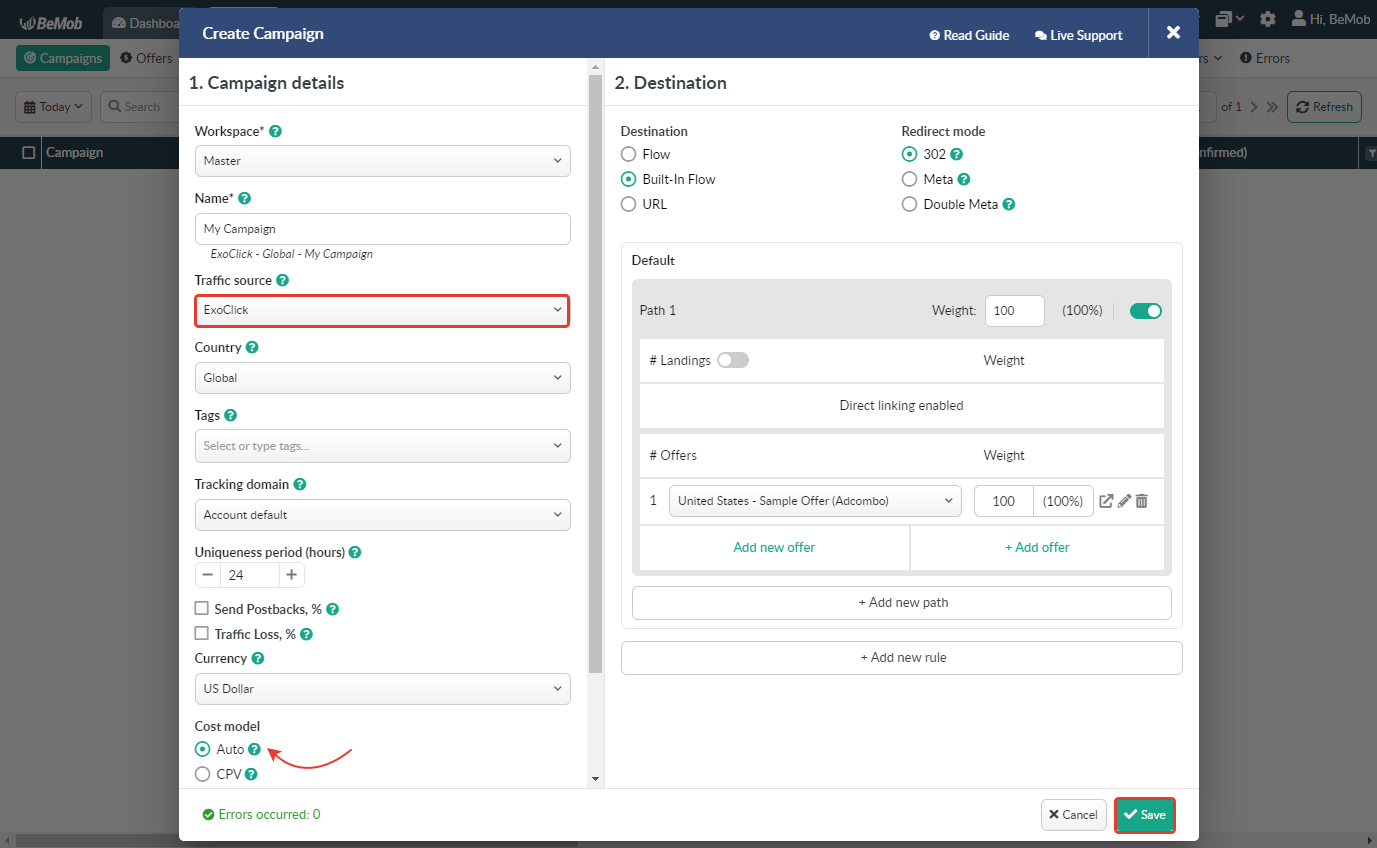
Una vez que haya terminado de configurar las rutas de destino de su campaña, haga clic en "Guardar". La URL de la campaña aparecerá tras ir a "Acciones" → "Enlaces de campaña"
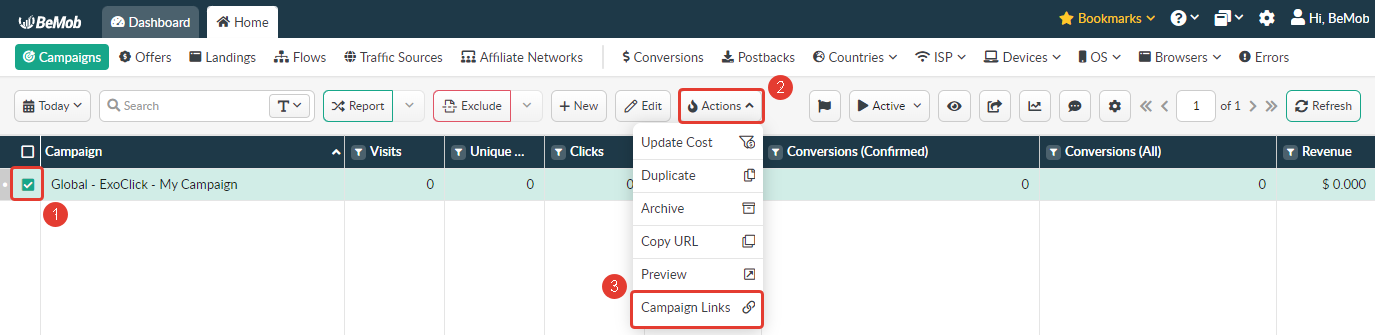
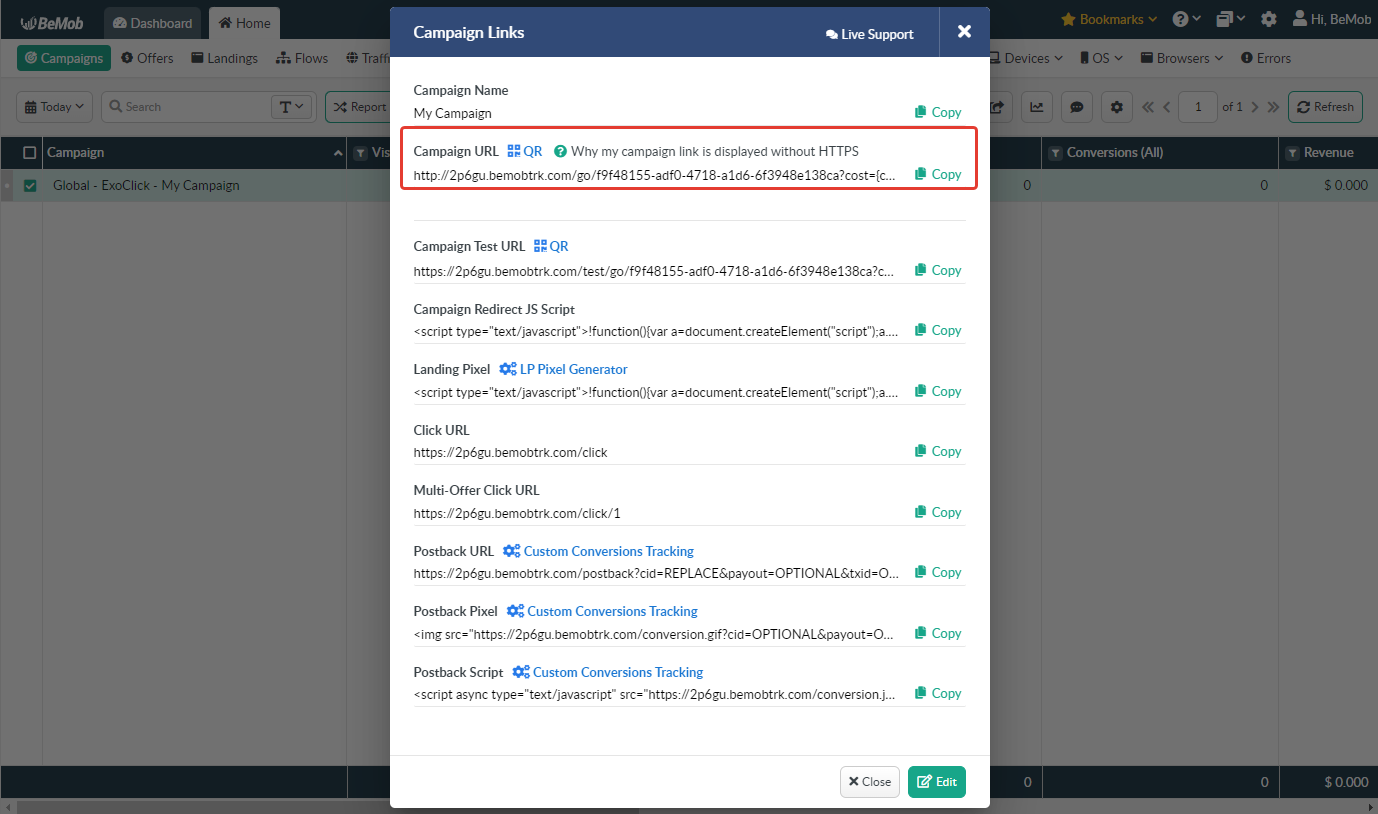
El enlace de la URL de la campaña es el que utilizará en la configuración de su campaña en ExoClick. He aquí un ejemplo:
Ejemplo de URL:
http://2p6gu.bemobtrk.com/go/992266f6-ed46-48ba-aaeb-03e1e7d9b8b5?cost={actual_cost}&tag={conversions_tracking}&campid={campaign_id}&varid={variation_id}&source={src_hostname}&siteid={site_id}&zoneid={zone_id}&catid={category_id}&country={country}&format={format}&keyword={tags}&payout={conversion_value}
Tenga en cuenta que, dependiendo de la configuración de su campaña en Bemob, su dominio de seguimiento puede ser diferente. No obstante, la URL de la campaña debería ser similar a la anterior.
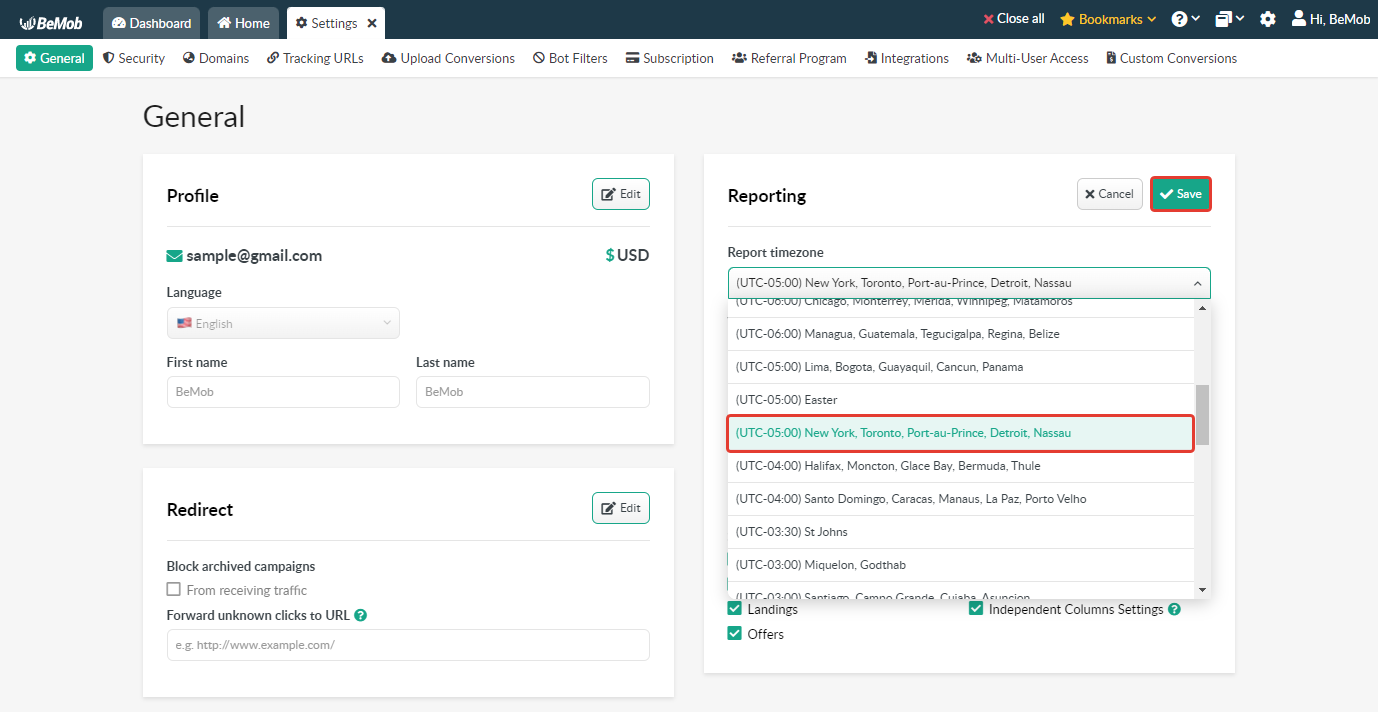
Con esta información, debería estar listo para configurar su campaña en ExoClick. Sin embargo, hay algunos ajustes adicionales que puede elegir para personalizar sus informes en Bemob:
- Zona horaria: Hay una opción en BeMob para elegir una zona horaria para los informes. Se sugiere utilizar la zona horaria Estados Unidos - Nueva York para que coincida con la zona horaria del servidor de ExoClick.
- Divisa: BeMob actualmente soporta múltiples monedas y le pide que seleccione una cuando se establece la cuenta. ExoClick soporta USD y EUR

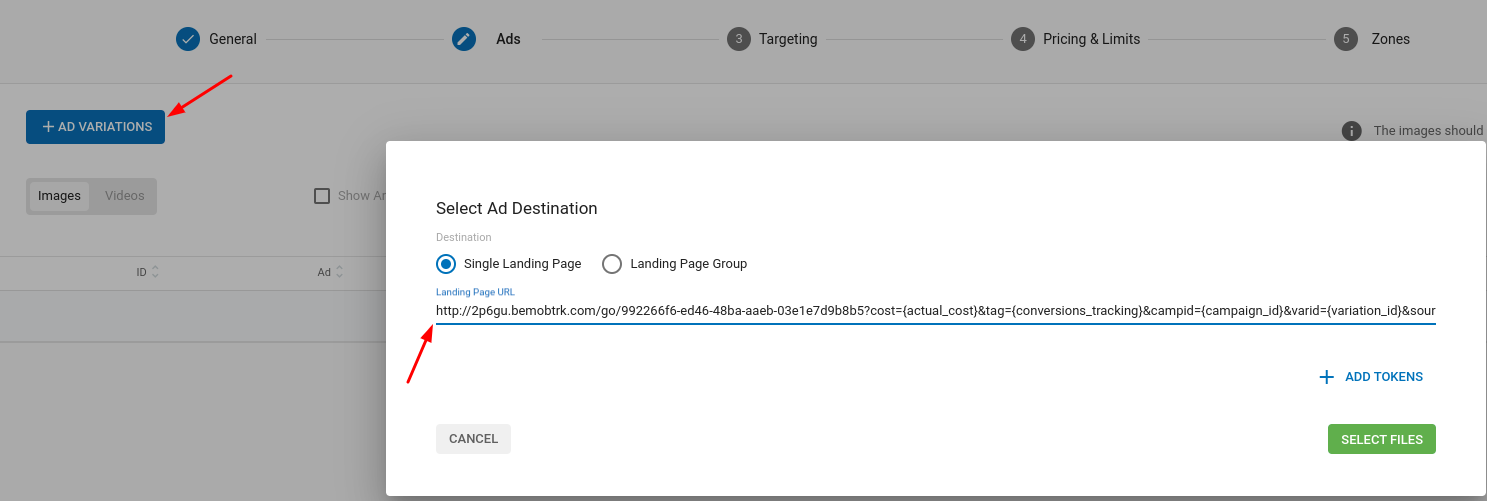
Paso 4: Configurar la campaña en Exoclick
Pegue la URL de la campaña creada en el paso anterior como su "Variación" para su campaña ExoClick
Puede encontrar una guía detallada sobre cómo crear una campaña en ExoClick aquí
Si la configuración se ha realizado correctamente, empezarás a ver conversiones tanto en Bemob como en Exoclick. No olvide habilitar la columna Goal correspondiente en su Campaigns List y en sus Statistics
Si necesita más orientación sobre cómo configurar el seguimiento de conversiones en Bemob, no dude en ponerse en contacto con Soporte de Bemob. También puede ponerse en contacto con Exoclick's Customer Success para revisar estos pasos.
API ExoClick Integración en Bemob
Mediante la integración de Bemob con ExoClick a través de la API, puede automatizar el proceso de recaudación de costes para ExoClick.
Requisitos
Antes de poder integrarte con Bemob, necesitas generar un Token API en ExoClick.
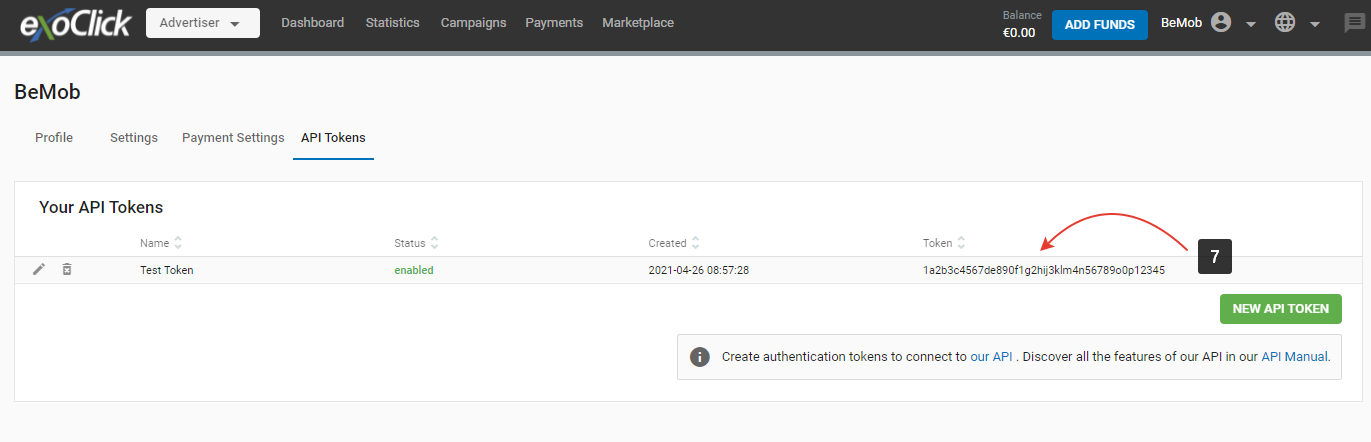
Para obtener ExoСlick API Token:
- Accede a los ajustes de Perfil.
- Ir a la sección API Tokens.
- Pulse el botón Nuevo token de API.
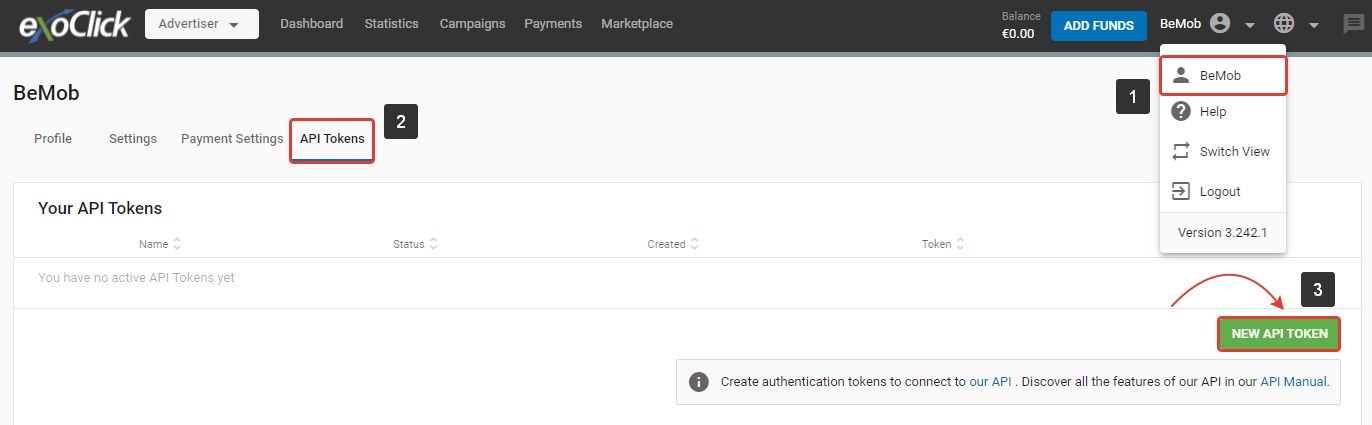
- Especifique Nombre del token en el campo correspondiente.
- Habilitar Estado de la ficha.
- Pulse Guardar para guardar los ajustes.

- Copie el token de API generado.
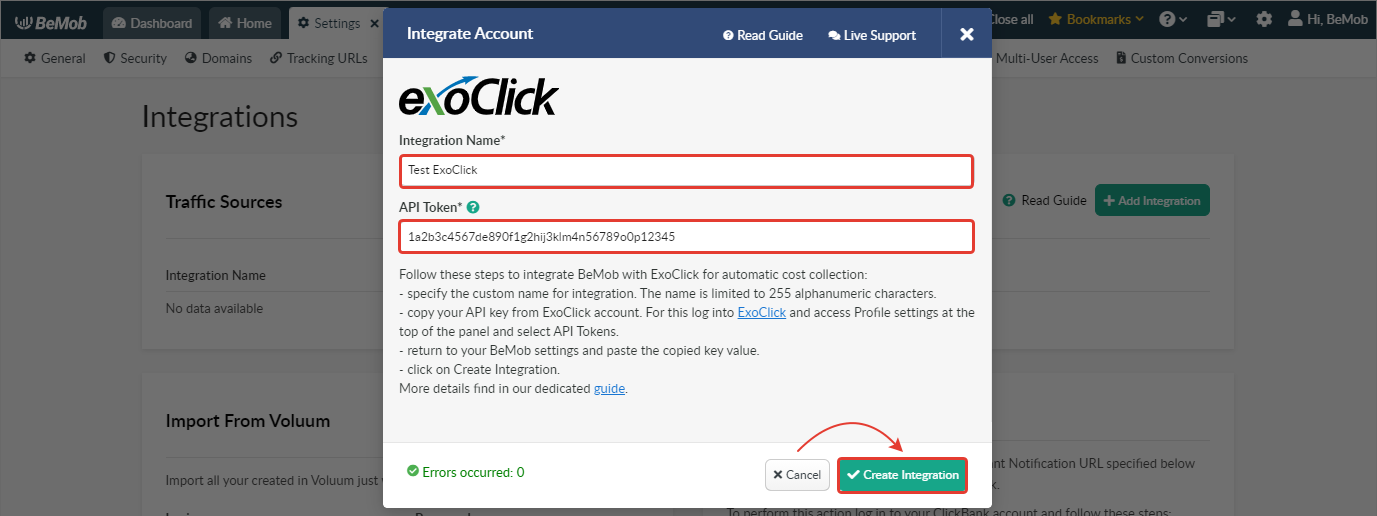
Instrucciones
Una vez que haya copiado correctamente el token de la API de ExoClick desde la plataforma de ExoClick, deberá proceder a integrarlo en su cuenta de BeMob.
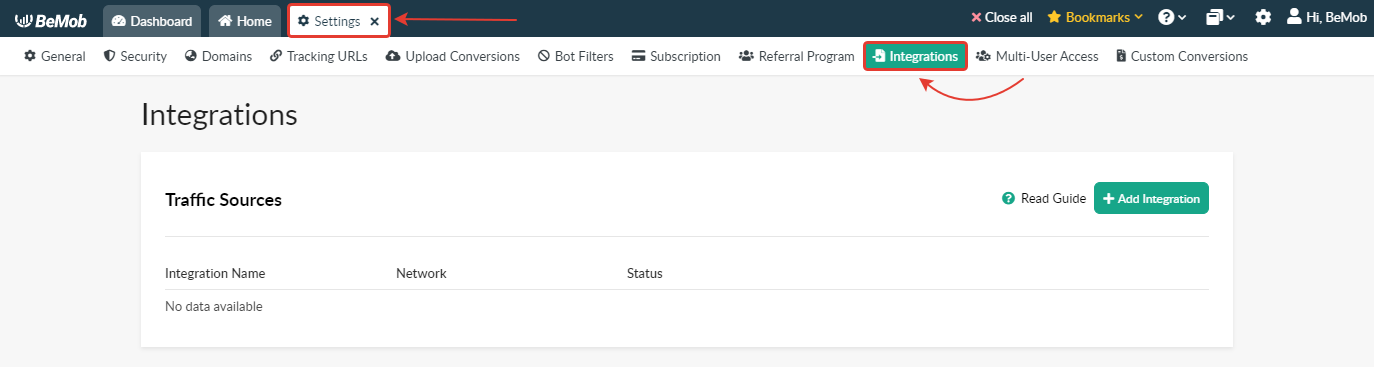
Para iniciar la integración, siga estos pasos:
- Vaya a Configuración de su cuenta BeMob.
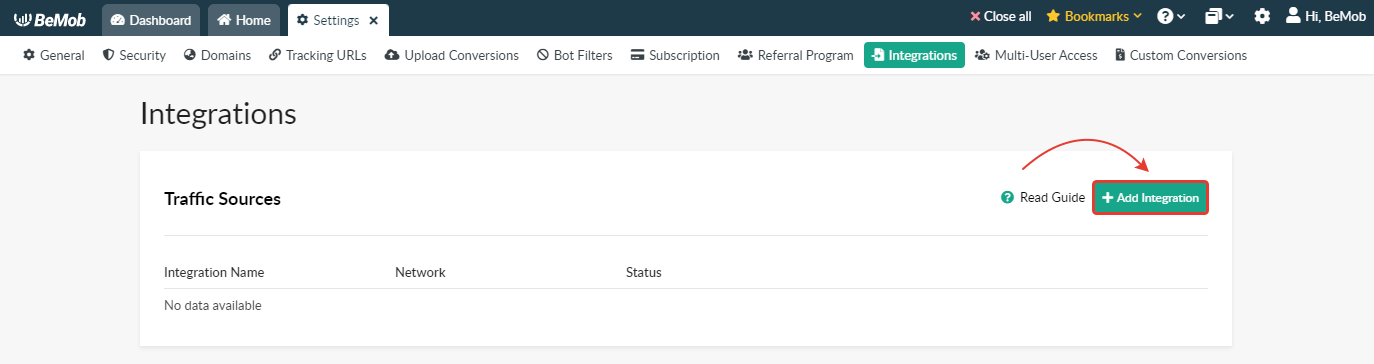
- Acceda a la sección Integraciones.
- Pulse el botón Añadir integración.
- Seleccione ExoСlick de la lista y pulse el botón Siguiente.
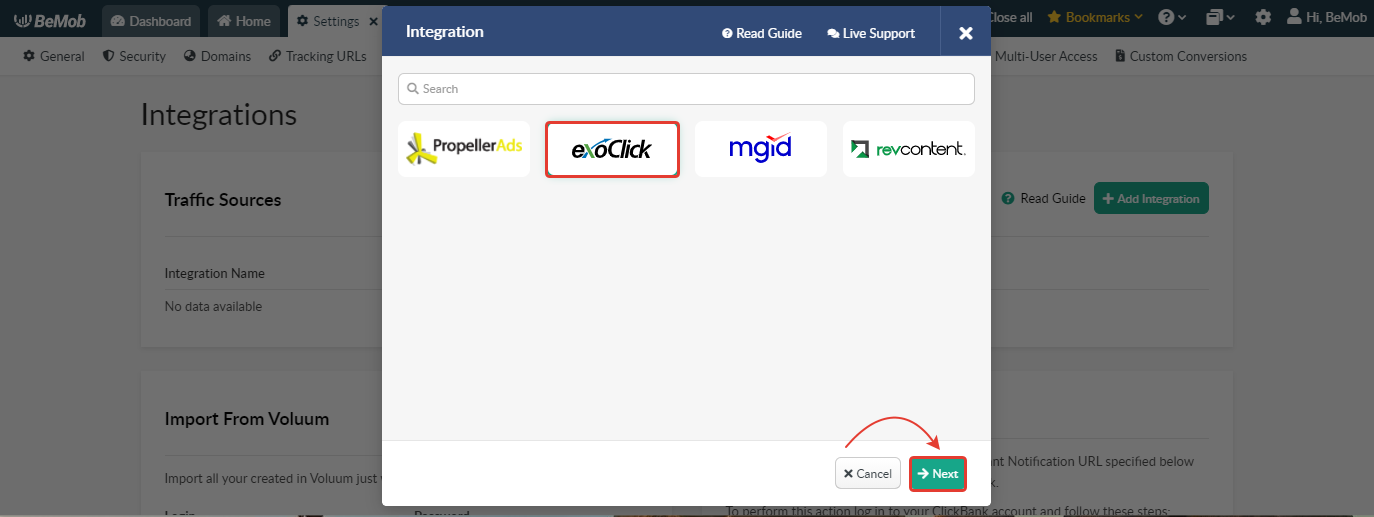
- Introduzca un Nombre de integración personalizado, asegurándose de que no supera los 250 caracteres alfanuméricos.
- Proporcione el API Token de su cuenta ExoСlick.
- Pulse el botón Crear integración.
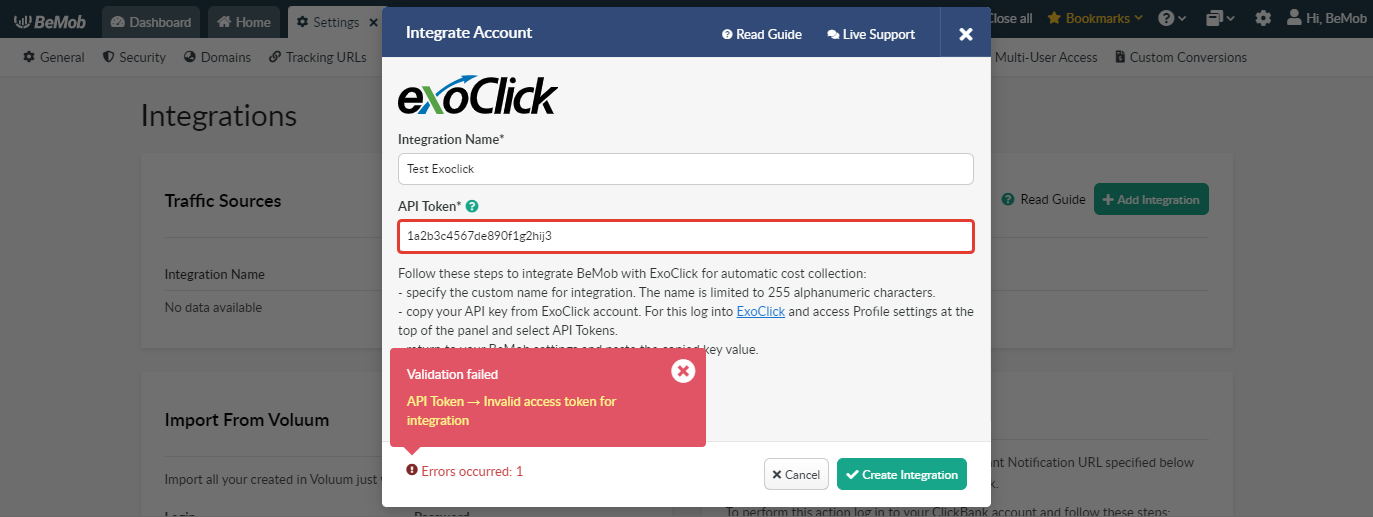
Nota: Si está utilizando un token de API no válido, no se creará la integración.
Si la clave es válida y aceptada por BeMob, aparecerá un registro en la sección Integración, y la integración se mostrará como activa.
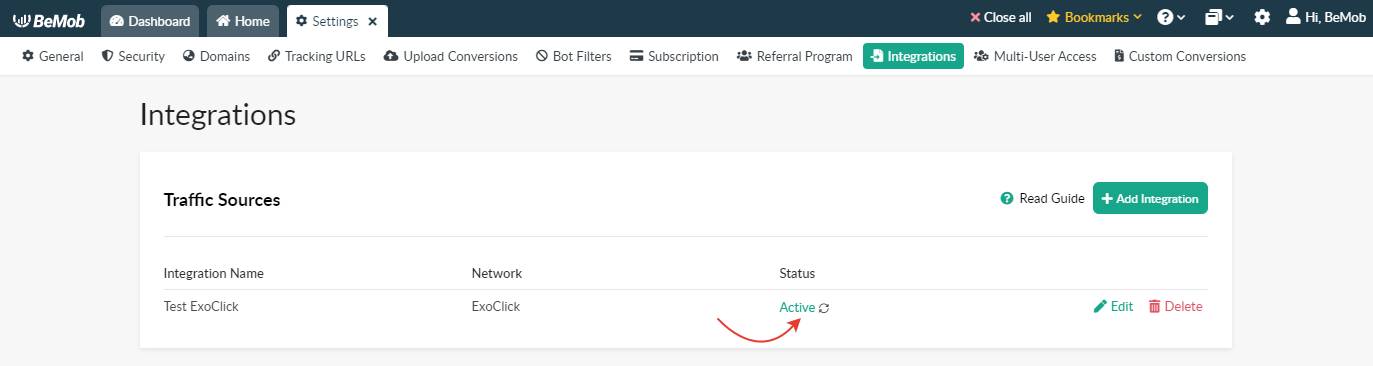
La integración puede ser editada o borrada si es necesario.
Nota: Si elimina la fuente de tráfico integrada, se detendrá la transmisión de costes a través de la API para todas las campañas asociadas. Sin embargo, se conservarán los datos recibidos anteriormente.
Después de crear con éxito la integración con ExoСlick en Configuración, es necesario seleccionar esta integración en el nivel de plantilla de fuente de tráfico ExoСlick.
Si ya ha configurado ExoСlick para sus campañas y desea configurar el cobro automático de costes para ellas, es necesario que siga estos pasos:
- Vaya a la pestaña Fuentes de tráfico;
- Seleccione ExoСlick → Editar;
- Elige la integarción correspondiente;
- Guarda la configuración.
Nota: Hay que atenerse a la fórmula: 1 campaña BeMob = 1 campaña ExoСlick. Si utiliza la misma URL de campaña BeMob en varias campañas ExoСlick, la integración funcionará sólo para 1 campaña.
Los datos del coste pasado automáticamente estarán disponibles en la columna Coste.

Si necesita más orientación o necesita ayuda con la configuración, póngase en contacto con el equipo de asistencia de BeMob. También puede ponerse en contacto con ExoClick's Customer Success para revisar estos pasos.