> For the complete documentation index, see [llms.txt](https://docs.exoclick.com/llms.txt). Markdown versions of documentation pages are available by appending `.md` to page URLs; this page is available as [Markdown](https://docs.exoclick.com/advertisers/conversion-tracking/tracking-manuals/affise-tracking.md).
# How to track conversions with Affise
*This guide is for Affise only. If you want to know the generic steps for S2S tracking, please check the* [*Advertisers section*](/advertisers/conversion-tracking/conversion-tracking.md#using-conversion-tracking-api---s2s-recommended)*.*
ExoClick gives you access to global traffic sources, targeting features, big data and statistical analytical tools to filter results and optimise your campaigns. This manual explains how to track conversions on the ExoClick network when you are using tracking software Affise. In order to track your offer, you need Affise and ExoClick to speak to each other through their servers.
If you want to receive additional information, please check [Affise's integration guide.](https://help-center.affise.com/en/articles/6485108-set-up-s2s-integration-with-affiliates)
{% stepper %}
{% step %}
## Create the Goal ID for the Postback URL
Log into your ExoClick Admin Panel and go to **Campaigns > Conversions tracking**. This allows you to create the conversions tracking code to be used in your **postback URL**:
Click "New Conversion Goal". There are three fields you must complete: **Name**, **Conversion Value** and **Order**. In **Name**, simply add a name for the goal, for example: "Postback".
The available Conversion Values are:
* **No Value:** value is 0
* **Fixed:** you determine the payout of the conversion manually when setting up the Goal.
* **Dynamic:** the value of the payout will be passed through the Postback URL. Dynamic value passing will be explained in detail later during the guide.
**Order** is used to organize the different goals you have created in your account. If you have created multiple Conversion Goals, the Order will help you organize how these goals are displayed in your Statistics and in the Campaigns List.
Once you have added all these fields, click on the **"Create"** button. The Admin Panel will display the structure of the Postback URL as well as the **Goal ID** corresponding to the Goal you just created. It should look something similar to this:
```
http://s.magsrv.com/tag.php?goal=66a8605e6cce49fbb8056f273f8e1a2e&tag=
```
You can also check our [Conversions Tracking](/advertisers/conversion-tracking/conversion-tracking.md) page to find out more details about our Goal creation process.
{% endstep %}
{% step %}
## Create Exoclick as an Affiliate and set up the Postback URL
To track conversions on ExoClick you will need to add to your **campaign URL** a dynamic tracker called **{conversions\_tracking}**, which identifies each conversion uniquely.
You must store this tracker on Affise Pro and get it to notify ExoClick’s server each time a user generates a conversion. This is achieved through a **Postback URL**.
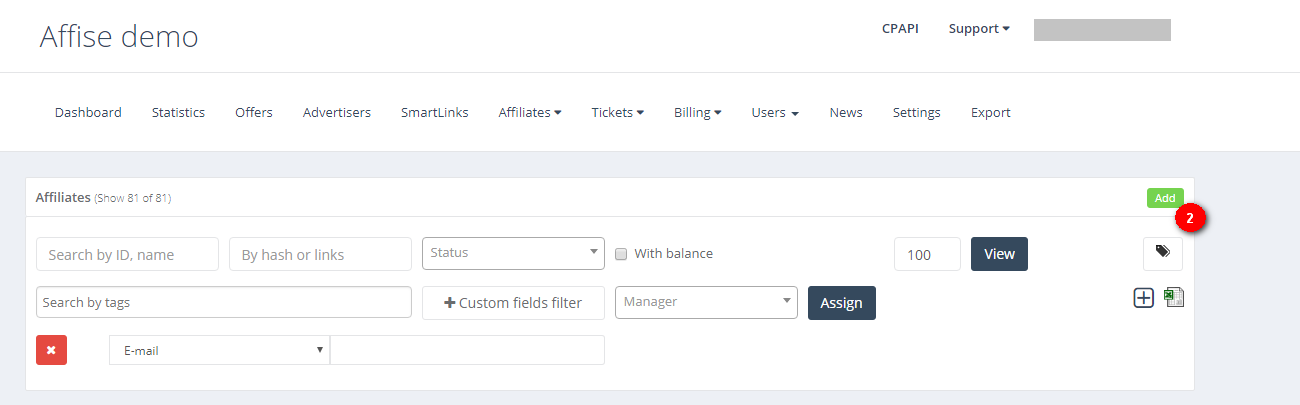
1. Go to "Affiliates" > "Affiliate Management", then click "Add"
1. When setting up an Affiliate in Affise, there are three required fields in the form: **Email**, **Password** and **Country**. You can use the same details as your account in ExoClick. However, make sure that fields Email and Company Name differ from each other since it'll further affect tracking flow.
2. Scroll down the form until you reach **"Affiliate Postbacks"**, then click on the **+** button to add a Postback:
When adding a Postback URL in Affise, you can choose whether to add a **Local Postback** or a **Global Postback**.
A local postback is applied to a specific campaign, whereas a global postback will be applied to all offers in which you use ExoClick as a traffic source. We recommend to use "Global Postback" for better ease of use, but you can set up a Local Postback later when setting up the offer.
4. Select **Default** as your Integration Method, then add the following **Postback URL**:
```
http://s.magsrv.com/tag.php?goal=REPLACE&tag={sub1}
```
If the Goal you created in Exoclick had **Dynamic** conversion value, then the Postback URL should be the following:
```
http://s.magsrv.com/tag.php?goal=REPLACE&tag={sub1}&value={sum}
```
5. Change the REPLACE value with the Goal ID you generated in the previous Section. **Note:** You need to add the Goal ID from ExoClick **inside the Postback URL**, not under the Goal column.
6. Click “Save” to finish the changes.
{% endstep %}
{% step %}
## Create the "Offer Link" in Affise
In order to create the offer link, you need to go to "Offers" > "New offers"
Complete the form with the corresponding values. Once all is set you just need to select ExoClick as the affiliate and copy the generated offer link you wish to track.
Under "Send the link to active affiliate", copy the link that will be generated here. You will use this link as your campaign URL in ExoClick. You will need to add a couple of parameters in order to make sure that you are able to get the **{conversions\_tracking}** string from the campaign URL.
Your tracking URL should look like the following:
```
http://demo.go2affise.com/click?pid=81&offer_id=46&s1={conversions_tracking}
```
**Note**: ExoClick’s {conversions\_tracking} generates a string of between 140 to 500 characters, so you have to make sure Affise is able to receive and return the complete string.
{% endstep %}
{% step %}
## Add the tracking URL as a Variation in your ExoClick campaign.
Paste the campaign URL created in the previous step as your "Variation" for your ExoClick campaign. Make sure it contains the **{conversions\_tracking}** tag to send the conversion details to Affise.
Finish the campaign set up. You can find a **detailed guide on how to create a campaign in Exoclick** [**here**](/advertisers/campaigns/creating-a-campaign/create-campaign-step1.md).
If the set up has been done correctly, you will start seeing conversions both in Affise and Exoclick. Do not forget to enable the corresponding Goal column in your [Campaigns List](/advertisers/campaigns/campaigns-list.md) and your [Statistics](/advertisers/advertiser-statistics.md)
If you need further guidance on how to set up Conversion tracking in Affise, don't hesitate to contact Affise support at [**support@affise.com**](mailto:support@affise.com) or by creating a ticket through your Affise platform. You can also contact [Exoclick's Customer Success](https://www.exoclick.com/contact/) to review these steps.
{% endstep %}
{% endstepper %}
---
# Agent Instructions
This documentation is published with GitBook. GitBook is the documentation platform designed so that both humans and AI agents can read, navigate, and reason over technical content effectively. Learn more at gitbook.com.
## Querying This Documentation
If you need additional information that is not directly available in this page, you can query the documentation by asking a question.
Perform an HTTP GET request on the following URL with the `ask` and `goal` query parameters:
```
GET https://docs.exoclick.com/advertisers/conversion-tracking/tracking-manuals/affise-tracking.md?ask=&goal=
```
`ask` is the immediate question: it should be specific, self-contained, and written in natural language.
`goal` is what the user is ultimately trying to achieve, the reason they need the answer. Sharing it helps GitBook give you a better, more relevant answer. A goal is most helpful when it describes the outcome the user wants rather than restating the question. For example, with `ask=how do I create an API token`, a goal like `automate deployments from our CI pipeline` lets GitBook tailor the answer to that use case.
The response will contain a direct answer to the question and relevant excerpts and sources from the documentation.
Use this mechanism when the answer is not explicitly present in the current page, you need clarification or additional context, or you want to retrieve related documentation sections.