> For the complete documentation index, see [llms.txt](https://docs.exoclick.com/llms.txt). Markdown versions of documentation pages are available by appending `.md` to page URLs; this page is available as [Markdown](https://docs.exoclick.com/advertisers/campaigns/creating-a-campaign/create-campaign-step5.md).
# Step 5 - Zones
In this tab, you can set which websites and zones you wish to target with your campaign. By default, all sites and zones are targeted, but you can use the filters to set up whitelists or blacklists of zones and sites.
## Filtering the list
At the top of the tab, you can use the filters to select which sites to display in the list.
* **Traffic Type**: In this drop-down, you can choose the following options:
* **All**: Target all sites and zones in ExoClick.
* **Free Content**: Consists of users from websites that offer content openly accessible to any visitor, with no signup, login, or membership required to view it.
* **Members Area**: Members area traffic consists of users of any website that requires the user to sign up and join to see the content.
* **Email Clicks (only sends traffic via Email Clicks ad format)**: Email Clicks send an email directly to end users who have signed up to the publisher's website. Once an Email Click is won, an email is sent to the end user which contains a call to action. The call to action will lead to the advertiser's URL.
* **Include Partner Networks**: Tick this option to receive Network traffic in addition to Website traffic.
## Targeting or blocking zones and sites
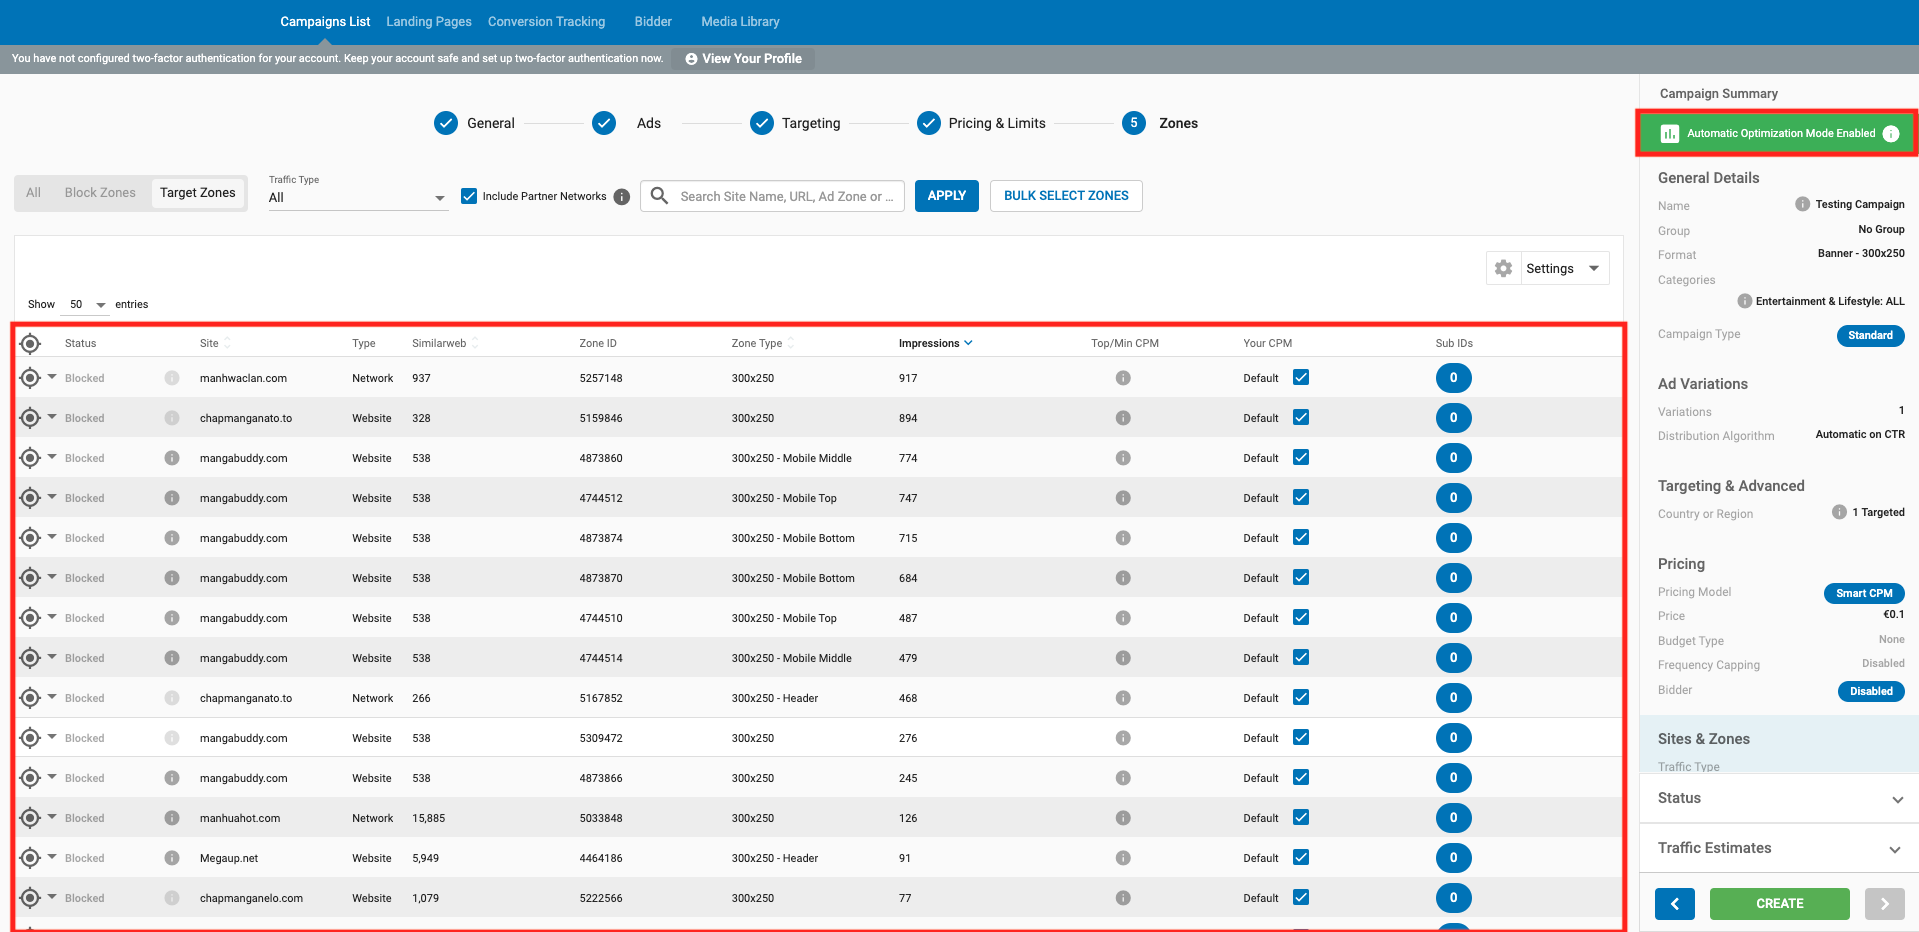
To target or block zones and sites in the list, first select the **Target Mode** by clicking whether to **Target Zones** or **Block Zones**. Once you select a **Target Mode** other than **All**, a list of zones will appear in the bottom half of the screen:
In the **Status** column on the left side of the list, you will see whether each zone is **Targeted** or **Blocked** according to your settings. If the whole site is targeted/blocked, you will see **Site Targeted**/**Site Blocked** in this column.
The list displays **Targeted Impressions**. This means the statistics shown per zone are based solely on the targeting options you selected in Step 3: Targeting.
### Zone search tools
You can use the search bar to find zones to target/exclude quickly. You can search by **Zone ID**, **Site URL** or **Zone Type**. Press the Apply button to search.
Next to the search bar, you will find the **Bulk Select Zones** button. You can use this feature to add a large number of zones to your campaign. To do so, add the Zone IDs as a list separated by commas (no spaces).
## Settings Filters
On the left side of the screen, you will find a **Settings** button. By cliclying on it, two options will be displayed. The **Selected Zones Only** checkbox will limit the list to show only the zones you are targeting/excluding and the **Zones With Custom Price Only** will show the zones that have a custom bid, set either by you or by **Bidder**.
{% hint style="info" %}
**Note:** In the event that a publisher decides to change the category of a zone you were targeting/excluding, you will only be able to find it in your list of targeted/excluded zones by enabling the **Selected Zones Only** checkbox. You can also remove the zone through **Bulk Select Zones**.
{% endhint %}
### Targeting zones and sites
If you select **Target Zones**, you can then choose to:
* **Target this zone**: Target only this zone.
* **Target all zones for this site**: Target all the zones on the site that this zone is on. The number of zones that this will target shows on the right.
When targeting specific zones, pay attention to the **Product Categories** and [**Labels**](/advertisers/advertisers-faq/advertiser-compliance/my-campaign-has-labels-what-mean.md) each zone is blocking. If one of your variations has a category or label that is being blocked by the zone, then that variation won't receive traffic from the zone.
### Blocking zones and sites
If you select **Block** in the **Target Mode** drop-down, you can then choose to:
* **Block this zone**: Block only this zone.
* **Block all zones for this site**: Block all the zones on the site that this zone is on. The number of zones that this will block shows on the right.
### Blacklisted Sites
With the feature of blocking sites on an account level, your campaigns will no longer receive any traffic from the sites that are blacklisted. You will see a warning icon highlighted in red next to the site column. On the hover of this icon, the following message is displayed: **This site has been blacklisted on your account.**
### View Minimum Bid and Top Bid
To view and compare the default or custom CPM price entered with the Top CPM price as per targeted options, you can click on the information icon under the column Top/Min CPM.
### Targeting and blocking by Sub ID
You can also target or block Sub IDs for each zone. To do this, click on the number in the **Sub IDs** column:
Next, add the Sub IDs that you wish to target or block, separated by commas. Then use the switch on the top right of the **Sub ID Targeting** dialog box to choose whether to **Target** or **Block** them.
Click **CLEAR** to clear all the Sub IDs from the list.
{% hint style="info" %}
**Notes**:
* Only a valid numeric value is allowed to be input as a Sub ID. If you enter any unsupported format or exceed the limit of maximum Sub IDs per zone, you will be shown a validation message to correct the action.
* You can set up to **500 Sub IDs** on each zone, but only on **10** **zones** per campaign.
{% endhint %}
## Manually Target or Block Zones while Bidder is enabled
At the top of the Campaign Summary, you will see **Automatic Optimization Mode Enabled** if you have switched on [Bidder](/advertisers/campaigns/bidder.md). Along with having the bidder enabled that will automatically optimize zones for you, you can also manually target or block zones that you wish.
Below are some use cases of how both automatic blocking by Bidder and manual target / block by you work hand in hand.
* **When Bidder is enabled and the Target Mode in campaign step 5 is BLOCK:** If you have un-blocked a zone, the bidder will block that zone if and when it matches the bidding algorithm rules.
* **When Bidder is enabled and the Target Mode in campaign step 5 is TARGET:** If you have targeted a zone, the bidder will un-target that zone if and when it matches the bidding algorithm rules.
{% hint style="info" %}
**Note**: The Bidder has the upper hand over the targeting options that you have set in your campaign.
{% endhint %}
## Creating the campaign
On the right side of the screen in the **Campaign Summary** section, you will see a summary of the campaign targeting settings. Review this information together with the estimated traffic volume. When you are satisfied, click **Create** to create the campaign.
Assuming that your account has funds, once create your campaign it will go into **"Pending Approval"** until our Compliance department confirms that the campaign settings and variations are correct. For more details about our **campaign processing times**, please check [**our FAQ**](/advertisers/advertisers-faq/advertiser-compliance/how-soon-approve-campaign.md)
If the variation has already been approved and there is no conflict on the targeting settings, then the campaign should be approved immediately.
## Traffic problems
If your campaign is not getting as much traffic as you would like, there are several possible causes.
### General problems
* **Check your account balance:** Campaigns are stopped if there are insufficient funds.
* **Check the bid price:** A campaign with a low bid could have been out-bid, and so is receiving little or no traffic.
* **High-quality countries and popular adspots:** Campaigns targeting high-quality countries and/or popular adspots must have very competitive bids in order to receive traffic. The prices will change frequently as we operate in real-time.
* **Check Banner/Adspot:** If the banner size is incorrect, the campaign won’t run. You should always use an image banner size that matches the format you chose in the first step of creating a campaign. Requirements for the different types of ads can be found [here](/exoclick-docs/ad-formats.md).
* **Sold out:** If a spot or country is already sold out, then no traffic will be available. This might happen if the spot or country is under an exclusive deal.
* **Popular adspots:** Ad zones that are used very often by Publishers will be heavily targeted by Advertisers. This competition can make it difficult to get these spots if your bid is not competitive.
### Campaign targeting problems
You should also check the campaign targeting that you have set in the [**Targeting**](/advertisers/campaigns/creating-a-campaign/create-campaign-step3.md) tab:
* How many impressions are available based on your campaign settings?
* Have you chosen incompatible options e.g. targeting the Android operating system but only selecting iPhone in the Device Settings?
* Is the bid price/budget too low or excessively high for the traffic you are targeting?
* If a campaign is incorrectly using domain targeting, i.e. chosing a Premium site in [**Step 5: Zones**](/advertisers/campaigns/creating-a-campaign/create-campaign-step5.md) of the Campaign setup but excluding it in [**Step 3: Targeting**](/advertisers/campaigns/creating-a-campaign/create-campaign-step3.md#domains) will prevent the campaign from running.
* Specific system settings: The campaign's domain/ID Zone targeting settings have been capped: Any campaign blocking or targeting more than 1000 URLs or 2500 ID zones will be automatically deactivated.
---
# Agent Instructions
This documentation is published with GitBook. GitBook is the documentation platform designed so that both humans and AI agents can read, navigate, and reason over technical content effectively. Learn more at gitbook.com.
## Querying This Documentation
If you need additional information that is not directly available in this page, you can query the documentation by asking a question.
Perform an HTTP GET request on the following URL with the `ask` and `goal` query parameters:
```
GET https://docs.exoclick.com/advertisers/campaigns/creating-a-campaign/create-campaign-step5.md?ask=&goal=
```
`ask` is the immediate question: it should be specific, self-contained, and written in natural language.
`goal` is what the user is ultimately trying to achieve, the reason they need the answer. Sharing it helps GitBook give you a better, more relevant answer. A goal is most helpful when it describes the outcome the user wants rather than restating the question. For example, with `ask=how do I create an API token`, a goal like `automate deployments from our CI pipeline` lets GitBook tailor the answer to that use case.
The response will contain a direct answer to the question and relevant excerpts and sources from the documentation.
Use this mechanism when the answer is not explicitly present in the current page, you need clarification or additional context, or you want to retrieve related documentation sections.


.png?alt=media&token=b3621610-a5db-48b3-815b-8670b449183f)

.png?alt=media&token=2cf698e3-15ff-43a8-823e-f8ed82f192b4)

.png?alt=media&token=33257ee2-1aba-4391-b257-55885ca29ff1)